Share your love
Set up and Configure Elasticsearch on Ubuntu 20.04

In this article, we want to teach you How To Set up and Configure Elasticsearch on Ubuntu 20.04.
Elasticsearch is a distributed, open-source search and analytics engine built on Apache Lucene and developed in Java.
It allows you to store, search, and analyze huge volumes of data quickly and in near real-time and give back answers in milliseconds.
what you read in this post?
How To Set up and Configure Elasticsearch on Ubuntu 20.04
Before you start to install Elasticsearch on Ubuntu 20.04, you need to log in to your server as a non-root user with Sudo privileges. To do this, you can follow our article about the Initial Server Setup with Ubuntu 20.04.
Now follow the steps below to install Elasticsearch on Ubuntu 20.04.
Install Java on Ubuntu 20.04
Elasticsearch needs Java to be installed on your server.
First, update your local package index with the following command:
sudo apt update
Then, use the following command to install the OpenJDK 11 on your Ubuntu 20.04:
sudo apt install openjdk-11-jdkVerify your Java installation with the following command:
java -versionIn your output you will see:
Output
openjdk version "11.0.11" 2021-04-20
OpenJDK Runtime Environment (build 11.0.11+9-Ubuntu-0ubuntu2.20.04)
OpenJDK 64-Bit Server VM (build 11.0.11+9-Ubuntu-0ubuntu2.20.04, mixed mode, sharing)
Also, you need to be sure the JAVA_HOME environment variable is configured. You can use the following command:
export JAVA_HOME=/usr/lib/jvm/java-11-openjdk-amd64 Install Elasticsearch on Ubuntu 20.04
To install Elasticsearch, you need to add its repository on your Ubuntu 20.04.
Run the following command to install the apt transport HTTPS:
sudo apt install apt-transport-https Now you need to import the GPG key for Elasticsearch packages with the following command:
wget -qO - https://artifacts.elastic.co/GPG-KEY-elasticsearch | sudo apt-key add -Then, use the following command to add the Elasticsearch repository on Ubuntu 20.04:
add-apt-repository "deb https://artifacts.elastic.co/packages/7.x/apt stable main"Update your local package index:
sudo apt update
Here you can install Elasticsearch on your server with the following command:
sudo apt install elasticsearch This command will install Elasticsearch and all its dependencies on your Ubuntu 20.04.
Configure Elasticsearch
At this point, you need to make some basic configuration changes.
Open the Elasticsearch configuration file with your favorite text editor, here we use vi:
sudo vi /etc/elasticsearch/elasticsearch.yml At the file, search for the network.host directive and uncomment it by removing the hashtag and setting it to 0.0.0.0 to listen on all interfaces and make it available publicly. You can use your LAN address for LAN access only:
network.host: 0.0.0.0Also, find the lines below and uncomment them and replace the names with your own:
cluster.name: myCluster1node.name: "myNode1"Then, find the discovery.seed_hosts directive and set it to your Node name:
discovery.seed_hosts: ["myNode1"]When you are done, save and close the file.
Now enable and start Elasticsearch on Ubuntu 20.04 with the following commands:
sudo systemctl enable elasticsearchsudo systemctl start elasticsearch
Verify that your Elasticsearch is active on your Ubuntu 20.04:
sudo systemctl status elasticsearch
In your output you will see:
Output
elasticsearch.service - Elasticsearch
     Loaded: loaded (/lib/systemd/system/elasticsearch.service; enabled; vendor preset: enabled)
     Active: active (running) since Mon 2021-11-29 12:00:32 CET; 12s ago
       Docs: https://www.elastic.co
   Main PID: 7881 (java)
      Tasks: 44 (limit: 2282)
     Memory: 1.1G
     CGroup: /system.slice/elasticsearch.service
             ├─7881 /usr/share/elasticsearch/jdk/bin/java -Xshare:auto -Des.networkaddress.cache.ttl=60 -Des.networkaddress.cache.negative.ttl=10 -XX:+AlwaysPreTouch -Xss1m -Djava.awt.headless=true -Dfile.encoding=UTF-8 -Djna.nosys=true>
             └─8084 /usr/share/elasticsearch/modules/x-pack-ml/platform/linux-x86_64/bin/controller
Now you can connect to your Elasticsearch by typing your server’s IP address in your web browser followed by 9200:
http://server-ip-address:9200You will see:
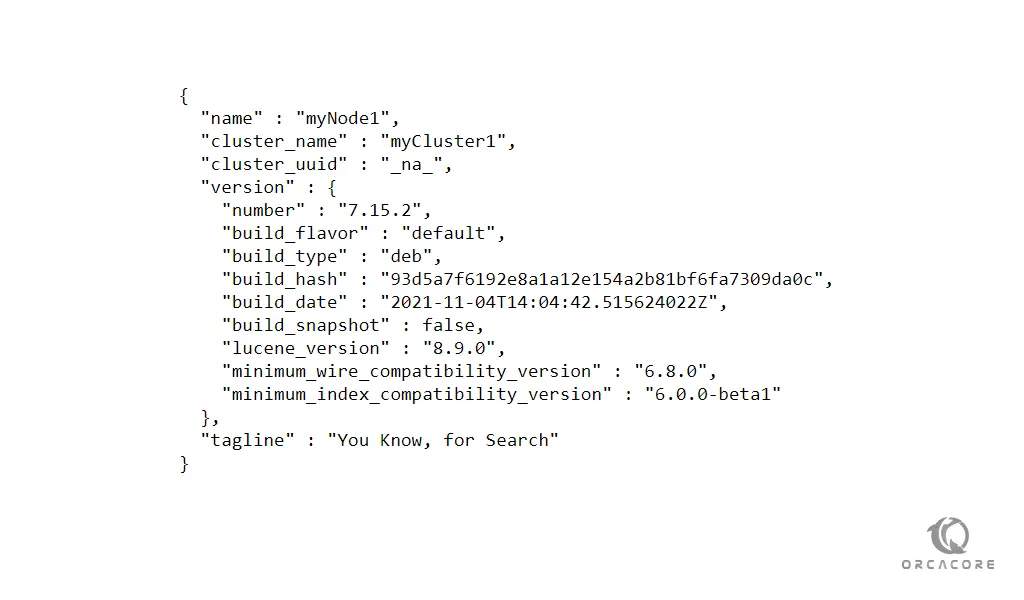
Conclusion
At this point, you learn to Install and Configure Elasticsearch on Ubuntu 20.04.
Hope you enjoy using it.