Share your love
How To Install Bitwarden on AlmaLinux 8

In this guide, we want to teach you to Install Bitwarden Password Manager on AlmaLinux 8.
Bitwarden is a secure open-source password manager that comes with heaps of extra features and a remarkably low price tag.
Bitwarden has all the security tools that you expect from a premium password manager, including strong encryption, two-factor authentication (2FA), password security auditing, password breach monitoring, and cloud or local hosting options.
Steps To Install Bitwarden on AlmaLinux 8
To complete this guide, you must log in to your server as a non-root user with sudo privileges and set up a basic firewall. To do this, you can follow our guide on Initial Server Setup with AlmaLinux 8.
Also, you need to have Docker and Docker Compose installed on your server. To do these, you can follow this guide on Install and Use Docker on AlmaLinux 8.
When you are done, follow the steps below.
Configure Firewall For Bitwarden
At this point, we assumed that you have enabled firewalld. So you need to open ports 80 and 443. To do this, run the following commands:
# sudo firewall-cmd --permanent --zone=public --add-service=http
# sudo firewall-cmd --permanent --zone=public --add-service=https
# sudo firewall-cmd --zone=public --add-masquerade --permanent
To apply the new rules reload the firewall:
sudo firewall-cmd --reloadRequest Hosting Installation Id & Key From Bitwarden
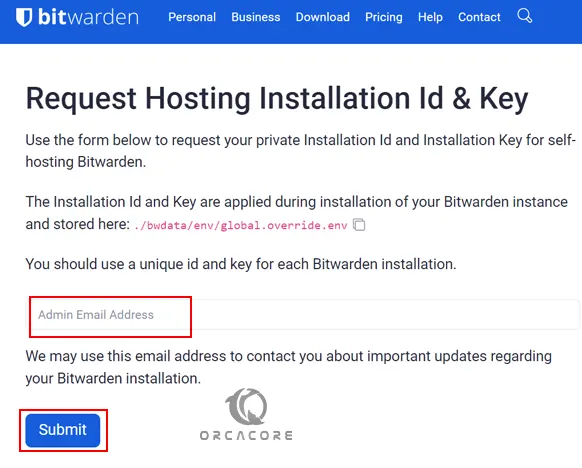
At this point, you need to visit the Bitwarden Host page and a key for your installation.
Enter your Email address and click Submit.

When you have gotten your Installation ID and Key, proceed to the next step.
Installation Steps of Bitwarden on AlmaLinux 8
At this point, you need to download the Bitwarden installer script by using the command below:
sudo curl -Lso bitwarden.sh https://go.btwrdn.co/bw-shMake your downloaded file executable:
sudo chmod +x bitwarden.shNow start your Bitwarden installation process on AlmaLinux 8 by using the command below:
sudo ./bitwarden.sh installIn the first step, you will be asked for your domain name, enter your domain name and continue.
Next, you will be asked to use Let’s Encrypt or not, here we enter N and continue.
Then, you need to set a database name for Bitwarden.
Now you will be asked to enter your ID and Key installation.
In case you get an error after entering the installation key – “Unable to validate installation id. Problem contacting Bitwarden server. “ You can re-run the command, it will be ok.
Output
 _     _ _                         _
| |__ (_) |___      ____ _ _ __ __| | ___ _ __
| '_ \| | __\ \ /\ / / _` | '__/ _` |/ _ \ '_ \
| |_) | | |_ \ V  V / (_| | | | (_| |  __/ | | |
|_.__/|_|\__| \_/\_/ \__,_|_|  \__,_|\___|_| |_|

Open source password management solutions
Copyright 2015-2023, 8bit Solutions LLC
https://bitwarden.com, https://github.com/bitwarden

===================================================

bitwarden.sh version 2023.3.0
Docker version 23.0.3, build 3e7cbfd
docker-compose version 1.25.4, build 8d51620a

Looks like Bitwarden is already installed at /root/bwdata.
Then, run the rebuild command before you start your Bitwarden service:
./bitwarden.sh rebuildNow you can start your Bitwarden service on AlmaLinux 8:
./bitwarden.sh startIf you get the following error:
ERROR: Failed to Setup IP tables: Unable to enable DROP INCOMING rule: (iptables failed: iptables --wait -I DOCKER-ISOLATION-STAGE-1 -i br-7b222b804172 ! -d 172.18.0.0/16 -j DROP: iptables: No chain/target/match by that name.
(exit status 1))
Restart your Docker service to resolve this problem:
sudo systemctl restart dockerThen, start the Bitwarden again:
./bitwarden.sh startOutput
_ _ _ _
| |__ (_) |___ ____ _ _ __ __| | ___ _ __
| '_ \| | __\ \ /\ / / _` | '__/ _` |/ _ \ '_ \
| |_) | | |_ \ V V / (_| | | | (_| | __/ | | |
|_.__/|_|\__| \_/\_/ \__,_|_| \__,_|\___|_| |_|
Open source password management solutions
Copyright 2015-2023, 8bit Solutions LLC
https://bitwarden.com, https://github.com/bitwarden
===================================================
bitwarden.sh version 2023.3.0
Docker version 23.0.3, build 3e7cbfd
docker-compose version 1.25.4, build 8d51620a
Pulling mssql ... done
Pulling web ... done
Pulling attachments ... done
Pulling api ... done
Pulling identity ... done
Pulling sso ... done
Pulling admin ... done
Pulling icons ... done
Pulling notifications ... done
Pulling events ... done
Pulling nginx ... done
Creating network "docker_default" with the default driver
Creating network "docker_public" with the default driver
Creating bitwarden-events ... done
Creating bitwarden-notifications ... done
Creating bitwarden-api ... done
Creating bitwarden-icons ... done
Creating bitwarden-mssql ... done
Creating bitwarden-identity ... done
Creating bitwarden-web ... done
Creating bitwarden-sso ... done
Creating bitwarden-attachments ... done
Creating bitwarden-admin ... done
Creating bitwarden-nginx ... done
2023.3.0: Pulling from bitwarden/setup
Digest: sha256:e09da2acdedd62819dd1fe774935d1a215058244cc6e1c18203bb65cf845f70c
Status: Image is up to date for bitwarden/setup:2023.3.0
docker.io/bitwarden/setup:2023.3.0
Bitwarden is up and running!
===================================================
visit https://localhost
to update, run `./bitwarden.sh updateself` and then `./bitwarden.sh update`
Congratulations! Bitwarden is now up and running at https://your.domain.com.
Conclusion
At this point, you have learned to Install Bitwarden on AlmaLinux 8.
Hope you enjoy it. You may be interested in these articles:


