Share your love
Install and Configure Lighttpd Web Server on Debian 11
In this guide, we want to teach you How To Install and Configure Lighttpd Web Server on Debian 11.
Lighttpd or Lighty is a free and open-source web server developed for high-performance environments. Lighttpd server is lightweight, high-speed, and secure. It is mainly provided as an alternative to web servers such as Apache because it consumes very few resources such as CPU and memory.
Lighttpd can handle more than 10000 parallel connections on a single server; it is often an excellent option for high-traffic sites.
Here you will learn to install Lighttpd with PHP and MariaDB on your server.
Install and Configure Lighttpd Web Server on Debian 11
To install Lighttpd, you must log in to your server as a non-root user with sudo privileges and set up a basic firewall. To do this, follow our guide on Initial Server Setup with Debian 11.
Also, you need a domain name that pointed to your server’s IP address.
Now follow the steps below to complete this guide.
Set up Lighttpd Web Server on Debian 11
Lighttpd packages are available in the default Debian repository. First, update your local package index with the following command:
sudo apt update -y
Then, use the following command to install Lighttpd:
sudo apt install lighttpd -y
Start and enable your Lighttpd service to start on boot:
# sudo systemctl start lighttpd
# sudo systemctl enable lighttpd
Verify that Lighttpd is active and running on Debian 11:
sudo systemctl status lighttpd
In your output you will see:
Output
● lighttpd.service - Lighttpd Daemon
Loaded: loaded (/lib/systemd/system/lighttpd.service; enabled; vendor pres>
Active: active (running) since Sun 2022-07-03 02:29:32 EDT; 1min 22s ago
Main PID: 1111 (lighttpd)
Tasks: 1 (limit: 2340)
Memory: 940.0K
CPU: 325ms
CGroup: /system.slice/lighttpd.service
└─1111 /usr/sbin/lighttpd -D -f /etc/lighttpd/lighttpd.conf
To check which Lighttpd version is installed on your server, run the following command:
lighttpd -v
Output
lighttpd/1.4.59 (ssl) - a light and fast webserver
Install MariaDB support for Lighttpd on Debian 11
At this point, you need to install the dependencies with the following command:
sudo apt install curl software-properties-common dirmngr ca-certificates apt-transport-https -y
By default, MariaDB is not available on Debian 11. You can import it using the MariaDB bash script designed for Linux distributions such as Debian that are supported, given they are long-term releases. To do this, run the following command:
curl -LsS https://downloads.mariadb.com/MariaDB/mariadb_repo_setup | sudo bash -s -- --mariadb-server-version=10.8
Now update your local package index again:
sudo apt updateAt this point, you can use the following command to install MariaDB on your server:
sudo apt install mariadb-server mariadb-client -y
Verify your MariaDB installation by checking its version:
mariadb --version
Output
mariadb Ver 15.1 Distrib 10.8.3-MariaDB, for debian-linux-gnu (x86_64) using readline EditLine wrapper
Now you need to start and enable your MariaDB service to start on boot with the following commands:
# sudo systemctl start mariadb
# sudo systemctl enable mariadb
Confirm that your MariaDB is active and running on Debian 11:
sudo systemctl status mariadb
Output
● mariadb.service - MariaDB 10.8.3 database server
Loaded: loaded (/lib/systemd/system/mariadb.service; enabled; vendor prese>
Drop-In: /etc/systemd/system/mariadb.service.d
└─migrated-from-my.cnf-settings.conf
Active: active (running) since Sun 2022-07-03 02:37:46 EDT; 35s ago
Docs: man:mariadbd(8)
https://mariadb.com/kb/en/library/systemd/
Main PID: 4246 (mariadbd)
Status: "Taking your SQL requests now..."
Tasks: 12 (limit: 2340)
Memory: 168.6M
CPU: 663ms
CGroup: /system.slice/mariadb.service
└─4246 /usr/sbin/mariadbd
At this point that you have MariaDB installed on your server you need to secure your MariaDB by running a security script:
sudo mysql_secure_installation
Output
Enter current password for root (enter for none):
You already have your root account protected, so you can safely answer 'n'.
Switch to unix_socket authentication [Y/n] n
You already have your root account protected, so you can safely answer 'n'.
Change the root password? [Y/n] Y
New password:
Re-enter new password:
Remove anonymous users? [Y/n] Y
Disallow root login remotely? [Y/n] Y
Remove test database and access to it? [Y/n] Y
Reload privilege tables now? [Y/n] Y

All done! If you've completed all of the above steps, your MariaDB
installation should now be secure.

Thanks for using MariaDB!
Now you can use the command below to access your MariaDB shell on Debian 11:
sudo mysql -u root -p
Output
Enter password:
Welcome to the MariaDB monitor. Commands end with ; or \g.
Your MariaDB connection id is 37
Server version: 10.8.3-MariaDB-1:10.8.3+maria~bullseye mariadb.org binary distribution

Copyright (c) 2000, 2018, Oracle, MariaDB Corporation Ab and others.

Type 'help;' or '\h' for help. Type '\c' to clear the current input statement.

MariaDB [(none)]>
Once you have finished, you can proceed to the next step.
Install PHP and PHP-FPM with FastCGI
To enable PHP-FPM with FastCGI support, first, you need to install PHP along with the necessary extensions. Here we will install PHP 8.1.
First, you need to install the required packages on your server with the command below:
sudo apt install ca-certificates apt-transport-https software-properties-common wget curl lsb-release -y
At this point, you need to add the Sury PHP repository on Debian 11.
This is a home for packaging various software into Debian and Ubuntu. The most notable package under DEB.SURY.ORG is the PHP packaging.
To add the Sury PHP repo, you can use the following command:
curl -sSL https://packages.sury.org/php/README.txt | sudo bash -x
Update and upgrade your APT repository list again:
sudo apt update && sudo apt upgrade
At this point, you can use the following command to install PHP 8.1 and its extensions:
sudo apt install php8.1 php-cgi php-fpm php-mysql -y
Once all the packages are installed, you will need to edit the php.ini file and set cgi.fix_pathinfo to 1. Open the file with your favorite text editor, here we use vi:
sudo vi /etc/php/8.1/fpm/php.ini
Find the following line and uncomment it and change it to 1 as shown below:
cgi.fix_pathinfo=1
When you are done, save and close the file.
By default, PHP points to the UNIX socket /var/run/php/php8.1-fpm.sock. So, you will need to configure the PHP-FPM pool to set PHP listens to the TCP socket.
You can do this by editing /etc/php/8.1/fpm/pool.d/www.conf file:
sudo vi /etc/php/8.1/fpm/pool.d/www.conf
Find the following line:
listen = /run/php/php8.1-fpm.sock
And replace it with the following line:
listen = 127.0.0.1:9000
Save and close the file when you are finished.
Then, restart the PHP-FPM service to apply the configuration changes:
sudo systemctl restart php8.1-fpm
Next, you will need to modify the 15-fastcgi-php.conf file:
sudo vi /etc/lighttpd/conf-available/15-fastcgi-php.conf
Find the following lines in the file:
fastcgi.server += ( ".php" =>
((
"bin-path" => "/usr/bin/php-cgi",
"socket" => "/run/lighttpd/php.socket",
...
))
)
And replace them with the following:
"host" => "127.0.0.1",
"port" => "9000",
Save and close the file when you are finished.
Then, enable both FastCGI and FastCGI-PHP modules with the following commands:
# lighty-enable-mod fastcgi
# lighty-enable-mod fastcgi-php
Finally, restart the Lighttpd service to apply the changes:
sudo systemctl restart lighttpd
Test PHP and PHP-FPM with FastCGI Support in Lighttpd
At this point, you need to create a new virtual host file to test PHP with Lighttpd. Create and open the file with your favorite text editor, here we use vi:
sudo vi /etc/lighttpd/conf-available/example.com.conf
Add the following content to the file:
$HTTP["host"] == "www.example.com" {
    server.document-root = "/var/www/html/"
    server.errorlog      = "/var/log/lighttpd/example.com-error.log"
}
When you are done, save and close the file.
Then, enable the Virtual host with the following command:
sudo ln -s /etc/lighttpd/conf-available/example.com.conf /etc/lighttpd/conf-enabled/
Next, create a sample index.php file in the Lighttpd document root directory with the following command:
sudo vi /var/www/html/index.php
Add the following line:
<?php
phpinfo();
?>
Save and close the file.
Now you must change the ownership of the Lighttpd document root directory to www-data with the following command:
sudo chown -R www-data:www-data /var/www/html/
Finally, restart the Lighttpd service to apply all the configuration changes on Debian 11:
sudo systemctl restart lighttpd
Access Lighttpd Web Interface
At this point, Lighttpd is installed and configured with PHP and PHP-FPM support. Now, it’s time to test it.
In your web browser type your domain name or server’s IP address:
http://domain-name
Or
http://server-ip
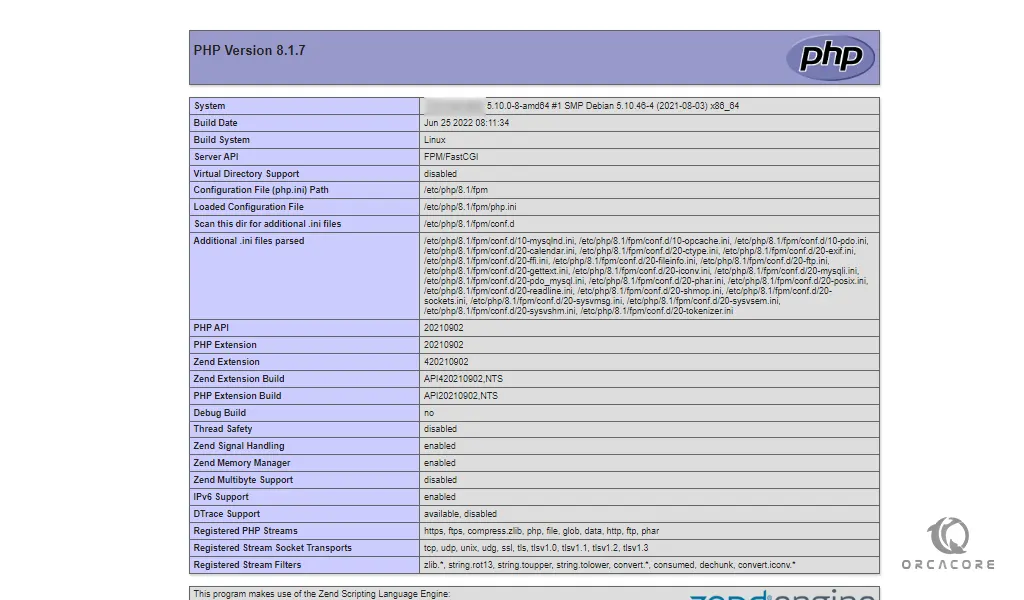
From there, you will see working information on PHP, PHP-FPM, and MySQL with lots of other modules that are already enabled.
For more information, you can visit the Lighttpd Documentation page.
Conclusion
At this point, you learn to Install and Configure Lighttpd Web Server with PHP and MariaDB on Debian 11.
I hope you enjoy using it.
You may be interested in these articles:
How To Set up PostgreSQL on Debian 11