Share your love
How To Install Sysdig on AlmaLinux 8

In this guide, we want to teach you How To Install Sysdig on AlmaLinux 8.
What is Sysdig Tool?
Sysdig is a tool that provides administrators and developers with unparalleled insight into their systems’ behavior. The team behind it hopes to enhance system-level monitoring and troubleshooting by providing a centralized, coherent, and granular view of the storage, transmission, network, and memory subsystems, as well as the ability to generate trace files for system operation that can be analyzed at any time.
They’ve also created a filtering language that allows them to dig into data in a natural and interactive way, as well as a large library of Lua scripts called chisels that solve common problems. Consider this program to be a supercharged version of strace, tcpdump, and lsof.
In a nutshell, it’s a robust performance analysis method for analyzing the state of a system and its activities.
Steps To Install and Use Sysdig on AlmaLinux 8
To install Sysdig, you must log in to your server as a non-root user with sudo privileges. To do this, you can follow our guide the Initial Server Setup with AlmaLinux 8.
Now follow the steps below to complete this guide.
Installing Sysdig Tool on AlmaLinux 8
First, you must update your local package index with the following command:
sudo dnf update -yThen, add the yum and Sysdig repository on your server with the following commands:
# sudo rpm --import https://download.sysdig.com/DRAIOS-GPG-KEY.public
# sudo curl -s -o /etc/yum.repos.d/draios.repo http://download.sysdig.com/stable/rpm/draios.repo
Next, install the Epel repository on your server:
sudo dnf install epel-releaseNow use the following command to install the Sysdig tool on your server:
sudo dnf -y install sysdigWhen your installation is completed, verify it by checking the Sysdig version installed on AlmaLinux 8:
sysdig --versionOutput
sysdig version 0.29.3How To Use Sysdig command on AlmaLinux 8
At this point, you start using Sysdig monitoring software.
Note: You need to run Sysdig as root because it requires access to critical areas such as /proc file system, /dev/sysdig* devices and needs to auto-load the sysdig-probe kernel module.
To do this, run the following command:
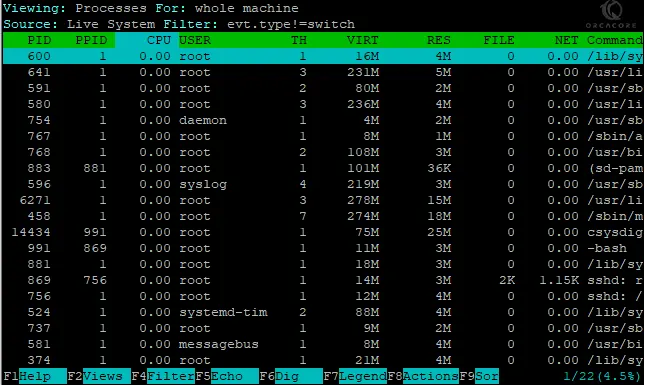
sudo csysdig
The output includes the following lines:
PID: Process PID.
CPU: Amount of CPU used by the process.
TH: Number of threads that the process contains.
VIRT: Total virtual memory for the process.
RES: Resident’s non-swapped memory for the process.
FILE: Total (input+output) file I/O bandwidth generated by the process, in bytes per second.
NET: Total (input+output) network I/O bandwidth generated by the process, in bytes per second.
Command: The full command line of the process
You can press the F2 button to change the view for future reference.
Also, you can use arrow keys to move around to select an option you would like to monitor.
To return to the previous menu selection, use the F2 button key. From here, you can select quite an extensive list.
Let’s see some more examples of the Sysdig tool on AlmaLinux 8.
To see the top processes ranked by CPU utilization percentage, you can run the following command:
sudo sysdig -c topprocs_cpuTo see the system’s network connections, you can run the command below:
sudo sysdig -c netstatAlso, you can list all system processes by running the command below:
sudo sysdig -c psConclusion
At this point, you learn to Install Sysdig on AlmaLinux 8 and basic usage of it.
Hope you enjoy it.
You may be interested in these articles:
Set up Fiber Server with Golang on AlmaLinux 8


