Share your love
Set Up Nginx Password Authentication on Debian 11 Easy Setup
In this guide on the Orcacore website, we want to teach you How To Set Up Nginx Password Authentication on Debian 11. Password authentication is a process that involves a user inputting a unique ID and key that are then checked against stored credentials.
You’ve likely been asked to create and/or enter a password to gain access to a personal account, whether that’s a social media platform or an online banking tool. When you do so, you’re taking part in a password authentication system that keeps your sensitive information safe from unauthorized users.
The idea is that only the person who created and set the password will know it and be able to repeat it, thus verifying their identity as the original user and providing access to restricted data and resources.
Table of Contents
How To Set Up Nginx Password Authentication on Debian 11
To configure Nginx Password Authentication on Debian 11, you need some requirements first.
First, you need to log in to your server as a non-root user with sudo privileges. To do this, you can follow our guide on Initial Server Setup with Debian 11.
Because you need to set up password auth with Nginx, you need to have Nginx installed on your server. To do this, you can follow our guide on How To Install Nginx on Debian 11.
When you are done, follow the steps below to complete Password Authentication on Debian 11.
1. Create a File for Password Authentication on Debian 11
In the first step, you must create a file that will hold your username and password combinations. There are two ways that you can use it.
- OpenSSL utility
htpasswdis included in theapache2-utilspackage (Nginx password files use the same format as Apache).
In this guide, we will show both ways, you can choose the one that is best for you.
Create a Password File with OpenSSL Utilities
In this case, if you have OpenSSL installed on your server, you can create a password file with no additional packages.
In this way, you will create a hidden file called .htpasswd in the /etc/nginx configuration directory to store your username and password combinations.
First, add a username to the file with the following command, here we named it sam, you can choose your desired name:
sudo sh -c "echo -n 'sam:' >> /etc/nginx/.htpasswd"Then, use the following command to add an encrypted password for your user:
sudo sh -c "openssl passwd -apr1 >> /etc/nginx/.htpasswd"You can repeat this way for additional users.
Also, you can list the usernames and encrypted passwords stored within the file by running the following command:
cat /etc/nginx/.htpasswdOutput
sam:$apr1$wI1/T0nB$jEKuTJHkTOOWkopnXqC1d1Create a Password File with Apache Utilities
Many users think that it is easier to use an Apache utility instead of OpenSSL. To do this, follow the steps below.
First, update your local package index with the following command:
sudo apt updateThen, use the following command to install apache2-utils package on Debian 11:
sudo apt install apache2-utilsWith this, you have access to the htpasswd command. You can use this to create a password file that Nginx can use to authenticate users on Debian 11.
Create a hidden file for this purpose called .htpasswd within your /etc/nginx configuration directory.
Next, use the following command to create your user, here we named it sam:
sudo htpasswd -c /etc/nginx/.htpasswd samYou will be asked to enter a password:

If you want to add more users, run the above command without the -c option:
sudo htpasswd /etc/nginx/.htpasswd another_userList your username and the encrypted password for each record with the command below:
cat /etc/nginx/.htpasswdOutput
sam:$apr1$RN6i1en7$6oZpZbofVH4cdduRzwv5A02. Configure Password Authentication with Nginx on Debian 11
At this point, you have a file with your users and passwords in a format that Nginx can read on Debian 11.
Now you must configure Nginx to check this file before serving your protected content. To do this, you need to open a server block configuration file if you wish to add a restriction.
For your example, you’ll be using the default server block file installed through Debian’s Nginx package:
sudo vi /etc/nginx/sites-enabled/defaultThis example will be for a server-level restriction. The auth_basic Directive turns on authentication and a real name is displayed to the user when prompting for credentials. You will use the auth_basic_user_file directive to point Nginx to the password file you created:
server {
    listen 80 default_server;

     . . .

    auth_basic "Restricted Content";
    auth_basic_user_file /etc/nginx/.htpasswd;
}Note: Depending on which block you place the restrictions on, you can control the granularity of which parts of your site require a password. This alternative example restricts only the document root with a location block, and you can even modify this listing to only target a specific directory within the web space:
server {
    listen 80 default_server;

     . . .

    location / {
    try_files $uri $uri/ =404;
    auth_basic "Restricted Content";
    auth_basic_user_file /etc/nginx/.htpasswd;
    }
}
When you are done, save and close the file.
Restart Nginx on Debian 11 to apply the changes:
sudo systemctl restart nginxAccess Restricted Content
To confirm that your content is protected, try to access your restricted content in a web browser:
http://your-server-ipYou should be presented with a username and password prompt:
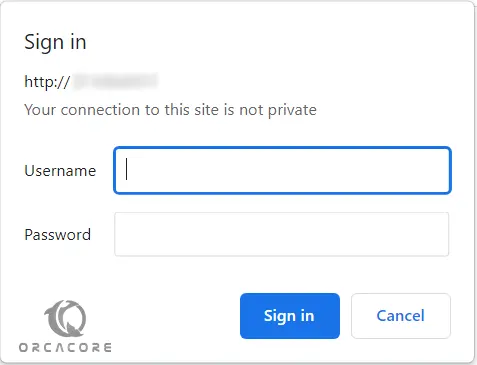
If you enter the correct credentials, you will be allowed to access the content.
Conclusion
At this point, you have learned to Set up Nginx Password Authentication on Debian 11. However, passwords are also one of the most insecure forms of user authentication out there. It is recommended to use TLS encryption. You can check for Securing Nginx With Let’s Encrypt on Debian 11.
Hope you enjoy it. Please subscribe to us on Facebook and YouTube.
You may also like these articles: