Share your love
Best Initial Server Setup with AlmaLinux 9
This guide intends to teach you an Initial Server Setup with AlmaLinux 9. The AlmaLinux OS Foundation announced that AlmaLinux 9 is now available for download as the newest version of this popular CentOS alternative derived from Red Hat Enterprise Linux’s source code.
Powered by Linux 5.14 LTS kernel series and based on and fully compatible with the recently-released Red Hat Enterprise Linux 9 operating system, AlmaLinux 9 is here as the first release of AlmaLinux that stems from CentOS Stream through RHEL.
You can learn more details by visiting this article about Introducing AlmaLinux as a replacement for Centos.
AlmaLinux 9 introduces new functionality that makes it easier to automate and deploy at scale, networking enhancements for cloud and edge through the addition of more performance metrics in Web Cockpit, access to information to identify bottlenecks, the ability to apply kernel live patching inside Web Cockpit, easier data export to data analytics and reporting tools like Grafana, as well as the ability to build images via a single build node.
You can now proceed to the following steps provided by the Orcacore website to complete the Initial Server Setup with AlmaLinux 9.
Table of Contents
Initial Server Setup with AlmaLinux 9
To start your initial server setup with AlmaLinux 9 you need to log in as a root user. Then, follow the steps below to Initial Server Setup with AlmaLinux 9.
Step 1 – Update AlmaLinux 9 software
You can update the software repositories, system security patches, and all packages on the AlmaLinux 9 server with the following command:
dnf update -yWhen you have finished updating, you can release disk space by deleting all downloaded software packages with all cached repository information on AlmaLinux 9 with the following command:
dnf clean allNow you can install some most useful utilities for your Initial Server Setup with AlmaLinux 9.
The “curl” and “wget” are used for downloading packages over the network mostly. Nano and Vim are text editors. The “net-tools” manage local networking. The “lsof” finds the list of open files by the process and the “bash-completion” command line autocomplete.
Run the following command on AlmaLinux 9 to install them:
dnf install nano vim wget curl net-tools lsof bash-completion -yStep 2 – Set up Hostname and networking on AlmaLinux 9 server
At this step of Initial Server Setup with AlmaLinux 9, you can configure and manage network configurations such as setting network hostname and configuring static IP addresses using the “nmtui” graphical command-line utility.
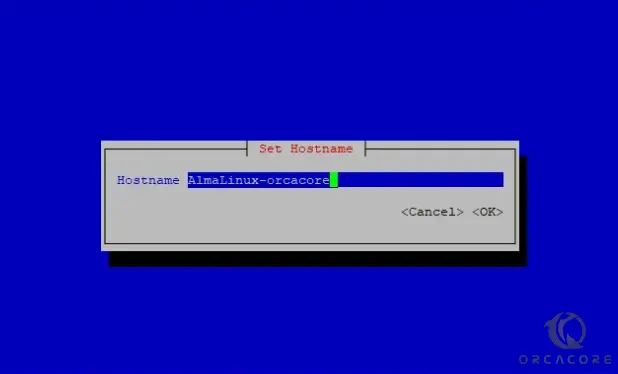
To set your hostname on AlmaLinux 9 server, run the following command :
nmtui-hostnameIt should be similar to this:
Set the static IP address on AlmaLinux 9
You can configure a network interface by following these steps.
The nmtui utility provides a command to directly access the sub-screen of each option.
To access the sub-screen of the first option, use the nmtui-edit command.
nmtui-editYou would see:
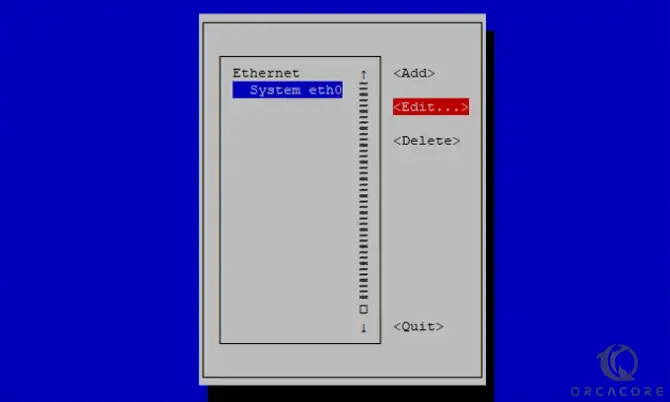
Here you can click on the Edit button to set up the network interface IP settings. You will see:
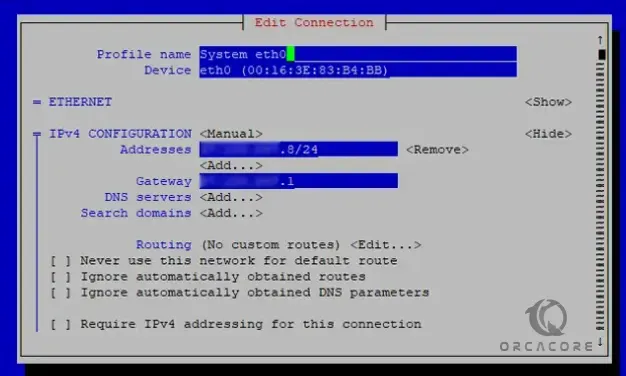
Now to save your configuration edit find ‘OK’ by using the ‘tab’ key and quit.
When you are finished with your network configuration, you need to apply the new settings. To do this run the following command:
nmtui-connectHere select the interface you want to manage and press the Deactivate/Active option to decommission and bring up the interface with the IP settings.
Now you can check the content of the interface file with the following commands:
ifconfig eth0Or:
ip aAlso, you can use these two utilities to check the speed of your network interface and get formation from them.
# ethtool eth0
# mii-tool eth0
Note: You can list all open network sockets, and list all files that are opened by processes with the following commands:
# netstat -tulpn
# ss -tulpn
# lsof -i4 -6
Step 3 – Create a new user on AlmaLinux 9
At this step of Initial Server Setup with AlmaLinux 9, you can create a new user with the following command:
For example, we added a user named olivia you can choose your name.
useradd oliviaNow set a password for your user with the following command:
passwd oliviaOutput
Changing password for user olivia.
New password:
Retype new password:
passwd: all authentication tokens updated successfully.At this point, you need to give your user the sudo privileges. In AlmaLinux users that are in the “wheel” group can run sudo commands. To do this, run the following command:
usermod -aG wheel oliviaTo check that the user has access to root privileges run the commands below:
# su - olivia
# sudo dnf update
Output
[olivia@AlmaLinux-orcacore ~]$ sudo dnf update
We trust you have received the usual lecture from the local System
Administrator. It usually boils down to these three things:
#1) Respect the privacy of others.
#2) Think before you type.
#3) With great power comes great responsibility.
[sudo] password for olivia:
...
Dependencies resolved.
Nothing to do.
Complete!After you run the command, you need to enter your password to execute your command.
Step 4 – Set up SSH passwordless login on AlmaLinux 9
In this step of Initial Server Setup with AlmaLinux 9, you can set up an SSH-passwordless authentication for your new user by generating an SSH key pair. This will increase your AlmaLinux 9 server security.
To do this, run the following commands:
# su - olivia
# ssh-keygen -t RSA
Your output should be similar to this:
Output
[olivia@AlmaLinux-orcacore ~]$ ssh-keygen -t RSA
Generating public/private RSA key pair.
Enter file in which to save the key (/home/olivia/.ssh/id_rsa):
Created directory '/home/olivia/.ssh'.
Enter passphrase (empty for no passphrase):
Enter same passphrase again:
Your identification has been saved in /home/olivia/.ssh/id_rsa.
Your public key has been saved in /home/olivia/.ssh/id_rsa.pub.
The key fingerprint is:
SHA256:o6KiEQ1647cpU2hkFPwsrhe4sA7wkKQQ5tWRfB/OyZY olivia@AlmaLinux-orcacore
The key's randomart image is:
+---[RSA 3072]----+
|.o.oo.o          |
|o.+  + . .       |
|o+ o  . = +      |
|=++ o    E       |
|B=+o    S        |
|+*=..  . .       |
|+=ooo .          |
|*.+o +           |
|++.oo            |
+----[SHA256]-----+
When you generate your keys, you will be asked for a passphrase, you can enter a strong password or press enter to leave it blank.
When your keys are generated you need to copy the generated public key pair to a remote server. To do this, run the following command:
ssh-copy-id username@ip-addressNote: Replace the username and IP address of the remote server in the above command.
Here you should be able to log in automatically without the SSH server asking for a password.
How to Secure SSH Remote Logins on AlmaLinux 9
For more security in Initial Server Setup with AlmaLinux 9, you can disable remote SSH access to the root account in the SSH configuration file. Open the file with your favorite text editor, here we use vi text editor:
vi /etc/ssh/sshd_configWhen you get into your file, find the PermitRootLogin line and uncomment the line by removing the ‘#’ from the beginning of the line. And modify the line to No:
PermitRootLogin noTo apply the new changes restart the SSH on AlmaLinux 9 server with the following command:
systemctl restart sshdAt this point when you try to log in as a root user, you will get an access SSH Permission Denied error.
Tips: Also, you can check this guide on Top SSH Security Tips on AlmaLinux 9 for more information.
Step 5 – Set up a Firewall on AlmaLinux 9
In AlmaLinux 9 server, the default firewall is FirewallD. For initial server setup with AlmaLinux 9, you need to install, enable, and start the firewalld:
# dnf install firewalld
# systemctl enable firewalld
# systemctl start firewalld
To check that your service is active and running run the following command:
systemctl status firewalldIn your output you should see:
Output
firewalld.service - firewalld - dynamic firewall daemon
   Loaded: loaded (/usr/lib/systemd/system/firewalld.service; enabled; vendor p>
   Active: active (running)
     Docs: man:firewalld(1)
 Main PID: 52785 (firewalld)
  ...
Now you can open an incoming connection to a specific service like SSH.
First of all, you need to verify that the service is present in the firewalld rules. Then, add the rule for the service by adding --permanent switch to commands:
# firewall-cmd --add-service=ssh
# firewall-cmd --add-service=ssh --permanent
Output
[olivia@AlmaLinux-orcacore ~]$ sudo firewall-cmd --add-service=ssh
Warning: ALREADY_ENABLED: 'ssh' already in 'public'
success
[olivia@AlmaLinux-orcacore ~]$ sudo firewall-cmd --add-service=ssh --permanent
Warning: ALREADY_ENABLED: ssh
successYou can do this for other services like HTTP and SMTP:
# firewall-cmd --permanent --add-service=http
# firewall-cmd --permanent --add-service=https
# firewall-cmd --permanent --add-service=smtp
Also, you can list all firewall rules on ALmaLinux 9 with the following command:
firewall-cmd --permanent --list-allTips: To get more information about firewalld, you can check for FirewallD Configuration on AlmaLinux 9.
When you are done with these steps of initial server setup with AlmaLinux 9, you can remove unwanted services too. let’s see how it works in Initial Server Setup with AlmaLinux 9.
Step 6 – How to remove unwanted services on AlmaLinux 9
After you install your fresh AlmaLinux 9 server, it is suggested to remove and disable unwanted services that are running by default on your server for more security and reduce the attacks.
You can use the following commands to list all network services (TCP/UDP) on the server:
# ss -tulpn
# netstat -tulpn
When you see your running services you may want to stop and remove a service that you don’t want it. For example, we want to remove the Postfix mail server. To do this, run the following commands.
To stop the service use:
systemctl stop postfixDisable the service with:
systemctl disable postfixThen, remove it with the following command:
dnf remove postfixAlso, you can use top and ps commands to find and recognize all unwanted services and remove them from the system.
you should install the psmic first:
dnf install psmiscThen, run the following command:
ps -pStep 7 – Manage services on the AlmaLinux 9 server
At this step of Initial Server Setup with AlmaLinux 9, we want to teach you some basic information about the management process on AlmaLinux 9.
You can list all active, running, exited, or failed services with the following command:
systemctl list-unitsTo check if a service is automatically enabled during the system starts, run the following command:
systemctl list-unit-files -t serviceTo start a service you can use:
systemctl start serviceYou can stop it with:
systemctl stop serviceTo stop and start the service again run the following command:
systemctl restart serviceIf you have made changes to your service you need to reload it. You can use the following command for this:
systemctl reload serviceAlso, you can check whether the service is active or not with the following command:
systemctl status serviceFor more information, you can visit the Official AlmaLinux Website.
Conclusion
At this point, you have learned how to log in to your server, create a new user with Sudo privileges, set up SSH passwordless login, and set up a basic firewall on AlmaLinux 9. This initial server setup with AlmaLinux 9 is an essential guide for everyone who wants to learn and use AlmaLinux.
Hope you enjoy this article about the Initial server setup with AlmaLinux 9.
Also, you may like to read the following articles:
AlmaLinux HPC and AI Compatibility