Share your love
Initial Server Setup with Centos 7 – Easy Guide

This article will discuss important tasks to perform Initial Server Setup with Centos 7 and some basic server security. CentOS, or the Community Enterprise Operating System, is a popular Linux distribution. It’s derived from, and is fully compatible, with Red Hat Enterprise Linux.
CentOS 7 will enjoy support until the end of 2020 and will receive maintenance updates until the end of June 2024.
Note: At the current time, Centos 7 has reached its end of life, it is recommended to use a more recent version or other replacements including AlmaLinux and Rocky Linux.
Now you can proceed to the following steps from the Orcacore website for Initial Server Setup with Centos 7.
Table of Contents
Steps To Initial Server Setup with Centos 7
To begin the Initial Server Setup with Centos 7, let’s start by SSH connecting to your server as a root user. Then, create a user and grant it sudo privileges.
Root login on Centos 7
If you aren’t connecting to your server, log in as the root by the following command:
ssh root@SERVER_IP_ADDRESSAccept the warning about host authenticity, and if it appears, then provide your root authentication. If it is your first time logging into the server, you should change the root password with a new password.
Point: We suggest choosing a complex password, including letters, numbers, and symbols.
Create a new user on Centos 7
You can create a new user by the adduser command on Centos 7, for example: create a user named Orcacore:
adduser orcacoreCreate a password for your user by using this command:
passwd orcacoreChoose a strong password for it.
Root privileges on Centos 7
In the Initial Server Setup with Centos 7 if a normal user wants to use the administrative privileges should put sudo before each command.
To add these privileges to our new user, we need to add the new user to the “wheel” group. By default, on CentOS 7, users who belong to the “wheel” group are allowed to use the sudo command.
You can add your new user to the “wheel” group with the following command:
gpasswd -a orcacore wheelAdd public key authentication for Centos server setup
In the initial server setup with Centos 7, you should secure your server by setting up public-key authentication for your new user. This security requires a private SSH key to log in.
If you already have a public key that you want to use, skip to the Copy the Public Key step. You can generate your new pair (public/private) key by visiting this guide on Generate SSH key Pairs in Linux.
After this, you should copy your public key to your new server. You can do this in two ways:
- 1) Use ssh-copy-id
ssh-copy-id orcacore@SERVER_IP_ADDRESS- 2) Manually install the key
cat ~/.ssh/id_rsa.pubIn your output, you will see your public SSH key, select and copy it. After this, you should add the public key to your new remote user with the following commands:
su – orcacoreCreate a new directory and set its permissions on Centos 7:
# mkdir .ssh
# chmod 700 .ssh
Then open a file with the Vi editor (or your favorite editor like Nano editor) named authorized_keys:
vi .ssh/authorized_keysEnter your public key in your editor save and close the file.
Next, set permissions for authorized_keys:
chmod 600 .ssh/authorized_keysType this command once to return to the root user:
exitConfigure SSH daemon to disallow root login with password
Now that we have our new account, we can secure our server by modifying its SSH daemon configuration to disallow remote SSH access to the root account.
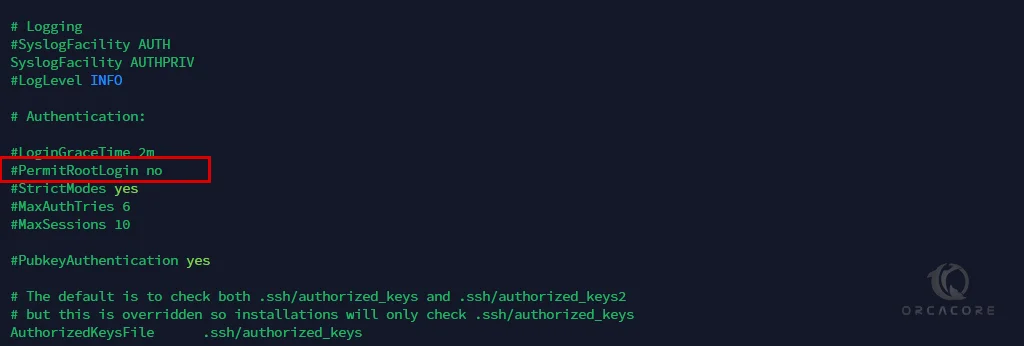
First, open the configuration file with vi editor as root on centos 7:
vi /etc/ssh/sshd_configIn your text editor find the” PermitRootLogin yes ” line and add # at the beginning of the line. Then replace no with yes. like the below picture.
Then save and close the file by pressing the Esc button and typing the “:wq” and pressing the Enter button on your keyboard.
After that reload the SSH service on Centos with the below command:
systemctl reload sshdNow you should test your new configuration. Open a new terminal window and run this command:
ssh orcacore@SERVER_IP_ADDRESSConclusion
At this point, you learn a basic server setup on centos7 and some basic server security for it. Also, you can set up your firewalld by visiting this guide on Set Up a Firewall with FirewallD on CentOS 7.
I hope you enjoy this guide on Initial Server Setup with Centos 7. You may also like the following articles: