Share your love
Easy ways To Install Android Studio on Ubuntu 20.04
In this guide, we intend to teach you How To Install Android Studio on Ubuntu 20.04. Android Studio is the integrated development environment for Google’s Android platform. Versions of Android Studio are compatible with some Apple, Windows, and Linux operating systems. With support for Google Cloud Platform and Google app integration, Android Studio offers developers a well-stocked toolkit for creating Android apps or other projects and has been an integral part of Android development since 2013.
You can now proceed to the guide steps below on the Orcacore website to start your Android Studio installation on Ubuntu 20.04.
Table of Contents
How To Install Android Studio on Ubuntu 20.04?
To complete this guide, you must log in to your server as a non-root user with sudo privileges. To do this, you can follow our guide to the Initial Server Setup with Ubuntu 20.04.
This article will show you how to install Android Studio on your Ubuntu server in 2 methods:
- Install Android Studio by adding the android-studio repository
- Install Android Studio through Snap
Method 1. Set up Android Studio from Official Repository
You can install Android Studio by adding the official Android repository to your server. First, you need to make sure that Java is installed on your server. To do this, run the command below:
java –versionIf Java is installed on your system, you need to install it.
Installing OpenJDK
At this point, you can install Java JDK-11 on your system with the following command:
sudo apt install default-jre -yVerify your Java installation by checking its version:
java –versionOutput
openjdk 11.0.16 2022-07-19
OpenJDK Runtime Environment (build 11.0.16+8-post-Ubuntu-0ubuntu120.04)
OpenJDK 64-Bit Server VM (build 11.0.16+8-post-Ubuntu-0ubuntu120.04, mixed mode, sharing)Add Android Studio Repository
At this point, you can use the command below to add the Android Studio repository to your Ubuntu 20.04:
sudo add-apt-repository ppa:maarten-fonville/android-studioWhen adding the repository, you will be prompted to press Enter to continue.
Installing Android Studio
Now that everything is done, update your local package index:
sudo apt updateThen, use the command below to install Android Studio:
sudo apt install android-studio -yMethod 2. Set up Android Studio via Snap
You can also install Android Studio using Snap on your Ubuntu 20.04. The Snap packages are available and installed on Ubuntu 20.04 by default. If it is not available, you can install it with the command below:
sudo apt install snapd -yOnce your installation is completed, restart your system to ensure Snap’s paths are updated correctly:
sudo rebootNow, use the following Snap command to install Android Studio:
sudo snap install android-studio --classicWhen your installation is completed, you will get the following output:
Output
android-studio 2021.2.1.15 from Snapcrafters installed
How To Run Android Studio on Ubuntu 20.04?
At this point, launch this tool on your system to verify that the installation has worked. Click on ‘Activities’ and then type ‘Android’ in the application launcher bar. You will see the Android Studio icon appear under the search bar.

Then, click on the Android Studio icon, and the following screen will appear on your desktop.
You should click on Do Not Import Settings and click Ok.

It will search for available SDK components.
Next, the Android Studio Setup wizard will appear on your Ubuntu 20.04. At the welcome screen, just click Next.
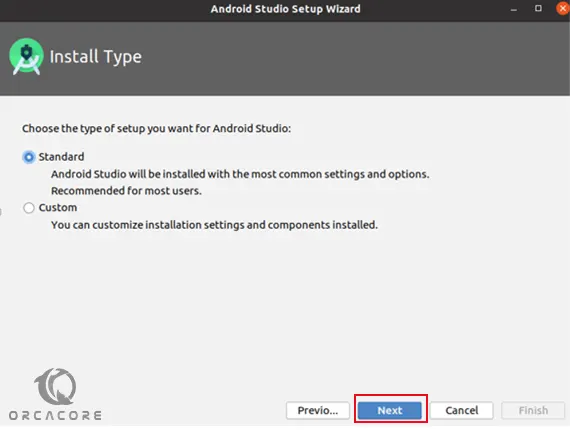
Then, you need to choose the Android Studio Installation type. You need to choose the Standard option and click Next.
Now, you need to select the UI theme. Choose Light or Darcula and click Next.
At this point, you will be asked to verify or review the installation settings. Click ‘Next’ if you are okay with the installation settings.
You are now at the end of the setup process, so you will click the ‘Finish’ option on the Emulator Settings screen.
This will download all the necessary Android components on your Ubuntu 20.04.
When your download is completed, click Finish.
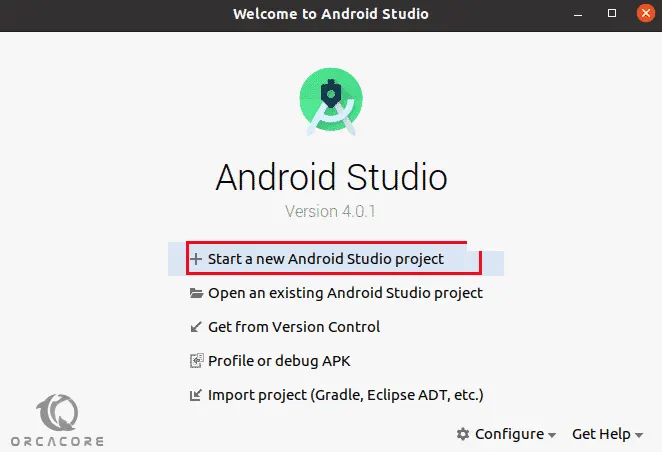
The following screen will display on your system from which you can use Android Studio on your system. Choose the option Start a new Android Studio project to create a new application.
That’s it, you are done. Your Android Studio has been installed and configured on Ubuntu 20.04.
Conclusion
At this point, you learn to Install Android Studio on Ubuntu 20.04 through both the Official repository and the Snap Store. After your setup is completed, Android Studio gives you a complete and reliable environment for building Android apps.
Hope you enjoy it. Please subscribe to us on Facebook and Twitter.
You may also like to read the following articles: