Share your love
Install and Configure Django on Rocky Linux 8
In this guide, we want to teach you to Install and Configure Django on Rocky Linux 8.
Django is a free and open-source web application framework written in Python. A framework is nothing more than a collection of modules that make development easier. They are grouped together and allow you to create applications or websites from an existing source, instead of from scratch.
How To Install and Configure Django on Rocky Linux 8
Before you start to complete this guide, you must log in to your server as a non-root user with sudo privileges and set up a basic firewall. To do this, you can follow our guide the Initial Server Setup with Rocky Linux 8.
Now proceed to the following steps to complete this guide.
Install Python and Pip on Rocky Linux8
Because Django is written in Python, you must have it installed on your server.
First, update your local package index with the following command:
sudo dnf update -yThen, use the command below to install Python 3 and pip 3 on Rocky Linux 8:
sudo dnf install python36 python3-pip
You can verify your Python and Pip installation by checking their versions:
python3 -V
Output
Python 3.6.8
pip3 -V
Output
pip 9.0.3 from /usr/lib/python3.6/site-packages (python 3.6)
Install Django on Rocky Linux 8
At this point that you have Python and Pip installed on your server, you can easily use pip to install Django:
sudo pip3 install Django
When your installation is completed, verify it by running the following command:
django-admin --version
Output
3.2.15
Now that you have Django installed on your server, it’s time to build your first project.
Create a Sample Project with Django
First, create a directory for your Django project with the command below:
sudo mkdir project
Then, switch t your Django project directory:
cd project
Now you can use the Django admin tool to build your first project, here we named it test_project:
django-admin startproject test_project
Switch to your created project:
cd test_project
In your project directory, there is a manage.py Python file.
Here you can use the following command to apply pending migrations:
sudo python3 manage.py migrate
In your output you will see:
Output
Operations to perform:
Apply all migrations: admin, auth, contenttypes, sessions
Running migrations:
Applying contenttypes.0001_initial… OK
Applying auth.0001_initial… OK
Applying admin.0001_initial… OK
Applying admin.0002_logentry_remove_auto_add… OK
Applying admin.0003_logentry_add_action_flag_choices… OK
Applying contenttypes.0002_remove_content_type_name… OK
Applying auth.0002_alter_permission_name_max_length… OK
Applying auth.0003_alter_user_email_max_length… OK
Applying auth.0004_alter_user_username_opts… OK
Applying auth.0005_alter_user_last_login_null… OK
Applying auth.0006_require_contenttypes_0002… OK
Applying auth.0007_alter_validators_add_error_messages… OK
Applying auth.0008_alter_user_username_max_length… OK
Applying auth.0009_alter_user_last_name_max_length… OK
Applying auth.0010_alter_group_name_max_length… OK
Applying auth.0011_update_proxy_permissions… OK
Applying auth.0012_alter_user_first_name_max_length… OK
Applying sessions.0001_initial… OK
Now follow the step below to create your Django admin user.
Create Django Superuser on Rocky Linux 8
At this point, you need to create a superuser for Django so that you can access the admin panel.
To do this, run the following command:
sudo python3 manage.py createsuperuser
You will be asked some questions. Answer them as shown below:
Output
Username (leave blank to use 'root'): admin
Email address: olivia@orcacore.com
Password:
Password (again):
Superuser created successfully.
As you know Django listens on port 8000. We assumed that you have enabled Firewalld. Now you need to allow traffic on port 8000 with the command below:
sudo firewall-cmd --add-port=8000/tcp --zone=public --permanent
sudo firewall-cmd --permanent --add-port=80/tcp
Then, reload the firewall to apply the new rules:
sudo firewall-cmd --reload
Here you need to edit the setting.py file to allow Django to be accessible by external users.
Open the file with your favorite text editor, here we use vi:
sudo vi test_project/settings.py
Find the ALLOWD_HOSTS line and specify your server’s IP address. Or you can assign the [‘*’] to the ALLOWED_HOSTS so that the application can be accessed from any network.
...
# SECURITY WARNING: don't run with debug turned on in production!
DEBUG = True
ALLOWED_HOSTS = ['your-specified-ip']
# Application definition
...
When you are done, save and close the file.
Access Django Admin Panel
At this point, you can start your Django app on Rocky Linux 8 by running the following command:
sudo python3 manage.py runserver 0.0.0.0:8000
In your output you will see:
Output
Watching for file changes with StatReloader
Performing system checks...
System check identified no issues (0 silenced).
Augsut 15, 2022 - 11:55:43
Django version 3.2.15, using settings 'test_project.settings'
Starting development server at http://0.0.0.0:8000/
Quit the server with CONTROL-C.
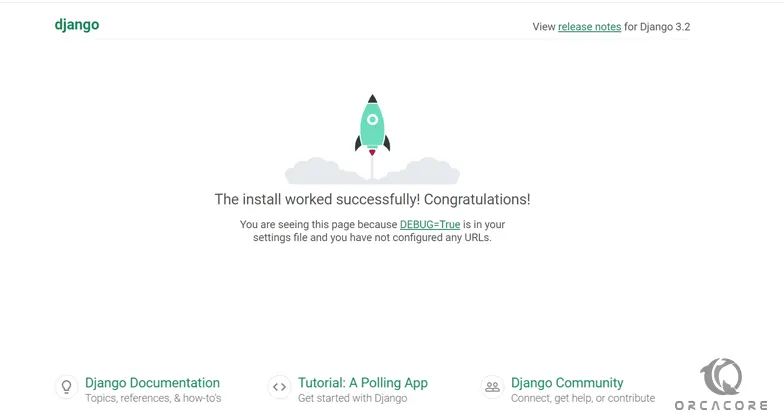
Now you can access the Django web interface that you have successfully installed Django on your server by typing your server’s IP address in your web browser followed by 8000:
http://server-IP:8000
You will see:
Then, you can access the Django admin dashboard with:
http://server-IP:8000/admin
You will see the Django admin login screen:

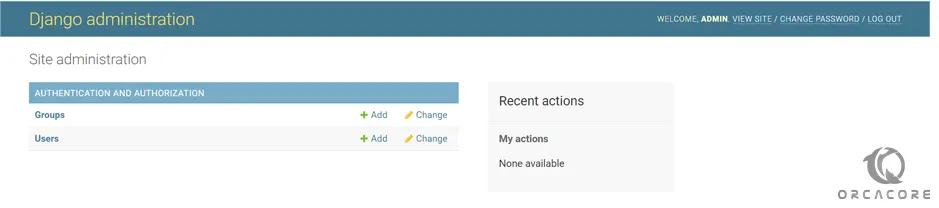
Enter your Django superuser name and password, you will see your Django Admin panel:
That’s it you are done.
For more information, you can visit the Django Documentation page.
Conclusion
At this point, you learn to Install and Configure Django on Rocky Linux 8.
Django can do a lot more than this, but this is basically what you will learn in this tutorial, and are the basic steps in a simple web application made with Django.
I hope you enjoy it on the Orcacore website.
You may be interested in these articles: