Share your love
Install and Configure GlassFish on Ubuntu 22.04 with Best Steps

In this guide, you will learn to Install and Configure GlassFish on Ubuntu 22.04. GlassFish is an open-source application server project started by Sun Microsystems for the Java EE platform and is now sponsored by Oracle Corporation. The supported version is called Oracle GlassFish Server.
GlassFish is free software, dual-licensed under two free software licenses: the Common Development and Distribution License and the GNU General Public License with the classpath exception. GlassFish is the reference implementation of Java EE and as such supports Enterprise JavaBeans, JPA, JavaServer Faces, JMS, RMI, JavaServer Pages, servlets, etc. This allows developers to create enterprise applications that are portable and scalable, and that integrate with legacy technologies.
Now follow the steps below on the Orcacore website to get GlassFish latest version and install it on Ubuntu 22.04.
Table of Contents
Steps To Install and Configure GlassFish on Ubuntu 22.04
To complete GlassFish latest version setup, you must log in to your server as a non-root user with sudo privileges and set up a basic firewall. To do this, you can follow our guide on Initial Server Setup with Ubuntu 22.04.
Install Java on Ubuntu 22.04
To install GlassFish latest version on Ubuntu 22.04 you need to have Java installed on your server.
First, update your local package index with the following command:
sudo apt updateThen, use the following command to install OpenJDK on Ubuntu 22.04:
sudo apt install default-jdk -yVerify your Java installation by checking its version:
java -versionOutput
openjdk version "11.0.18" 2023-01-17
OpenJDK Runtime Environment (build 11.0.18+10-post-Ubuntu-0ubuntu122.04)
OpenJDK 64-Bit Server VM (build 11.0.18+10-post-Ubuntu-0ubuntu122.04, mixed mode, sharing)GlassFish Installation on Ubuntu 22.04
At this point, you need to download GlassFish latest version from the GlassFish Downloads Page.
GlassFish Eclipse Download
First, switch to the /opt directory with the command below:
cd /optThen, use the following wget command to download the GlassFish latest version on Ubuntu 22.04:
sudo wget https://download.eclipse.org/ee4j/glassfish/glassfish-7.0.4.zipWhen your download is completed, extract your downloaded file with the command below:
sudo unzip glassfish-7.0.4.zipCreate a Systemd Unit File for GlassFish
Now you need to create a systemd unit file for the GlassFish service. Create and open the file with your favorite text editor, here we use the vi editor:
sudo vi /etc/systemd/system/glassfish.serviceAdd the following contents to the file:
[Unit]
Description = GlassFish Server v7.0
After = syslog.target network.target [Service]
ExecStart=/opt/glassfish7/bin/asadmin start-domain
ExecReload=/opt/glassfish7/bin/asadmin restart-domain
ExecStop=/opt/glassfish7/bin/asadmin stop-domain
Type = forking [Install]
WantedBy = multi-user.target
When you are done, save and close the file.
Next, you need to reload the system services with the following command:
sudo systemctl daemon-reloadNow you can start and enable GlassFish to start on boot with the commands below:
# sudo systemctl start glassfish
# sudo systemctl enable glassfish
Verify that your GlassFish service is active and running on Ubuntu 22.04 with the following command:
sudo systemctl status glassfishOutput
● glassfish.service - GlassFish Server v7.0
Loaded: loaded (/etc/systemd/system/glassfish.service; enabled; vendor pre>
Active: active (running) since Tue 2023-05-09 12:33:56 UTC; 43s ago
Main PID: 12579 (java)
Tasks: 94 (limit: 4575)
Memory: 338.7M
CPU: 29.722s
CGroup: /system.slice/glassfish.service
└─12579 /usr/lib/jvm/java-11-openjdk-amd64/bin/java -cp /opt/glass>GlassFish Configuration on Ubuntu 22.04
The default GlassFish admin password is blank. For more security, you can set a password for your GlassFish admin user.
GlassFish has a tool called asadmin that accepts commands for setting up GlassFish via a command line.
To make this command executable anywhere, run the following command:
export PATH=/opt/glassfish7/bin:$PATHNow you can use the following command to set a GlassFish admin password:
asadmin --port 4848 change-admin-passwordYou will be asked to enter the admin password, press enter to set a new password.
Enter admin user name [default: admin]>admin
Enter the admin password> press enter
Enter the new admin password> set a password
Enter the new admin password again> re-type password
Output
Command change-admin-password executed successfully.Next, you need to enable the secure admin feature with the following command:
asadmin --port 4848 enable-secure-adminYou should enter your admin username and password then, in your output, you will see:
Output
Command enable-secure-admin executed successfully.
Now restart GlassFish on Ubuntu 22.04 to apply the changes:
sudo systemctl restart glassfish
Configure Firewall for GlassFish
If you have a running firewall, you need to allow the following ports through the UFW firewall:
# sudo ufw allow 4848/tcp
# Sudo ufw allow 8080/tcp
Reload the firewall to apply the new rules:
sudo ufw reloadAccess GlassFish Web Interface
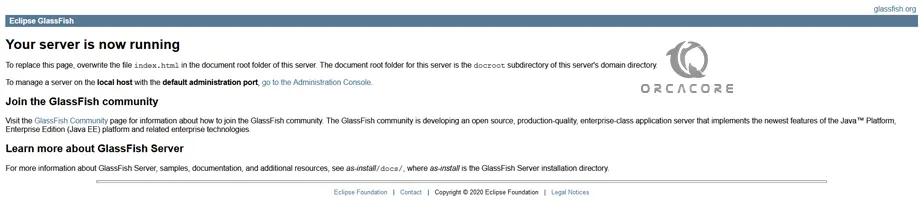
At this point, you can access the default GlassFish page by typing your server’s IP address in your web browser followed by 8080:
http://your-server-IP:8080You will see:
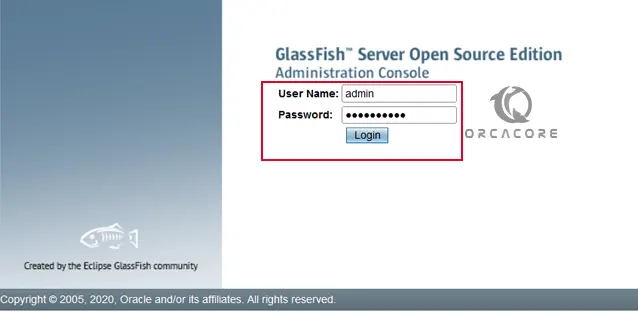
Also, you can access the web administrator console by typing your Server’s IP address in your web browser followed by 4848:
https://your-server-IP:4848You will see the GlassFish Administration console login screen.
Enter your GlassFish admin user and password, and click login.
You will see your GlassFish dashboard on Ubuntu 22.04.
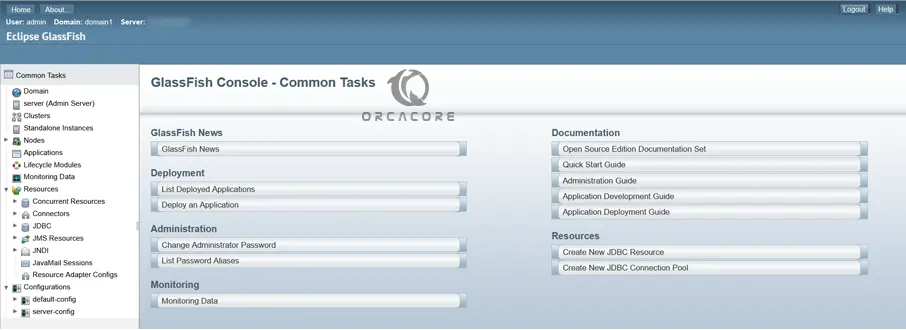
From there, you can manage Java EE applications.
Conclusion
At this point, you have learned to Install and Configure GlassFish on Ubuntu 22.04. With GlassFish latest version set on your server, you can simply manage your JAVA apps.
Hope you enjoy using it. Please subscribe to us on Facebook and Twitter.
Also, you may like to read the following articles:
Disabling Automatic Updates From the Command Line on Ubuntu
Install Zabbix 7.2 on Ubuntu 24.04