Share your love
Install DotNet on Rocky Linux 8 with Easy Steps
In this guide, we want to show you how to Install DotNet on Rocky Linux 8. Dot NET Core is the latest general-purpose development platform maintained by Microsoft. It works across different platforms and has been redesigned in a way that makes .NET fast, flexible, and modern. This happens to be one of the major contributions of Microsoft. Developers can now build Android, iOS, Linux, Mac, and Windows applications with .NET, all in Open Source.
You can now proceed to the Guide steps below on the Orcacore website to complete the DotNet Core setup on Rocky Linux 8.
Table of Contents
Steps To Install .NET Core on Rocky Linux 8
To Install DotNet on Rocky Linux 8, you must log in to your server as a non-root user with sudo privileges. To do this, you can follow our guide on Initial Server Setup with Rocky Linux 8.
1. Install DotNet on Rocky Linux 8
First, you need to update your local package index with the following command:
sudo dnf update -y.NET packages are available in the default Rocky Linux repository.
You can install .Net tools, runtime, and SDK with the following command:
sudo dnf install dotnetFor installing only .NET Runtime, you can use the following command:
sudo dnf install dotnet-runtime-7.0If you want to install the Net Software Development Kit (.Net SDK), you can use the command below:
sudo dnf install dotnet-sdk-7.0Verify DotNet Setup
Note: You can check what are the available versions to install with the command below:
sudo dnf search dotnetWhen your installation is completed, you can verify your Dotnet (.NET) installation on Rocky Linux 8 by using the command below:
dotnet --info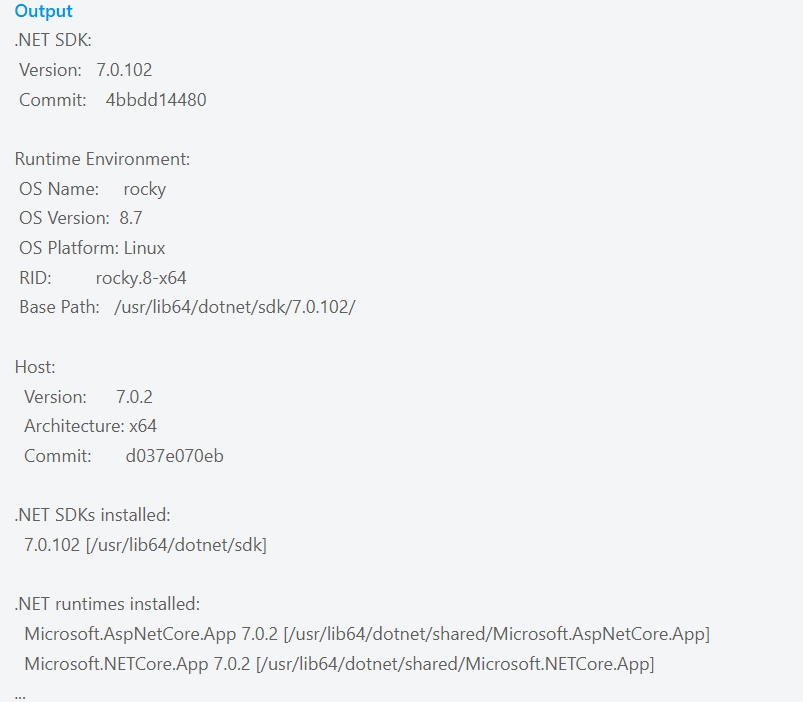
Now let’s see how to use the Dotnet core by creating a sample project on Rocky Linux.
2. Create a Sample Project with the .NET
First, you need to create a new console app with the following command, here we named it MyApp:
dotnet new console -o MyApp -f net7.0Outout
The template "Console App" was created successfully.
Processing post-creation actions...
Restoring /root/MyApp/MyApp.csproj:
Determining projects to restore...
Restored /root/MyApp/MyApp.csproj (in 167 ms).
Restore succeeded.Then, switch to your project directory:
cd MyAppThere is already a demo program inside the created project directory called program.cs. To run the demo program, use the following command:
dotnet runOutput
Hello, World!3. Uninstall .Net from Rocky Linux 8
If you don’t want to use “.NET” anymore, you can easily remove it with the command below:
sudo dnf remove dotnetAnd for the SDK and runtime, you can use the following commands:
sudo dnf remove dotnet-sdk-your-versionsudo dnf remove dotnet-runtime-your-versionFor example, if the version is 7.0 then the command will be:
sudo dnf remove dotnet-sdk-7.0For more information, you can visit the .NET Documentation page.
Conclusion
At this point, you have learned to Install Dotnet on Rocky Linux 8. .NET Core is a free, cross-platform framework used to build modern apps for Windows, Linux, and macOS. It is great for web, desktop, cloud, and mobile applications with high performance and scalability.
Hope you enjoy it. You may also like these articles:
Install and Use Iptables on Rocky Linux 8
Install PostgreSQL 14 on Rocky Linux 8
Extend Sudo Session Timeout in Linux
Understanding /etc/passwd File Format
Create Hidden Files and Folders in Linux
How to do input/output redirection in Linux
How to make a permanent alias in Linux?