Share your love
How to Install and Secure phpMyAdmin on Ubuntu 20.04

In this article, we want to teach you How to Install and Secure phpMyAdmin on Ubuntu 20.04.
phpMyAdmin is a free web application that provides a convenient GUI for working with the MySQL database management system.
How to Install and Secure phpMyAdmin on Ubuntu 20.04
Before you start to install and secure phpMyAdmin on Ubuntu 20.04 you need some requirements first.
Let’s see what are these requirements.
Requirements
- Log in to your server as a non-root user with sudo privileges and set up a basic UFW firewall. to this, you can check the Initial server setup article for Ubuntu 20.04.
- Install LAMP stack on Ubuntu 20.04. You can visit our article about how to install the LAMP stack on Ubuntu 20.04.
- You need to set up Apache virtual hosts for your domain. you can visit this article about How to set up Apache virtual hosts.
- Also, you need to have a domain configured with an SSL/TLS certificate. for this, you can check our article about How to secure Apache with Let’s Encrypt on Ubuntu 20.04.
When you are done with these requirements you can start to install phpMyAdmin on Ubuntu 20.04.
Install phpMyAdmin on Ubuntu 20.04
phpMyAdmin is available in the Ubuntu 20.04 default repository. First, update the APT packages with the following command:
sudo apt update
Then install phpMyAdmin software and its extensions that you need with the following command:
sudo apt install phpmyadmin php-mbstring php-zip php-gd php-json php-curl php-xml
At this point, you will be asked some questions to configure your installation correctly:
In the server selection part, choose apache2 by hitting space, then press TAB and Enter.
Next, select yes to use dbcnfig-common to set up the database.
After that, you will be asked to choose and confirm a MySQL application password for phpMyAdmin.
Note: If you have enabled the Validate Password plugin in the MySQL installation part of the LAMP stack, you will face an error to set a password for the phpmyadmin user:
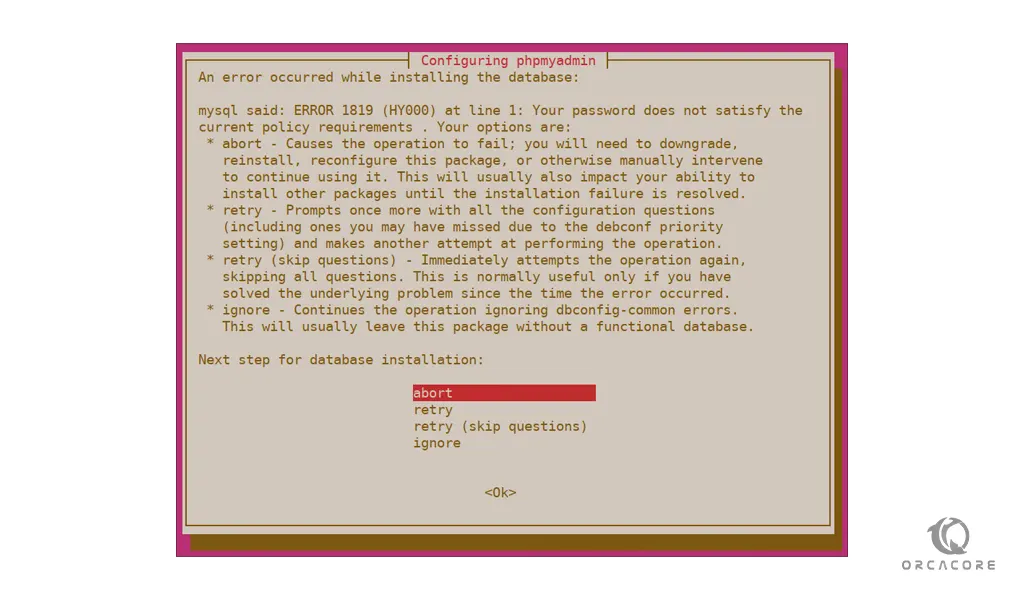
To resolve this error, select abort to stop the installation. Then run the following command to open your MySQL:
sudo mysql
Or, if you enabled password authentication for the root MySQL user, run this command and then enter your password:
mysql -u root -p
Now run the following command in the MySQL console to disable the Validate Password component:
mysql> UNINSTALL COMPONENT "file://component_validate_password";
Then close the MySQL shell with the following command:
mysql> exit
At this point, you can start to install phpMyAdmin again:
sudo apt install phpmyadmin
When your installation is finished, you can open the MySQL console again, then run the following command to re-enable the Validate Password component:
mysql> INSTALL COMPONENT "file://component_validate_password";
Now you need to enable the mbstring PHP extension with the following command:
sudo phpenmod mbstring
Then restart Apache to apply these changes:
sudo systemctl restart apache2
phpMyAdmin is now installed and configured on Ubuntu 20.04 to work with the Apache webserver.
Also, you need to be sure that your MySQL users have the correct privileges to interact with the program.
How to Adjust User authentication and privileges
when you installed phpMyAdmin on Ubuntu 20.04, automatically created a database user named phpMyAdmin.
It’s recommended to log in as your root MySQL user or as a user dedicated to managing databases through the phpMyAdmin interface instead of the phpMyAdmin database user.
Let’s see how to configure password access for the root MySQL user and the user dedicated to managing databases through the phpMyAdmin interface.
Configure password access for the root MySQL user
To log in to the phpMyAdmin on Ubuntu 20.04 with the root MySQL user, you will need to switch its authentication method from auth-socket to one that makes use of a password.
To do this, open the MySQL shell:
sudo mysql
Then, you need to check which authentication method each of your MySQL user accounts uses with the following command:
mysql> SELECT user,authentication_string,plugin,host FROM mysql.user;
Outut
+------------------+------------------------------------------------------------------------+-----------------------+-----------+
| user             |           authentication_string                                        | plugin                | host      |
+------------------+------------------------------------------------------------------------+-----------------------+-----------+
| debian-sys-maint | $A$005$4?<a?8By}RZ~L;cSpHuCR6wifjtJ.oBYa57Nfeky5KZcTQKMDFuWztBvg0      | caching_sha2_password | localhost |
| mysql.infoschema | $A$005$THISISACOMBINATIONOFINVALIDSALTANDPASSWORDTHATMUSTNEVERBRBEUSED | caching_sha2_password | localhost |
| mysql.session    | $A$005$THISISACOMBINATIONOFINVALIDSALTANDPASSWORDTHATMUSTNEVERBRBEUSED | caching_sha2_password | localhost |
| mysql.sys        | $A$005$THISISACOMBINATIONOFINVALIDSALTANDPASSWORDTHATMUSTNEVERBRBEUSED | caching_sha2_password | localhost |
| phpmyadmin       | $A$005$DtuL~,.~fZmrvptvhCnw4FKQ8f1Jfe61Eco0o9w3cMtGMarQLIvHnL/         | caching_sha2_password | localhost |
| root             |                                                                        | auth_socket           | localhost |
+------------------+------------------------------------------------------------------------+-----------------------+-----------+
6 rows in set (0.01 sec)
As you can see the root user uses the auth-socket plugin. To configure the root account to authenticate with a password run the following command:
Remember to replace the phrase password with a strong one.
mysql> ALTER USER 'root'@'localhost' IDENTIFIED WITH caching_sha2_password BY 'password';
Output
+------------------+------------------------------------------------------------------------+-----------------------+-----------+
| user             | authentication_string                                                  | plugin                | host      |
+------------------+------------------------------------------------------------------------+-----------------------+-----------+
| debian-sys-maint | $A$005$4?<a?8By}RZ~L;cSpHuCR6wifjtJ.oBYa57Nfeky5KZcTQKMDFuWztBvg0      | caching_sha2_password | localhost |
| mysql.infoschema | $A$005$THISISACOMBINATIONOFINVALIDSALTANDPASSWORDTHATMUSTNEVERBRBEUSED | caching_sha2_password | localhost |
| mysql.session    | $A$005$THISISACOMBINATIONOFINVALIDSALTANDPASSWORDTHATMUSTNEVERBRBEUSED | caching_sha2_password | localhost |
| mysql.sys        | $A$005$THISISACOMBINATIONOFINVALIDSALTANDPASSWORDTHATMUSTNEVERBRBEUSED | caching_sha2_password | localhost |
| phpmyadmin       | $A$005$DtuL~,.~fZmrvptvhCnw4FKQ8f1Jfe61Eco0o9w3cMtGMarQLIvHnL/         | caching_sha2_password | localhost |
| root             | $A$005$@\X*"~F"b~DbZ ?8bJ/8e3ufhWJbYadLNG2nlQbSWU.qTOu8IiX/B4ulj2      | caching_sha2_password | localhost |
+------------------+------------------------------------------------------------------------+-----------------------+-----------+
6 rows in set (0.00 sec)
At this point, you see that the root user doesn’t use the auth-socket plugin anymore.
Note: Later, when you want to log in to phpMyAdmin, if you face any error, you need to set root to authenticate with mysql_native_password instead of caching-sha2-password:
mysql> ALTER USER 'root'@'localhost' IDENTIFIED WITH mysql_native_password BY 'password';
Now you can log in to the phpMyAdmin interface as your root user with the password that you have created for it.
Configure password access for a dedicated MySQL user
If you prefer to log in to your phpMyAdmin interface with a dedicated MySQL user, open MySQL shell following command:
sudo mysql
Note: If you have set a password authentication for your root user in the previous part, run the following command to open the MySQL shell:
mysql -u root -p
Then, create a new user with a strong password with the following command:
mysql> CREATE USER 'olivia'@'localhost' IDENTIFIED WITH caching_sha2_password BY 'password';
After that give the correct privileges to the new user with the following command:
mysql> GRANT ALL PRIVILEGES ON *.* TO 'olivia'@'localhost' WITH GRANT OPTION;
Now exit from the MySQL shell with the following command:
mysql> exit
Note: If you want to set your new user to authenticate with mysql_native_password instead of caching_sha2_password, run the following command:
mysql> ALTER USER 'olivia'@'localhost' IDENTIFIED WITH mysql_native_password BY 'password';
Now you can access the phpMyAdmin interface by typing your domain name or IP address followed by phpmyadmin:
https://your_domain_or_IP/phpmyadmin
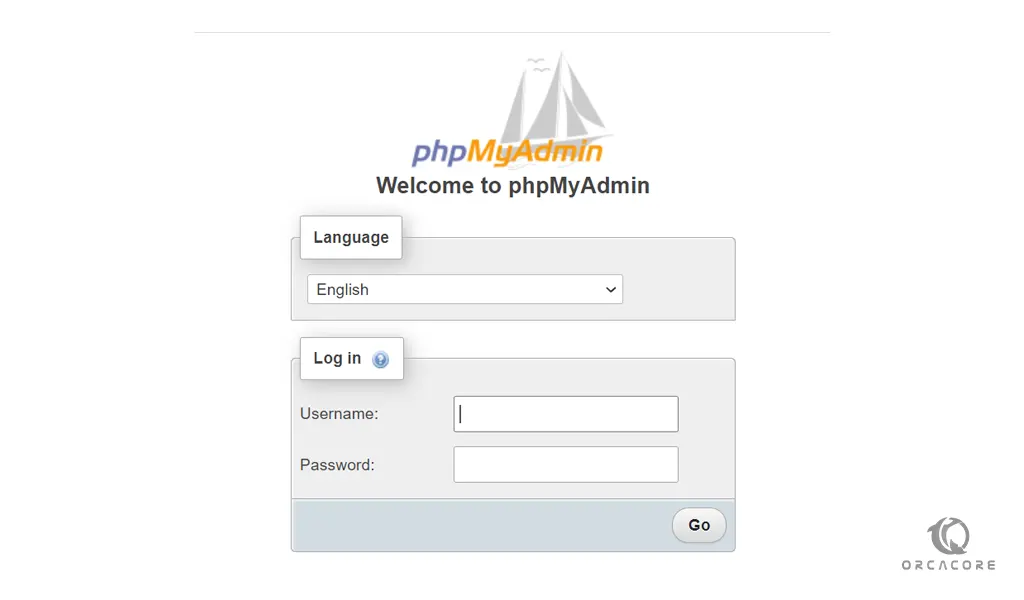
Log in to phpMyAdmin with the root user and the password you have created for it, or you can use the user you have created.
you will see something like this:
At this point when you are able to connect and interact with phpMyAdmin on Ubuntu 20.04, you need to secure it to be safe from attackers.
How to Secure your phpMyAdmin on Ubuntu 20.04
phpMyAdmin is a popular target for attackers, one way to be safe from it is to place a gateway in front of the entire application by using Apache’s built-in “.htaccess” authentication and authorization functionalities.
First, you need to edit your phpMyAdmin installation’s Apache configuration file. open the file with your favorite text editor:
sudo vi /etc/apache2/conf-available/phpmyadmin.conf
Then, add the “AllowOverride All” directive to the <Directory /usr/share/phmyadmin> part of the file:
<Directory /usr/share/phpmyadmin>
Options SymLinksIfOwnerMatch
DirectoryIndex index.php
AllowOverride All
. . .
When you are finished, save and close the file.
To apply the changes, restart Apache:
sudo systemctl restart apache2
Now create the “.htaccess” file with the following command, you can use your favorite text editor:
sudo vi /usr/share/phpmyadmin/.htaccess
Add this information to the file:
AuthType Basic
AuthName "Restricted Files"
AuthUserFile /etc/phpmyadmin/.htpasswd
Require valid-user
Save and close the file when you are done.
At this step, you can create the “.htpasswd” file with an initial user with the following command:
sudo htpasswd -c /etc/phpmyadmin/.htpasswd username
You will be asked to set up a new password for the username.
If you want to add an additional user, run the following command:
sudo htpasswd /etc/phpmyadmin/.htpasswd additionaluser
Then, restart Apache to apply the changes:
sudo systemctl restart apache2
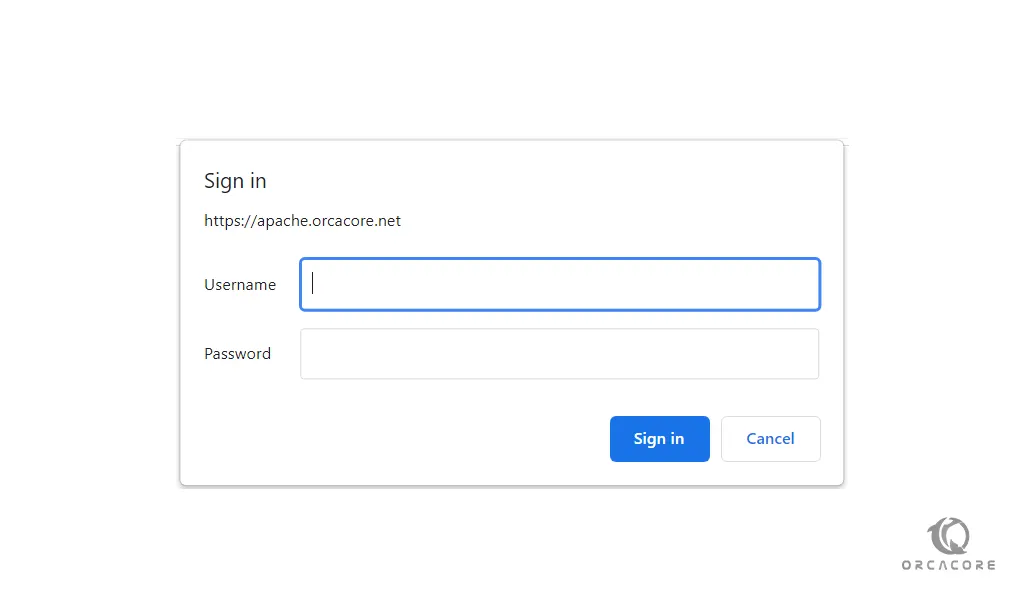
Now, when you want to access the phpMyAdmin interface, first you need to enter the username and password that you have just created.
https://domain_name_or_IP/phpmyadmin
You should see this page:
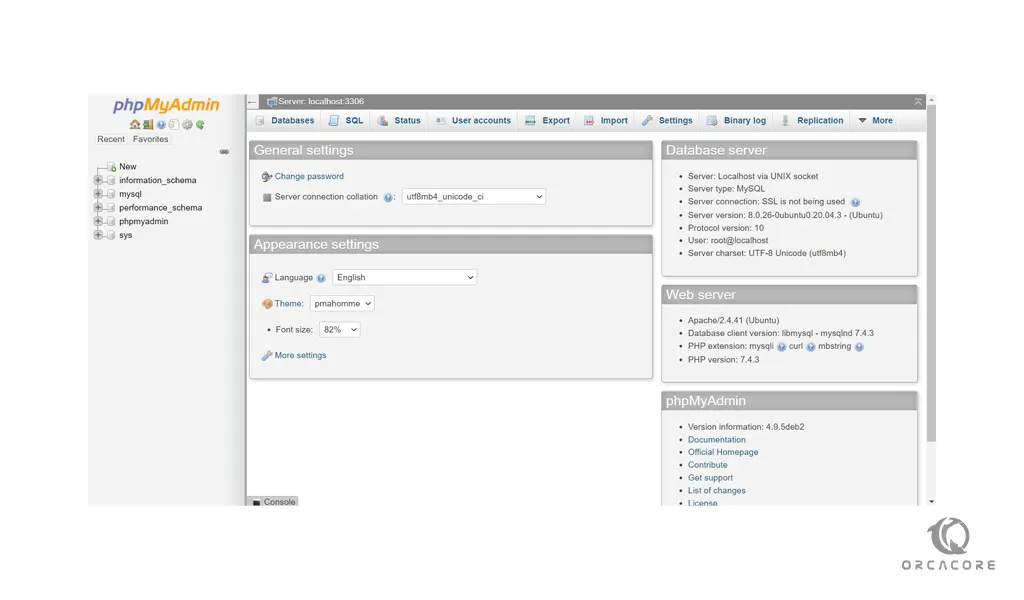
After entering the Apache authentication, you’ll be taken to the phpMyAdmin interface page to enter your MySQL credentials.
Conclusion
At this point, you learn to install and secure phpMyAdmin. from here, you can easily create databases, users, and tables.
Hope you enjoy this article about How to Install and Secure phpMyAdmin on Ubuntu 20.04.