Share your love
How To Set up Apache Tomcat on Debian 11

In this article, we want to teach you How To Set up Apache Tomcat on Debian 11.
Essentially Apache Tomcat is an open-source Java servlet and Java Server Page container that lets developers implement an array of enterprise Java applications. Tomcat also runs an HTTP web server environment in which Java code can run.
How To Set up Apache Tomcat on Debian 11
To install Apache Tomcat on Debian 11, you need to log in to your server as a non-root user with sudo privileges and set up a basic firewall. To do this, you can follow our article the Initial Server Setup with Debian 11.
Now follow the steps below to complete this guide.
Install OpenJDK on Debian 11
To set up Apache Tomcat, you need to have OpenJDK installed on your server.
First, you need to update your local package index with the following command:
sudo apt update
Then, use the following command to install OpenJDK 11 on your server:
sudo apt install openjdk-11-jdk -y
Verify your installation by checking the OpenJDK version:
java -version
Output
openjdk version "11.0.14" 2022-01-18
OpenJDK Runtime Environment (build 11.0.14+9-post-Debian-1deb11u1)
OpenJDK 64-Bit Server VM (build 11.0.14+9-post-Debian-1deb11u1, mixed mode, sharing)
Install Apache Tomcat on Debian 11
At the time of writing this guide, the latest version of Apache Tomcat is 10.0.20. Visit the Apache Tomcat Downloads page and grab the latest binary or use the wget command as follows:
wget https://dlcdn.apache.org/tomcat/tomcat-10/v10.0.20/bin/apache-tomcat-10.0.20.tar.gz
Then, create a directory in your /opt directory:
sudo mkdir /opt/tomcat
Next, extract your downloaded file in the /opt/tomcat directory:
sudo tar -xvf apache-tomcat-10*tar.gz -C /opt/tomcat --strip-components=1
At this point, you need to create a new user and group for Tomcat on Debian 11.
You can create a group called tomcat with the following command:
sudo groupadd tomcat
Next, create the tomcat user and add the user to the tomcat group with /opt/tomcat as the home directory:
sudo useradd -s /bin/false -g tomcat -d /opt/tomcat tomcat
Now you need to set the correct permissions and ownership for your Tomcat directory:
$ sudo chown -R tomcat: /opt/tomcat
$ sudo sh -c 'chmod +x /opt/tomcat/bin/*.sh'
By default, Tomcat doesn’t come with a systemd unit file. So you need to create it manually. Open the file as shown below with your favorite text editor, here we use vi:
sudo vi /etc/systemd/system/tomcat.service
Add the following content to your file:
[Unit]
Description=Tomcat webs servlet container
After=network.target
[Service]
Type=forking
User=tomcat
Group=tomcat
RestartSec=10
Restart=always
Environment="JAVA_HOME=/usr/lib/jvm/java-1.11.0-openjdk-amd64"
Environment="JAVA_OPTS=-Djava.awt.headless=true -Djava.security.egd=file:/dev/./urandom"
Environment="CATALINA_BASE=/opt/tomcat"
Environment="CATALINA_HOME=/opt/tomcat"
Environment="CATALINA_PID=/opt/tomcat/temp/tomcat.pid"
Environment="CATALINA_OPTS=-Xms512M -Xmx1024M -server -XX:+UseParallelGC"
ExecStart=/opt/tomcat/bin/startup.sh
ExecStop=/opt/tomcat/bin/shutdown.sh
[Install]
WantedBy=multi-user.target
When you are done, save and close the file.
Then rerun the systemd generator and reload all the unit files with the following command:
sudo systemctl daemon-reload
Confirm the default path for Java with the following command:
sudo update-java-alternatives -l
Output
java-1.11.0-openjdk-amd64 1111 /usr/lib/jvm/java-1.11.0-openjdk-amd64
Manage Apache Tomcat on Debian 11
At this point, you can start and enable your Apache Tomcat service on Debian 11 with the following commands:
$ sudo systemctl start tomcat
$ sudo systemctl enable tomcat
Verify that your service is active and running on Debian 11 with the command below:
sudo systemctl status tomcat
Output
tomcat.service - Tomcat webs servlet container
Loaded: loaded (/etc/systemd/system/tomcat.service; enabled; vendor preset>
Active: active (running) since Sun 2022-04-17 08:44:59 EDT; 44s ago
Main PID: 4784 (java)
Tasks: 29 (limit: 2340)
Memory: 153.9M
CPU: 4.575s
CGroup: /system.slice/tomcat.service
└─4784 /usr/lib/jvm/java-1.11.0-openjdk-amd64/bin/java -Djava.util
Configure Apache Tomcat on Debian 11
At this point, you need to configure an Administrative user to access the ‘server status’, ‘host manager’, and ‘manager app’ sections on Tomcat’s web page.
To do this, you need to edit the Tomcat configuration file. Open the file with your favorite text editor, here we use vi:
sudo vi /opt/tomcat/conf/tomcat-users.xml
Add the following lines of code just before the </tomcat-users> tag at the end of the file. You can choose your own name for username and password.
<role rolename="admin"/>
<role rolename="admin-gui"/>
<role rolename="manager"/>
<role rolename="manager-gui"/>
<user username="orca" password="<enetr-password-here>" roles="admin,admin-gui,manager,manager-gui"/>
When you are done, save and close the file.
By default, you can only access Tomcat’s web interface from the host system. So you need to configure remote access to Tomcat Manager by manually editing the context.xml configuration file.
sudo vi /opt/tomcat/webapps/manager/META-INF/context.xml
Scroll down and comment on these lines by simply adding <!– at the beginning and –> at the end.
<!-- <Valve className="org.apache.catalina.valves.RemoteAddrValve"
allow="127\.\d+\.\d+\.\d+|::1|0:0:0:0:0:0:0:1" /> -->
When you are done, save and close the file.
Next, we need to allow remote access to the Host Manager. So, edit the Host manager’s context.xml file.
sudo vi /opt/tomcat/webapps/host-manager/META-INF/context.xml
Again, comment out the following block of text by adding <!– at the beginning and –> at the end.
<!-- <Valve className="org.apache.catalina.valves.RemoteAddrValve"
allow="127\.\d+\.\d+\.\d+|::1|0:0:0:0:0:0:0:1" /> -->
When you are done, save and close the file.
To apply all the changes, restart Tomcat on Debian 11:
sudo systemctl restart tomcat
Access Apache Tomcat Web Interface
Here you need to allow Apache Tomcat port 8080 through the Debian 11 firewall:
$ sudo ufw allow 8080
$ sudo ufw reload
At this point, you can access the Apache Tomcat web interface by typing your server’s IP address in your web browser followed by 8080:
http://server-ip-addres:8080
You will see the default home page of Apache Tomcat.
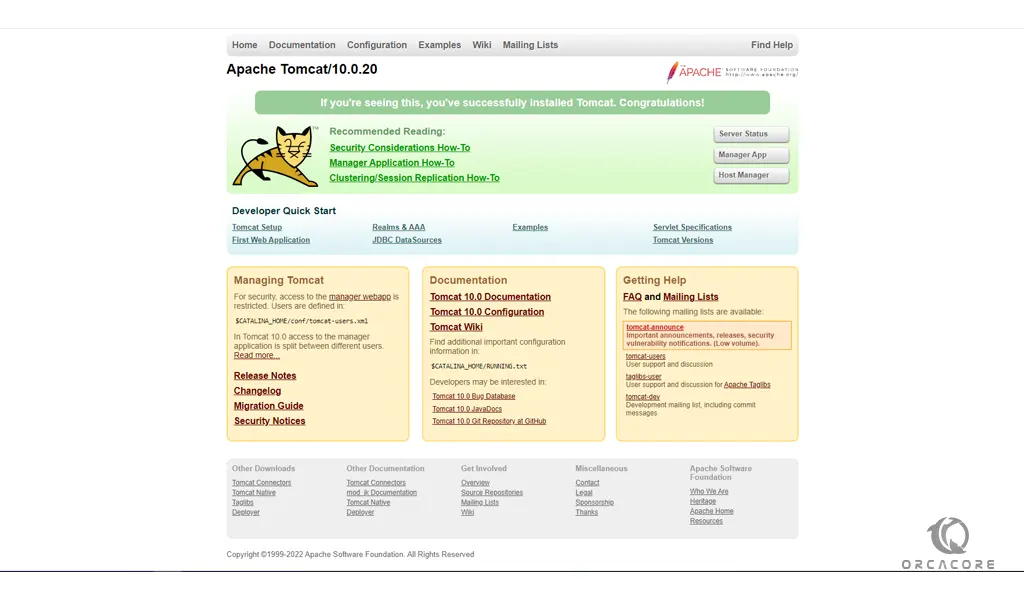
To access the ‘Server status’ page, click on ‘Server status’. A pop-up will appear prompting for user credentials. Provide the Admin login credentials that you have defined before.
Similarly, you will be prompted for the same credentials when accessing the Tomcat Application Manager which can be accessed by clicking on ‘Manager App’ on the default web interface.
Clicking on the ‘Host Manager’ will take you to the Virtual Host Manager section.
Conclusion
At this point, you learn to Set up Apache Tomcat on Debian 11.
Hope you enjoy it.
May you will be interested in these articles: