Share your love
Set up Bitwarden Password Manager on Debian 12: Secure Password Manager
This guide intends to show you how to Set up Bitwarden Password Manager on Debian 12 Bookworm. With Bitwarden you can sync your passwords across all of your devices using the same password vault. It also has browser extensions that allow you to automatically fill out passwords in your browser.
You can follow this instruction on the Orcacore website to install docker and docker-compose and Set up Bitwarden Password Manager on Debian 12.
Table of Contents
How To Set up Bitwarden Password Manager on Debian 12?
To Set up Bitwarden Password Manager on Debian 12, you need some requirements. Let’s see what is needed.
Requirements for Bitwarden Setup with Docker
To install Bitwarden, you must log in to your server as a non-root user with sudo privileges. To do this, you can follow our guide on Initial Server Setup with Debian 12 Bookworm.
Also, you need to have Docker and Docker Compose installed on your server. To do these, you can visit the following guides:
Install Docker CE on Debian 12 Bookworm
Install Docker Compose on Debian 12 Bookworm
Also, you need a domain name that is pointed to your server’s IP address.
Now follow the steps below to Set up Bitwarden Password Manager on Debian 12.
Step 1 – Create a Dedicated User for Bitwarden on Debian 12
It is recommended to run Bitwarden as a dedicated user. To create the user you can use the following command:
sudo useradd -G docker,sudo -s /bin/bash -m -d /opt/bitwarden bitwardenThis will add the user to the sudo and Docker groups.
Then, set a password for your user by using the command below:
sudo passwd bitwardenOutput
New password:
Retype new password:
passwd: password updated successfullySet the correct permission for the /opt/bitwarden directory:
sudo chown -R bitwarden: /opt/bitwardenStep 2 – Install Bitwarden Password Manager on Debian 12
At this point, you need to visit the Bitwarden hosting page and get the Installation ID and Key.
Enter your email address and click submit.
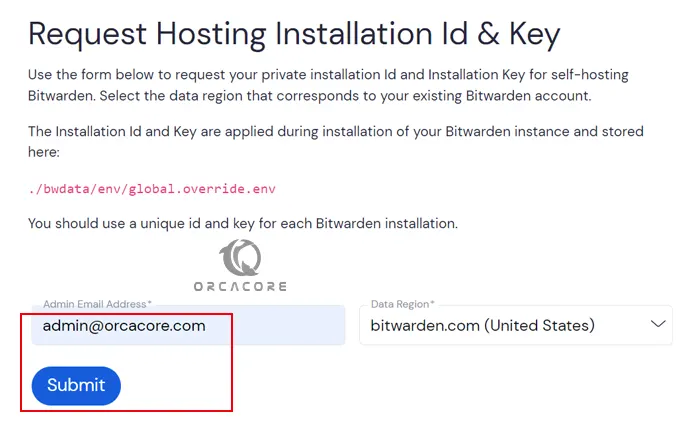
Then, you will get your installation ID and key.

Next, switch to Bitwarden user and download the Bitwarden installation script with the following curl command:
# su - bitwarden
# sudo curl -Lso bitwarden.sh https://go.btwrdn.co/bw-sh
Then, set the correct permission for your script:
sudo chmod +x bitwarden.shAnd install the Bitwarden password manager with the following command:
sudo ./bitwarden.sh installYou will be asked to provide your domain or IP, SSL information, database name, installation ID and key, and self-signed SSL, as shown below:
Output
 _     _ _                         _
| |__ (_) |___      ____ _ _ __ __| | ___ _ __
| '_ \| | __\ \ /\ / / _` | '__/ _` |/ _ \ '_ \
| |_) | | |_ \ V  V / (_| | | | (_| |  __/ | | |
|_.__/|_|\__| \_/\_/ \__,_|_|  \__,_|\___|_| |_|

Open source password management solutions
Copyright 2015-2023, 8bit Solutions LLC
https://bitwarden.com, https://github.com/bitwarden

===================================================

bitwarden.sh version 2023.7.2
Docker version 24.0.5, build ced0996
Docker Compose version v2.20.2

(!) Enter the domain name for your Bitwarden instance (ex. bitwarden.example.com): bit.orcacore.net

(!) Do you want to use Let's Encrypt to generate a free SSL certificate? (y/n): n

(!) Enter the database name for your Bitwarden instance (ex. vault): bitdb

2023.3.0: Pulling from bitwarden/setup
3f9582a2cbe7: Pull complete
d866aec6058e: Pull complete
11332129480d: Pull complete
9f9b514859b0: Pull complete
b709e83c5e9e: Pull complete
1f8900615ea1: Pull complete
47137b35c8bf: Pull complete
b7b87e36a4d9: Pull complete
223d50917a39: Pull complete
23ee09621502: Pull complete
Digest: sha256:e09da2acdedd62819dd1fe774935d1a215058244cc6e1c18203bb65cf845f70c
Status: Downloaded newer image for bitwarden/setup:2023.3.0
docker.io/bitwarden/setup:2023.3.0

(!) Enter your installation id (get at https://bitwarden.com/host): 89c6b904-d1c1-42ff-9f99-afe501342444

(!) Enter your installation key: VUzFlxjaZzn4mevt6vvN

(!) Do you have a SSL certificate to use? (y/n): n

(!) Do you want to generate a self-signed SSL certificate? (y/n): y

Generating self signed SSL certificate.
Generating a RSA private key
............++++
........................................................................................................++++
writing new private key to '/bitwarden/ssl/self/bit.orcacore.net/private.key'
-----
Generating key for IdentityServer.
Generating a RSA private key
.....................................++++
.......................................................................................................................................................................................++++
writing new private key to 'identity.key'
-----

!!!!!!!!!! WARNING !!!!!!!!!!
You are using an untrusted SSL certificate. This certificate will not be
trusted by Bitwarden client applications. You must add this certificate to
the trusted store on each device or else you will receive errors when trying
to connect to your installation.

Building nginx config.
Building docker environment files.
Building docker environment override files.
Building FIDO U2F app id.
Building docker-compose.yml.

Installation complete
Step 3 – How To Start Bitwarden Password Manager?
Now you can start your Bitwarden by using the command below on Debian 12:
sudo ./bitwarden.sh startOutput
2023.7.2: Pulling from bitwarden/setup
Digest: sha256:8040174b601984a687aa429464a02392ae1638887ef261d9563c4d4ecb9cb88f
Status: Image is up to date for bitwarden/setup:2023.7.2
docker.io/bitwarden/setup:2023.7.2
Bitwarden is up and running!
===================================================Step 4 – How To Update Bitwarden Password Manager on Debian 12?
You can easily update your software by running the following commands:
# sudo ./bitwarden.sh updateself
# sudo ./bitwarden.sh update
Step 4 – Access Bitwarden Dashboard via Web Interface
At this point, you can access your Bitwarden Web interface by typing your domain name in your web browser:
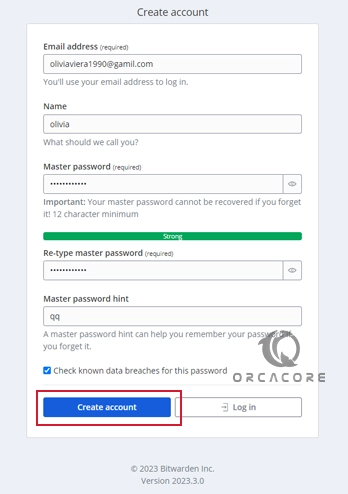
https://your-domainYou will see the Bitwarden login screen, Click Create Account.

Then, provide the information and click Create Account.
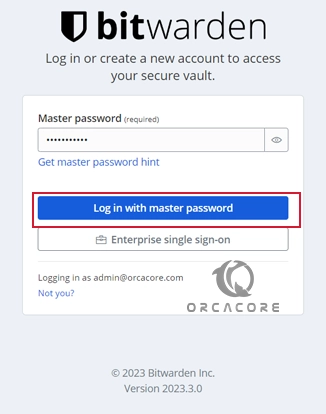
You will be redirected to the Bitwarden login page. Enter the Email and master password and click login with a master password.
You should see the Bitwarden dashboard on Debian 12.
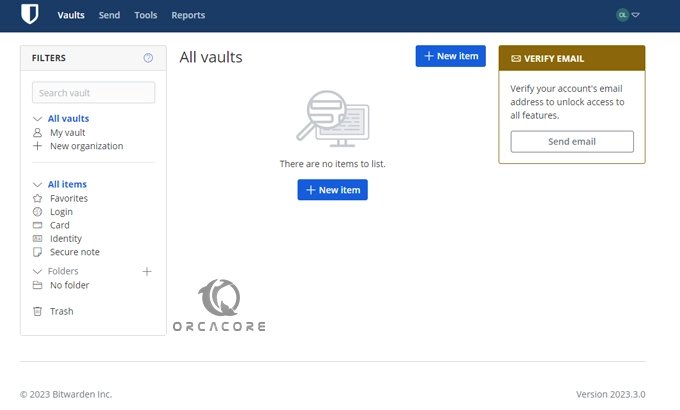
You can now add your passwords and share them between multiple devices.
Conclusion
At this point, you have learned to install docker and docker-compose as the requirements for Bitwarden, Set up Bitwarden Password Manager on Debian 12 from the command line, and access its dashboard via the web interface. Hope you enjoy it.