Share your love
Set up LiteSpeed in cPanel and WHM | Easy Steps

In this article, we want to teach you How To Set up LiteSpeed in cPanel and WHM. LiteSpeed Web Server is the leading high-performance, high-scalability web server from LiteSpeed technologies.
It can be used to replace an existing Apache server without changing any other programs or operating system details. You can now proceed to the guide steps below on the Orcacore website to complete the LiteSpeed setup in cPanel WHM.
Table of Contents
Set up LiteSpeed in cPanel and WHM
In this guide, we will teach you how to install LiteSpeed in cPanel with Almalinux. To install cPanel on AlmaLinux, you can follow our article How To Set up cPanel and WHM on AlmaLinux.
Now you can follow the steps below to set up the LiteSpeed webserver in cPanel.
1. Install LiteSpeed WHM plugin on AlmaLinux
First, log in to your server as a root user. Update your local package index with the command below:
dnf update -yThen, switch to the src directory with the command below:
cd /usr/srcNext, use the wget command to download the LiteSpeed installer script for cPanel and WHM:
wget http://www.litespeedtech.com/packages/cpanel/lsws_whm_plugin_install.shRun the LiteSpeed WHM plugin script:
sh lsws_whm_plugin_install.shWhen your LiteSpeed WHM plugin installation is completed, you will get the following output:

Now you need to log in to your WHM panel to install LiteSpeed on cPanel/WHM.
2. Install LiteSpeed webserver from cPanel/WHM
At this point, that you have installed the LiteSpeed plugin for cPanel/WHM, you need to navigate to the Plugins section from your cPanel.

Click on LiteSpeed Web Server and install LiteSpeed webserver on WHM.

Next, read the End-User license agreement for LiteSpeed software and check the box next to the I agree.
After that, you need to choose a license type. If you have a license key, choose the use an enterprise license and enter your serial number. But if you don’t have a license key, choose the request a trial license.
In the next part, set your installation options and WebAdmin console login and click on the Install button.

When your installation is completed, you will see the following message. Scroll Down and Click on the ok button.

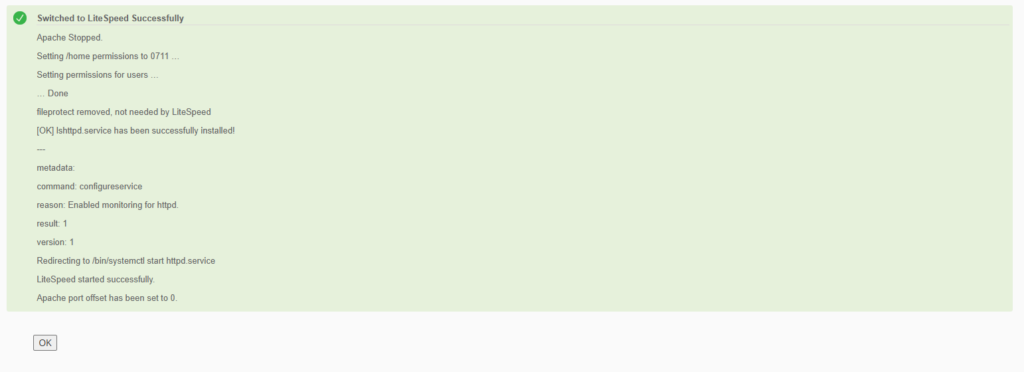
Now you need to click on the manage cache installations to generate cache management data. Then, press the switch to the LiteSpeed button to replace the LiteSpeed webserver with Apache on WHM.

Confirm the operation and click on the switch to LiteSpeed.

Next, click on the Ok button to complete your LiteSpeed installation.
To verify that your LiteSpeed service is active and running on your server, go to your SSH and run the following command:
systemctl status lshttpdIn your output you will see:

Conclusion
At this point, you have learned to set up LiteSpeed in cPanel WHM with AlmaLinux 9. LiteSpeed in cPanel & WHM is a high-performance web server that replaces Apache to improve website speed, security, and resource efficiency. It enhances performance with built-in caching, HTTP/3 support, and better handling of high-traffic loads.
Hope you enjoy it. Please subscribe to us on Facebook, YouTube, and Twitter.
Also, you may like to read the following articles:
Install Let’s Encrypt on cPanel New Version
Resolve cPanel Error ‘PHP PECL imagick fails on PHP 8.3’
Fix cPanel/WHM Installation on Red Hat 6 & 7
Enable Custom Exim Mail HELOs in cPanel
FAQs
Why use LiteSpeed instead of Apache in cPanel?
LiteSpeed delivers faster page loads, lower resource usage, and built-in caching compared to Apache.
Where is the LiteSpeed configuration file located?
The main config file is:/usr/local/lsws/conf/httpd_config.xml
Does LiteSpeed support .htaccess rules?
Yes, LiteSpeed is fully compatible with Apache .htaccess configurations.