Share your love
How To Set up XWiki on Ubuntu 20.04

In this article, we want to teach you How To Set up XWiki on Ubuntu 20.04.
XWiki is a powerful Open Source knowledge management platform that helps businesses save time and budget while enhancing collaboration on both team and organizational levels.
It allows users across different departments to stay on the same page by accessing critical information in a fast and efficient way.
Also, it runs on Tomcat, Jetty, or JBoss servlet containers and uses MySQL/MariaDB or PostgreSQL as a database to store the information.
How To Set up XWiki on Ubuntu 20.04
Before you start to install XWiki on Ubuntu 20.04, you need to log in to your server as a non-root user with sudo privileges. To do this, you can follow our article the Initial Server Setup with Ubuntu 20.04.
Now follow the steps below to set up XWiki on your server.
Install Java on Ubuntu 20.04
To install XWiki on Ubuntu 20.04, you need to have Java installed on your server. First, update your local package index with the following command:
sudo apt update -y && sudo apt upgrade -y
Then, install Java on Ubuntu 20.04 with the following command:
sudo apt install default-jdk gnupg2 -y
You can verify your installation by checking its version with the command below:
java --version
In your output you will see:
Output
openjdk 11.0.11 2021-04-20
OpenJDK Runtime Environment (build 11.0.11+9-Ubuntu-0ubuntu2.20.04)
OpenJDK 64-Bit Server VM (build 11.0.11+9-Ubuntu-0ubuntu2.20.04, mixed mode, sharing)
Install XWiki on Ubuntu 20.04
Here you need to add the GPG public key with the following command:
wget https://maven.xwiki.org/xwiki-keyring.gpg -P /usr/share/keyrings/
XWiki repository isn’t available in Ubuntu 20.04, so you need to add the XWiki repository with the following command:
wget "https://maven.xwiki.org/stable/xwiki-stable.list" -P /etc/apt/sources.list.d/
Now update your local package index again:
sudo apt update -y
You can list available XWiki packets with the following command:
apt-cache search xwiki
In this guide, we use Tomcat as a servlet container and MariaDB as a database. You need to need to install the XWiki-tomcat9-common and XWiki-tomcat9-MariaDB with the following command:
sudo apt install xwiki-tomcat9-common xwiki-tomcat9-mariadb -y
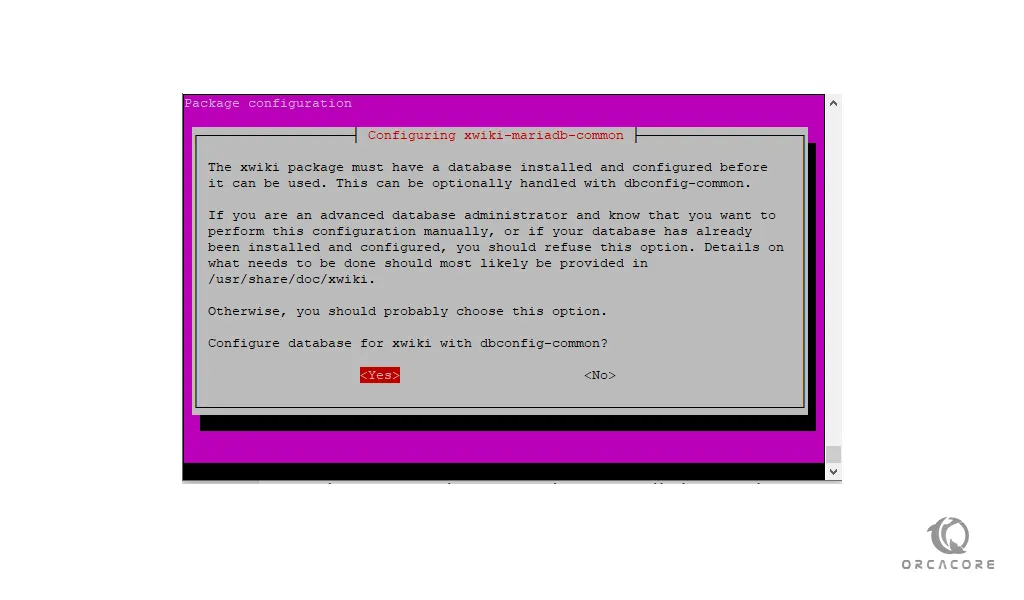
During the installation, you will be asked to enter the MySQL root password for your XWiki installation.
In the first window press yes to continue:
Then, you need to enter MySQL password for XWiki on Ubuntu 20.04 and press ok:
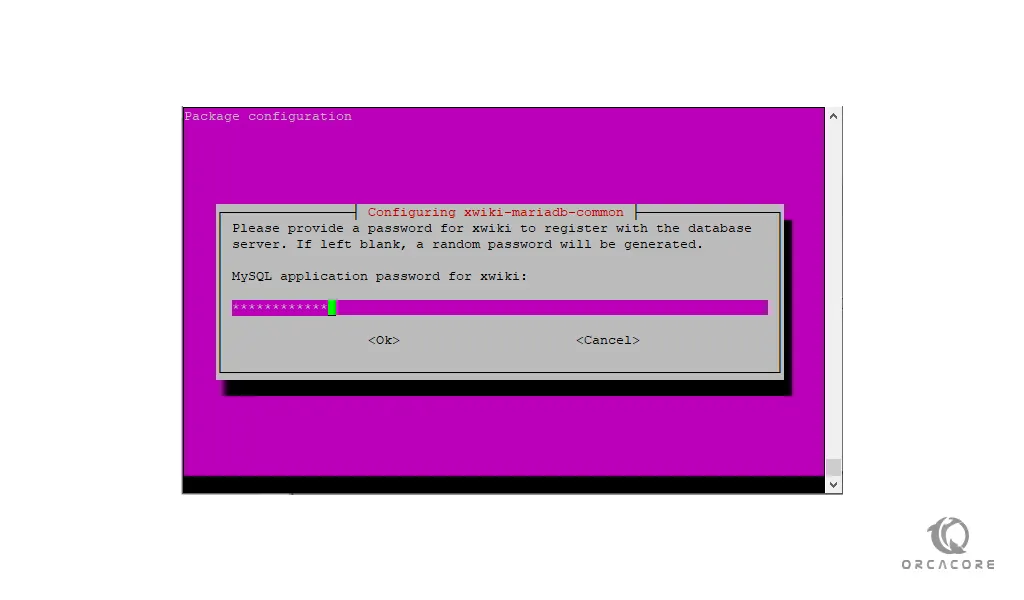
Next, confirm your password and press ok to continue:

When your installation is completed, you can verify that your Tomcat and MariaDB services are active and running on your server.
Verify that the Tomcat service is active and running with the following command:
sudo systemctl status tomcat9
Output
tomcat9.service - Apache Tomcat 9 Web Application Server
Loaded: loaded (/lib/systemd/system/tomcat9.service; enabled; vendor prese>
Drop-In: /etc/systemd/system/tomcat9.service.d
└─xwiki-tomcat9-systemd.conf
Active: active (running) since Wed 2021-12-08 08:54:44 CET; 13min ago
Docs: https://tomcat.apache.org/tomcat-9.0-doc/index.html
Main PID: 59883 (java)
Tasks: 60 (limit: 2282)
Memory: 506.7M
CGroup: /system.slice/tomcat9.service
└─59883 /usr/lib/jvm/default-java/bin/java -Djava.util.logging.con
Also, for the MariaDB service:
sudo systemctl status mariadb
Output
mariadb.service - MariaDB 10.3.32 database server
Loaded: loaded (/lib/systemd/system/mariadb.service; enabled; vendor prese>
Active: active (running) since Wed 2021-12-08 08:52:05 CET; 16min ago
Docs: man:mysqld(8)
https://mariadb.com/kb/en/library/systemd/
Main PID: 58975 (mysqld)
Status: "Taking your SQL requests now..."
Tasks: 30 (limit: 2282)
Memory: 64.9M
CGroup: /system.slice/mariadb.service
└─58975 /usr/sbin/mysqld
Install Nginx as Web Server on Ubuntu 20.04
At this point, you need to install Nginx as a web server so you can set up the reverse proxy for accessing the XWiki installation.
Install Nginx on Ubuntu 20.04 with the following command:
sudo apt install nginx -y
When your installation is completed, start Nginx with the command below:
sudo systemctl start nginx
Verify that your service is up and running:
sudo systemctl status nginx
Output
nginx.service - A high performance web server and a reverse proxy server
Loaded: loaded (/lib/systemd/system/nginx.service; enabled; vendor preset:>
Active: active (running) since Wed 2021-12-08 09:18:48 CET; 1min 9s ago
Docs: man:nginx(8)
Main PID: 61653 (nginx)
Tasks: 3 (limit: 2282)
Memory: 7.1M
CGroup: /system.slice/nginx.service
├─61653 nginx: master process /usr/sbin/nginx -g daemon on; master>
├─61654 nginx: worker process
└─61655 nginx: worker process
Now you need to create the Nginx virtual host file. Create the file with your favorite text editor, here we use vi:
sudo vi /etc/nginx/conf.d/xwiki.conf
Paste the following content to the file:
server {
 listen 80;

 server_name xwiki.example.com;

 access_log /var/log/nginx/xwiki-access.log;
 error_log /var/log/nginx/xwiki-error.log;

 location / {
 proxy_set_header   X-Real-IP $remote_addr;
 proxy_set_header   Host      $host;
 proxy_http_version 1.1;
 proxy_set_header   Upgrade $http_upgrade;
 proxy_set_header   Connection 'upgrade';
 proxy_cache_bypass $http_upgrade;
 proxy_pass         http://127.0.0.1:8080;
 }
 }
When you are done, save and close the file.
Next, activate the Nginx virtual host with the following command:
sudo ln -s /etc/nginx/conf.d/xwiki.conf /etc/nginx/sites-enabled/
Then, you should increase the hash_bucket size value in the Nginx configuration file. Open the file with your favorite text editor, here we use vi:
sudo vi /etc/nginx/nginx.conf
In the HTTP section uncomment the following line by removing the # from the beginning of the line:
server_names_hash_bucket_size 64;
When you are done, save and close the file.
To apply the changes, restart Nginx with the command below:
sudo systemctl restart nginx
Now you can access the XWiki web interface on Ubuntu 20.04.
Access the XWiki web interface
In your web browser type your server’s IP address followed by 8080/XWiki:
http://your-server-IP:8080/xwiki
You will see the XWiki distribution wizard click on the continue:

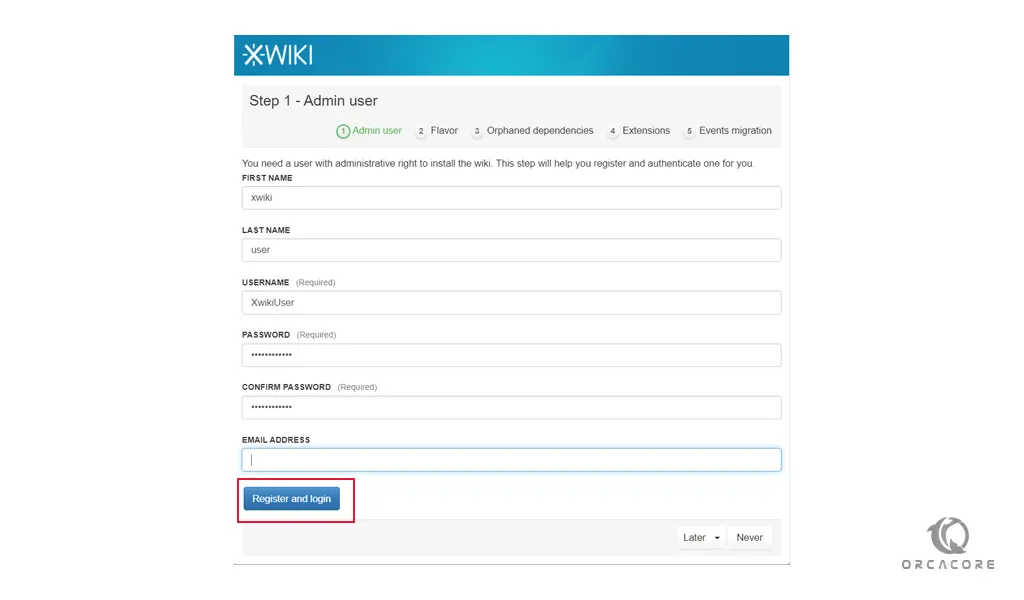
In the next window, you should set up an admin user for XWiki. Enter the credentials and press register and login:
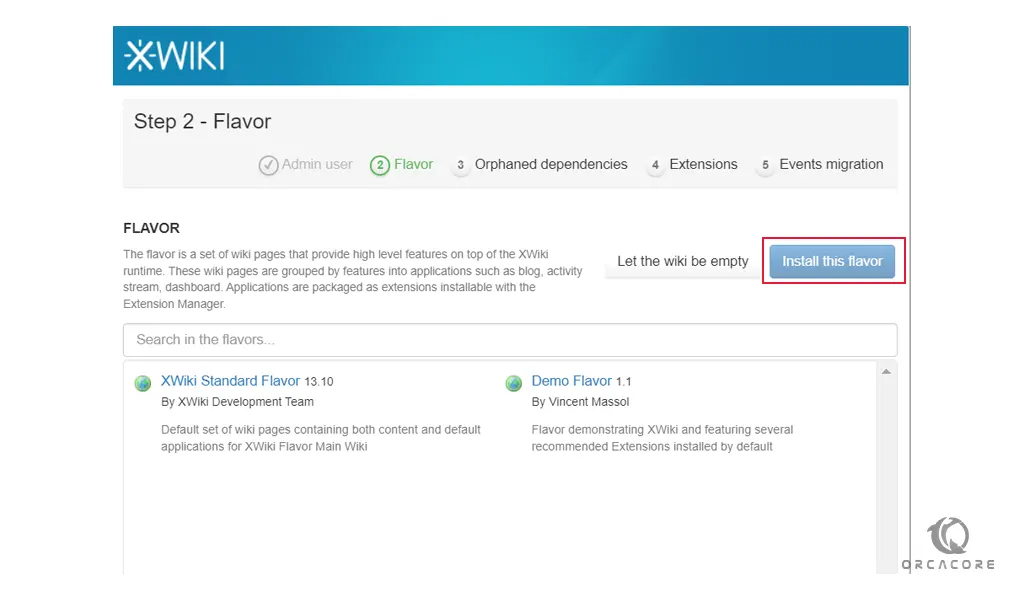
Now in this window, you should choose one flavor by your choice and press the install this flavor:
From here click on the continue button until your installation gets complete.
After the flavor installation is completed, press continue to finish with the installation.
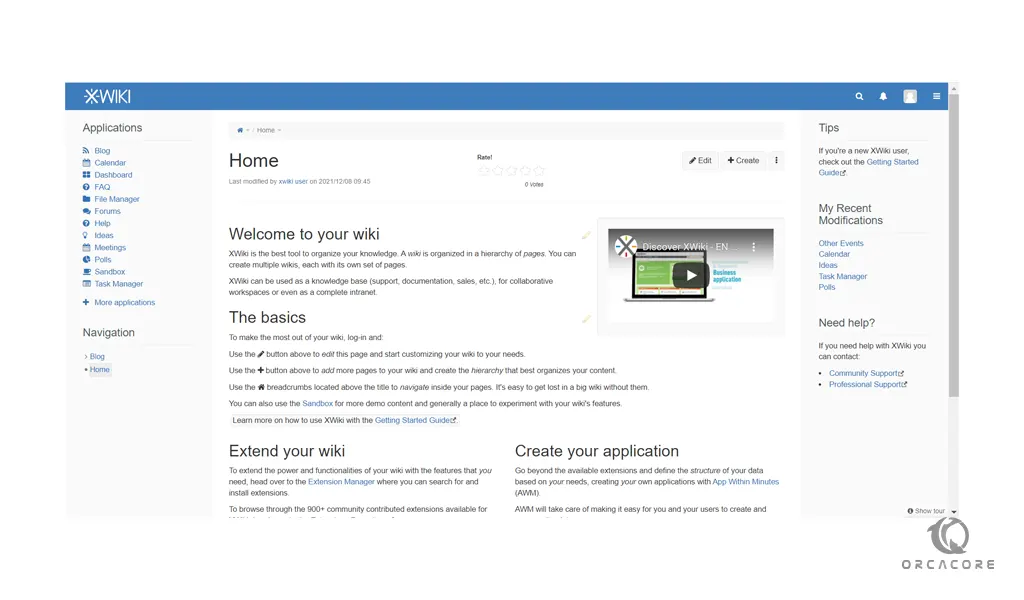
You will see the XWiki welcome dashboard:
Conclusion
At this point, you learn to Set up the XWiki platform on Ubuntu 20.04.
Hope you enjoy using it.