Share your love
Comprehensive Guide for Drupal CMS Installation on Debian / Ubuntu
This guide intends to show you the Drupal CMS Installation on Debian / Ubuntu with LAMP Stack. If you are looking for a free and open-source content management system, Drupal CMS is a good option for you. It is one of the best CMS in the world that is written in PHP and released under GPL. Also, it has amazing features such as Multi-site support, Multi-user content editing, a very well-updated system, and Available modules to download for free from the Drupal store, etc.
Now you can follow the steps below to start your Drupal CMS installation with LAMP Stack on your Debian-based distros. You can use distros like Ubuntu 24.04, Ubuntu 22.04, Debian 12, and other versions of them.
Table of Contents
Steps To Drupal CMS Installation on Debian / Ubuntu with LAMP Stack
Before you start Drupal CMS Installation on Debian / Ubuntu, you must have access to your server as a root or non-root user with sudo privileges. You can check the Orcacore website and visit the Linux server setup initial guides.
Also, you need a valid domain name that is pointed to your server’s IP address.
Then, proceed to the following steps to start Drupal CMS Installation on Debian / Ubuntu. In this guide, to show the installation steps we run an Ubuntu 22.04.
Step 1 – LMAP Stack Installation on Debian / Ubuntu
First, run the system update with the command below:
sudo apt updateThen, you can use the command below to install LAMP (Apache, MariaDB, and PHP) and some required PHP extensions and composer on your server:
sudo apt install apache2 mariadb-server composer php php-apcu php-dev libapache2-mod-php libcurl4-openssl-dev php-cli php-mysql php-zip php-gd php-fpm php-json php-common php-intl php-mbstring php-curl php-xml php-pear php-tidy php-soap php-bcmath php-xmlrpWhen you are done, you need to run a security script for your MariaDB and set a password for it. To do this, run the command below:
sudo mysql_secure_installation* Enter current password for root (enter for none):
* Switch to unix_socket authentication [Y/n] n
* Change the root password? [Y/n] y
New password:
Re-enter new password:
* Remove anonymous users? [Y/n] y
* Disallow root login remotely? [Y/n] y
* Remove test database and access to it? [Y/n] y
* Reload privilege tables now? [Y/n] y
Thanks for using MariaDB!Step 2 – PHP Configuration for Drupal CMS
At this point, you must install the Uploadprogress Extension via PECL (PHP Extension Community Library) and edit your php.ini file. To do this, follow the steps below:
First, install the Uploadprogress Extension with the command below:
sudo pecl install uploadprogressThen, run the following command to uploadprogress the extension to your PHP installation. This will create a new PHP extension configuration /etc/php/8.1/mods-available/uploadprogress.ini.
cat <<EOF | sudo tee /etc/php/8.1/mods-available/uploadprogress.ini
; configuration for php uploadprogress module
; priority 15
extension=uploadprogress.so
EOF
Next, enable the new PHP extension with the command below:
sudo ln -s /etc/php/8.1/mods-available/uploadprogress.ini /etc/php/8.1/apache2/conf.d/15-uploadprogress.iniAt this point, open your php.ini file and adjust the following configuration changes:
sudo vi /etc/php/8.1/apache2/php.inimemory_limit = 512M
upload_max_filesize = 60M
max_execution_time = 300
date.timezone = Europe/AmsterdamWhen you are done, save and close the file.
Now you can proceed to the following steps to start your Drupal CMS Installation on Debian / Ubuntu.
Step 3 – Create a Database and User For Drupal CMS
At this point, you must create a database for Drupal CMS and a database user on Debian and Ubuntu. To do this, log in to your MariaDB shell with the command below:
sudo mysql -u root -pYou will be asked to enter the root password that you have configured in the previous step.
Enter password:
Welcome to the MariaDB monitor.  Commands end with ; or \g.
Your MariaDB connection id is 39
Server version: 10.6.12-MariaDB-0ubuntu0.22.04.1 Ubuntu 22.04

Copyright (c) 2000, 2018, Oracle, MariaDB Corporation Ab and others.

Type 'help;' or '\h' for help. Type '\c' to clear the current input statement.

MariaDB [(none)]>
Then, from your MariaDB shell, run the command below to create your Drupal CMS database:
MariaDB [(none)]> create database drupaldb;Next, create a user database for Drupal with the command below:
MariaDB [(none)]> CREATE USER drupaluser@localhost IDENTIFIED BY "password";Grant all the privileges to your user database with the command below:
MariaDB [(none)]> GRANT ALL ON drupaldb.* TO drupaluser@localhost;Now flush the privileges and exit from the MariaDB shell with the following commands:
MariaDB [(none)]> FLUSH PRIVILEGES;
MariaDB [(none)]> EXIT;
Step 4 – Download the Drupal CMS Package on Debian / Ubuntu
At this point, you can visit the Drupal Downloads page and get the latest tar.gz package on your server by using the following wget command:
sudo wget https://www.drupal.org/download-latest/tar.gz -O drupal.tar.gzWhen your download is completed, extract your file with the following command:
sudo tar -xvf drupal.tar.gzThen, move your Drupal CMS extracted file to the /var/www directory on Ubuntu and Debian:
sudo mv drupal-10.1.5 /var/www/html/drupalFinally, set the correct permission and ownership for the Drupal CMS directory with the commands below:
# sudo chown -R www-data:www-data /var/www/html/drupal/
# sudo chmod -R 755 /var/www/html/drupal/
Step 5 – Apache Configuration for Drupal CMS
At this point, you must configure Apache for your Drupal CMS Installation on Debian / Ubuntu . You need to create an Apache virtual host file. To do this, you can run the command below with your desired text editor like Vi editor or Nano editor:
sudo vi /etc/apache2/sites-available/drupal.confAdd the following configuration content to the file with your domain name:
<VirtualHost *:80>
     ServerAdmin admin@example.com
     DocumentRoot /var/www/html/drupal/
     ServerName  example.com
     ServerAlias www.example.com

     ErrorLog ${APACHE_LOG_DIR}/error.log
     CustomLog ${APACHE_LOG_DIR}/access.log combined

     <Directory /var/www/html/drupal/>
            Options FollowSymlinks
            AllowOverride All
            Require all granted
     </Directory>

     <Directory /var/www/html/>
            RewriteEngine on
            RewriteBase /
            RewriteCond %{REQUEST_FILENAME} !-f
            RewriteCond %{REQUEST_FILENAME} !-d
            RewriteRule ^(.*)$ index.php?q=$1 [L,QSA]
    </Directory>
</VirtualHost>
When you are done, save and close the file.
Next, enable your Apache virtual host file and other modules with the commands below:
# sudo a2ensite drupal.conf
# sudo a2enmod rewrite ssl headers deflate
Then, restart Apache on Debian and Ubuntu to apply the changes for Drupal CMS:
sudo systemctl restart apache2Step 6 – Get SSL Certificates from Let’s Encrypt For Drupal CMS
At this point, you have completed the Drupal CMS Installation on Debian / Ubuntu. Now to make your installation secure, you can get SSL certificates with Let’s Encrypt. First, install Apache Certbot plugin on Debian and Ubuntu:
sudo apt install certbot python3-certbot-apacheThen, run the command below to get your SSL certificates for your domain name:
sudo certbot --apache --agree-tos --redirect --hsts --staple-ocsp --email admin@example.com -d example.comStep 5 – Drupal CMS Setup on Debian / Ubuntu via Web Interface
At this point, you can continue your Drupal installation from the Web interface. You can type your server IP or domain name in your favorite web browser followed by Drupal:
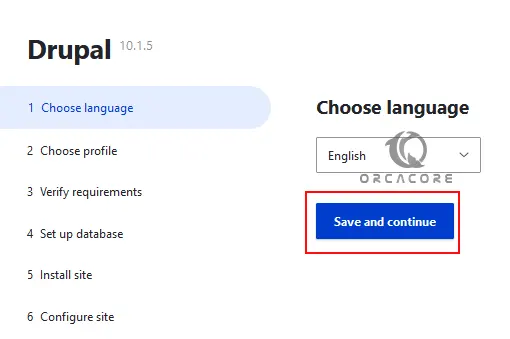
https://example.comFirst, you need to select your desired language click on Save and continue.
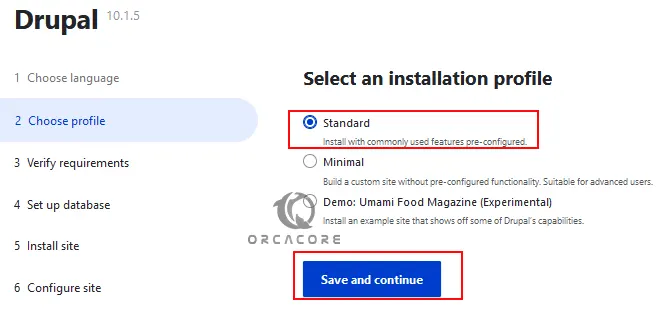
Next, you must select an installation profile for Drupal CMS on Debian and Ubuntu. Here we recommend choosing the Standard type and clicking on Save and Continue.
In the next step, verify your requirements and continue.
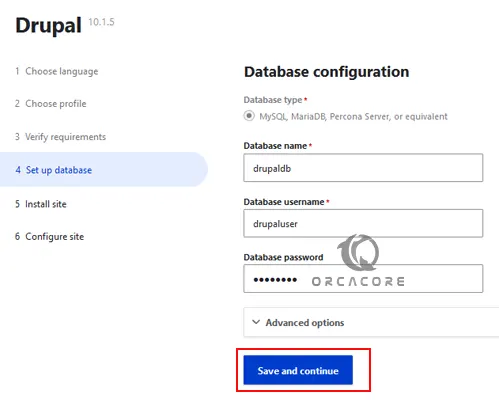
Here you should enter your database credentials and click on Save and Continue.
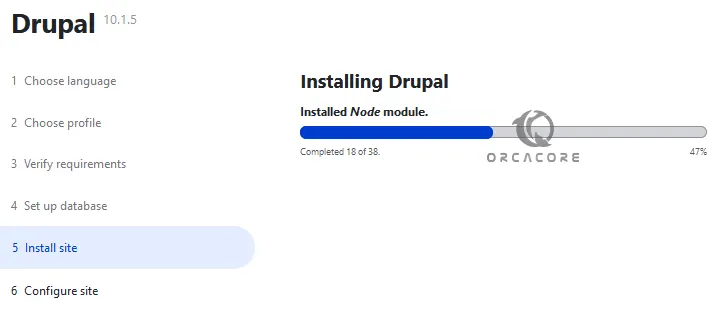
Wait for your Drupal installation to be completed.
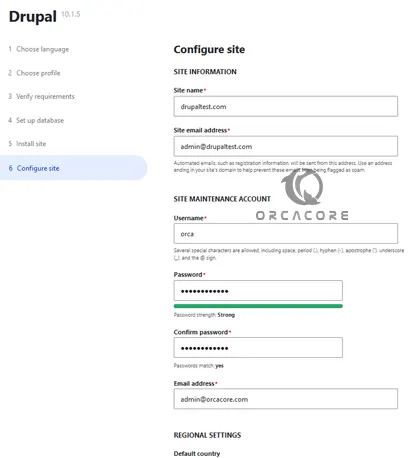
Finally, you will get into the site configuration. Enter the needed information and click on Save and Continue.
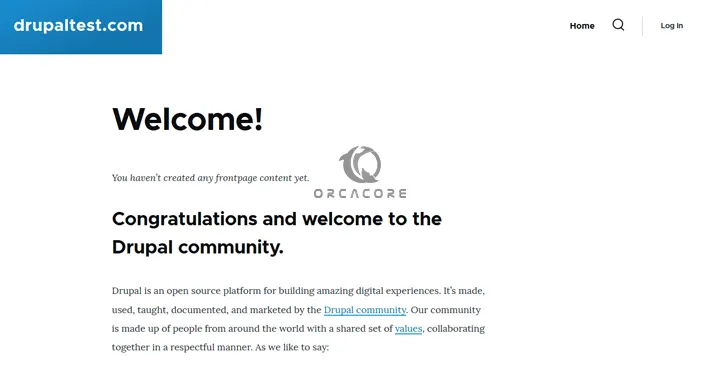
Now you will see the Drupal Welcome screen. You can log in to your account and start to manage your Drupal content, site structures, and Drupal administration, and check the status of your Drupal installation.
Conclusion
At this point, you have learned Drupal CMS Installation on Debian / Ubuntu. Also, you have learned to get the SSL certificates from Let’s Encrypt to make your site secure and access your Drupal CMS dashboard via the Web interface.
Hope you enjoy using it. If need any help, please comment for us.
Also, you may like to read the following articles:
Install Mozilla Firefox in Ubuntu Using Terminal
Installing aaPanel on Ubuntu 24.04