Share your love
Enable and Configure SSH on Ubuntu 22.04

In this guide, we want to teach you how to Enable and Configure SSH on Ubuntu 22.04. SSH or Secure Shell is a network communication protocol that enables two computers to communicate (c.f http or hypertext transfer protocol, which is the protocol used to transfer hypertext such as web pages) and share data. An inherent feature of SSH is that the communication between the two computers is encrypted, which is suitable for use on insecure networks.
SSH is often used to “log in” and perform operations on remote computers, but may also be used to transfer data. You can now proceed to the guide steps below on the Orcacore website to complete your SSH setup on Ubuntu 22.04.
Table of Contents
Steps To Enable and Configure SSH on Ubuntu 22.04
To complete this guide, you must log in to your server as a non-root user with sudo privileges and set up a basic firewall. To do this, you can follow our guide on the Initial Server Setup with Ubuntu 22.04.
1. Install OpenSSH on Ubuntu 22.04
First, you need to update your local package index with the command below:
sudo apt updateBy default, SSH is installed on Ubuntu 22.04. To verify this, run the command below:
ssh -VOutput
OpenSSH_8.9p1 Ubuntu-3, OpenSSL 3.0.2 15 Mar 2022Note: This information does not mean that you have an SSH server running on your server; it only means that you are currently able to connect as a client to SSH servers.
Then, use the command below to install OpenSSH:
sudo apt install openssh-server -yWhen your installation is completed, enable your service to start on boot:
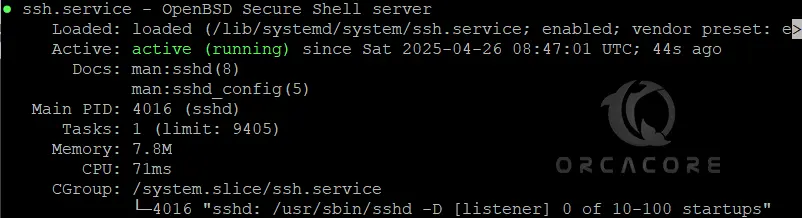
sudo systemctl enable sshCheck your SSH status with the command below:
sudo systemctl status sshdIn your output, you should see:
2. Configure Firewall for SSH Server on Ubuntu 22.04
By default, your SSH server is listening on port 22 (which is the default SSH port). You can check that the SSH server is listening on port 22 with the netstat command:
netstat -tulpn | grep 22
At this point, you need to allow SSH traffic on the UFW firewall. To enable SSH connections on your Ubuntu 22.04, run the command below:
sudo ufw allow sshNow you can check your UFW status:
sudo ufw status
3. Configure SSH Server on Ubuntu 22.04
As you know, SSH configuration files are located in the /etc/ssh folder. In this directory, you are going to find many different files and folders, but the most important ones are :
- ssh_config is used to configure SSH clients. It means that it defines rules that are applied every time you use SSH to connect to a remote host or to transfer files between hosts.
- sshd_config is used to configure your SSH server. It is used, for example, to define the reachable SSH port or to deny specific users from communicating with your server.
In this tutorial, we are going to focus on the server part of the configuration.
Change SSH Default Port
To secure your SSH server, it’s recommended to change the SSH default port on Ubuntu 22.04. Open the sshd_config file with your favorite text editor, here we use vi:
sudo vi /etc/ssh/sshd_configFind the port line, uncomment it, and change it to your desired value. Here we change it to 2222:
Port 2222When you are done, save and close the file.
Note: Be careful when you change your default SSH port, you will have to specify it when connecting to it.
Disable Root Login on your SSH Server
By default, on recent distributions, root login is set to “prohibit-password”. This option means that all interactive authentication methods are banned, allowing only public keys to be used.
In short, you need to set up SSH keys and use them to connect as root.
However, even if you connect without a password, root login is not recommended: if keys are compromised, your entire host is compromised.
As a consequence, you can set this option to “no” to restrict it completely. Again, open the SSH server config file on Ubuntu 22.04:
sudo vi /etc/ssh/sshd_configFind the line below and set it to no:
PermitRootLogin noWhen you are done, save and close the file.
To apply these changes, restart the SSH service:
sudo systemctl restart sshdYou can also use the “netstat” command as we already did in the previous sections:
netstat -tulpn | grep 2222
How To Connect to SSH Server?
At this point, you can easily connect to your SSH server by using the command below:
ssh -p <port> <username>@<ip_address>For example, to connect to my instance located at 127.0.0.1, I would run the following command:
ssh -p 2222 <user>@127.0.0.1You will be asked to provide your password and to certify that the authenticity of the server is correct.
To exit from your SSH server on Ubuntu 22.04, you can hit Ctrl + D or type ‘logout’, and your connection will be terminated.
Disable the SSH server
If you plan to disable your SSH server, you can use the following command:
sudo systemctl stop sshd Check your SSH service status:
sudo systemctl status sshdIn your output, you will see:

From there, your SSH server won’t be accessible anymore.
Conclusion
In this tutorial, you learned to enable and configure your SSH server on Ubuntu 22.04. With this tutorial, you also learned how to configure your SSH server for it to be robust enough for basic attacks.
Hope you enjoy it. Please subscribe to us on Facebook, X, and YouTube.
You may also like these articles:
How To Set up CSF Firewall on Ubuntu 22.04
Secure Nginx with Let’s Encrypt on Ubuntu 22.04