Share your love
Install Apache Tomcat on AlmaLinux 9: Best Servlet Container
In this guide, we want to teach you How To Install Apache Tomcat on AlmaLinux 9. Apache Tomcat is a long-lived, open-source Java servlet container that implements core Java enterprise (now Jakarta EE) specifications, including the Jakarta Servlet, Jakarta Server Pages, and Jakarta WebSocket specs.
Today, it remains the most widely used Java application server, boasting a well-tested and proven core engine with good extensibility. You can now proceed to the guide steps below on the Orcacore website to complete the Apache Tomcat setup on AlmaLinux 9.
Table of Contents
Steps To Install and Configure Apache Tomcat on AlmaLinux 9
To complete this guide, you must log in to your server as a non-root user with sudo privileges and set up a basic firewall. To do this, you can follow our guide on Initial Server Setup with AlmaLinux 9.
1. Install Java For Setting Up Tomcat
To install Tomcat, you need to have Java installed on your server. First, update your local package index with the following command:
sudo dnf update -yThen, use the command below to install Java on AlmaLinux 9:
sudo dnf install java -yYou can verify your Java installation by checking its version:
java --version
In your output you will see:
Output
openjdk 11.0.17 2022-10-18 LTS
OpenJDK Runtime Environment (Red_Hat-11.0.17.0.8-2.el9_0) (build 11.0.17+8-LTS)
OpenJDK 64-Bit Server VM (Red_Hat-11.0.17.0.8-2.el9_0) (build 11.0.17+8-LTS, mixed mode, sharing)
2. Install Tomcat on AlmaLinux 9
At this point, to install the latest Tomcat on your server, you need to visit the Tomcat downloads page. We will install Tomcat 10 in this guide steps.
Download Tomcat 10
Now check for the latest release and download it to your server by using the wget command:
sudo wget https://archive.apache.org/dist/tomcat/tomcat-10/v10.1.1/bin/apache-tomcat-10.1.1.tar.gzWhen your download is completed, extract it by using the command below:
sudo tar -xvf apache-tomcat-10*.tar.gzNext, move your file to the /usr/local/tomcat directory:
sudo mv apache-tomcat-10.1.1 /usr/local/tomcatCreate Tomcat User
At this point, you need to run the Tomcat service as a normal user. To do this, create a Tomcat user and group by using the commands below:
# sudo groupadd tomcat
# sudo useradd -d /usr/local/tomcat -r -s /bin/false -g tomcat tomcat
Then, set the correct ownership of the directory to the Tomcat user by using the following command:
sudo chown -R tomcat:tomcat /usr/local/tomcat/You can verify the change of ownership using the following command:
sudo ls -l /usr/local/tomcatOutput
drwxr-x--- 2 tomcat tomcat 4096 Nov 3 04:38 bin
-rw-r----- 1 tomcat tomcat 20123 Oct 3 08:42 BUILDING.txt
drwx------ 2 tomcat tomcat 4096 Oct 3 08:42 conf
-rw-r----- 1 tomcat tomcat 6210 Oct 3 08:42 CONTRIBUTING.md
drwxr-x--- 2 tomcat tomcat 4096 Nov 3 04:38 lib
-rw-r----- 1 tomcat tomcat 60393 Oct 3 08:42 LICENSE
drwxr-x--- 2 tomcat tomcat 4096 Oct 3 08:42 logs
-rw-r----- 1 tomcat tomcat 2333 Oct 3 08:42 NOTICE
-rw-r----- 1 tomcat tomcat 3398 Oct 3 08:42 README.md
-rw-r----- 1 tomcat tomcat 6775 Oct 3 08:42 RELEASE-NOTES
-rw-r----- 1 tomcat tomcat 16073 Oct 3 08:42 RUNNING.txt
drwxr-x--- 2 tomcat tomcat 4096 Nov 3 04:38 temp
drwxr-x--- 7 tomcat tomcat 4096 Oct 3 08:42 webapps
drwxr-x--- 2 tomcat tomcat 4096 Oct 3 08:42 work3. Configure Apache Tomcat on AlmaLinux 9
At this point, you need to configure the CATALINA_HOME Environment variable required to run the Tomcat server. To do this, run the following commands:
# echo "export CATALINA_HOME="/usr/local/tomcat"" >> ~/.bashrc
# source ~/.bashrc
In order to access the Tomcat Web Management Interface, you need to create a user to access the manager-gui and admin-gui.
Edit Tomcat Users File
Here you need to open the tomcat user file on AlmaLinux 9 by using your favorite text editor like Vi Editor or Nano Editor:
sudo vi /usr/local/tomcat/conf/tomcat-users.xmlAdd the following lines just above the </tomcat-users> tag at the end of the file.
<role rolename="manager-gui"/>
<role rolename="admin-gui"/>
<user username="admin" password="admin-pass" roles="manager-gui,admin-gui"/>
Remember to update the ‘password’ field to match your preferred one. Save and exit the file, when you are done.
At this point, you need to allow the tomcat manager and host manager to be accessible.
Edit Tomcat Host Manager File
Open the host manager file with your favorite text editor, we use vi:
sudo vi /usr/local/tomcat/webapps/host-manager/META-INF/context.xmlComment on the following line as shown below:
<!-- <Valve className="org.apache.catalina.valves.RemoteAddrValve"
allow="127\.\d+\.\d+\.\d+|::1|0:0:0:0:0:0:0:1" /> -->
When you are done, save and close the file.
Edit Tomcat Manager App
Open the Tomcat Manager app:
sudo vi /usr/local/tomcat/webapps/manager/META-INF/context.xmlComment on the following line as shown below:
<!-- <Valve className="org.apache.catalina.valves.RemoteAddrValve"
allow="127\.\d+\.\d+\.\d+|::1|0:0:0:0:0:0:0:1" /> -->
When you are done, save and close the file.
4. Run Tomcat as a service on AlmaLinux 9
At this point, you can use the following command to start your Tomcat service:
# cd /usr/local/tomcat
# sudo ./bin/startup.sh
You will get the following output:
Output
Using CATALINA_BASE:   /usr/local/tomcat
Using CATALINA_HOME:   /usr/local/tomcat
Using CATALINA_TMPDIR: /usr/local/tomcat/temp
Using JRE_HOME:        /usr
Using CLASSPATH:       /usr/local/tomcat/bin/bootstrap.jar:/usr/local/tomcat/bin/tomcat-juli.jar
Using CATALINA_OPTS:
Tomcat started.
5. Configure Firewall for Tomcat
At this point, we assume that you have enabled firewalls. So you need to allow port 8080 for Tomcat through the firewall:
sudo firewall-cmd --zone=public --add-port=8080/tcp --permanentReload the firewall to apply the new rules:
sudo firewall-cmd --reload6. Access Apache Tomcat Web GUI
In your web browser type your server’s IP address followed by 8080:
http://server-IP-adress:8080You will see:
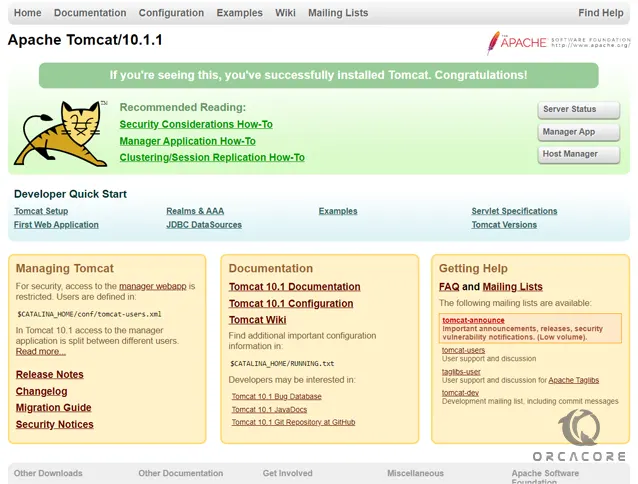
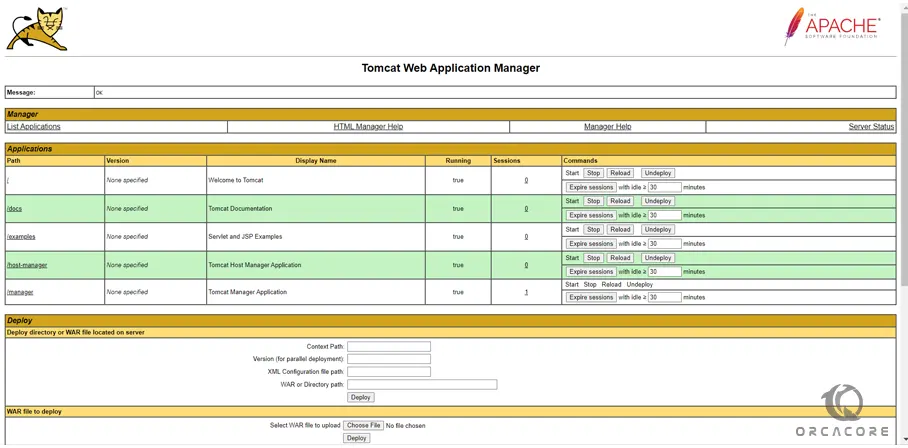
To access the Manager GUI click on Manager App. Then you will be presented will a login prompt. Enter the user and password that you have provided before.
Then, you will see your Manager App screen:
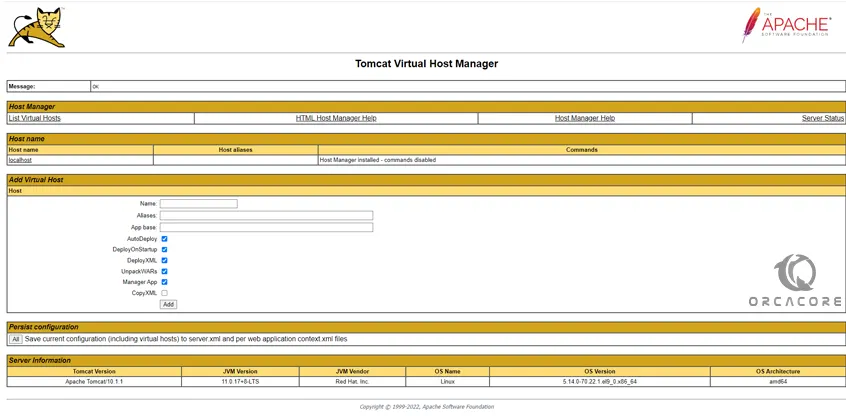
For the Host Manager GUI, you follow the same process and the page is as shown below.
Conclusion
At this point, you have learned to Install Tomcat on AlmaLinux 9. Apache Tomcat in AlmaLinux 9 is used as a web server and servlet container to run Java-based web applications. It supports Java Servlet, JavaServer Pages (JSP), and WebSocket technologies, making it ideal for deploying dynamic Java applications.
Hope you enjoy it. Please subscribe to us on Facebook, Instagram, and YouTube.
You may also like these articles:
Set up Apache Tomcat on AlmaLinux 8