Share your love
Easy Guide Steps To Install Cloudron on Ubuntu 20.04
This article intends to teach you to Install Cloudron on Ubuntu 20.04. Cloudron is a complete solution for installing and maintaining apps like WordPress, Rocket Chat, NextCloud, GitLab, OpenVPN & Discourse. Unlike other 1-click management platforms which deploy a docker image and leave you to figure out the rest, Cloudron fully automates the deployment.
Now follow the steps below provided by the Orcacore team to set up Cloudron on Ubuntu 20.04.
Table of Contents
Steps To Install Cloudron on Ubuntu 20.04
To complete this guide, you must log in to your server as a root or non-root user with sudo privileges. To do this, you can follow our guide on Initial Server Setup with Ubuntu 20.04.
Step 1. Set up Cloudron on Ubuntu 20.04
First, you need to update your local package index with the following command:
apt updateDownload Cloudron Installer Script
Then, you need to download Cloudron installer script by using the wget command:
wget https://cloudron.io/cloudron-setupWhen your download is completed, make your downloaded file executable:
chmod +x ./cloudron-setupInstall Cloudron
Now you can use the following command to install Cloudron:
bash cloudron-setupThis will take some time to complete. Once ready, you will be prompted to reboot the server and enter Y to restart.
Output
##############################################
         Cloudron Setup (latest)
##############################################

 Follow setup logs in a second terminal with:
 $ tail -f /var/log/cloudron-setup.log

 Join us at https://forum.cloudron.io for any questions.

=> Updating apt and installing script dependencies
=> Checking version
=> Downloading Cloudron version 7.4.2 ...
=> Installing base dependencies and downloading docker images (this takes some time) ...
=> Installing Cloudron version 7.4.2 (this takes some time) ...
=> Waiting for cloudron to be ready (this takes some time) .....

After reboot, visit one of the following URLs and accept the self-signed certificate to finish setup.

  * https://...
  * https://...

The server has to be rebooted to apply all the settings. Reboot now ? [Y/n] y
Step 2. Configure and Access Cloudron on Ubuntu 20.04
At this point, you can access the Cloudron web interface by typing your server’s IP address in your web browser:
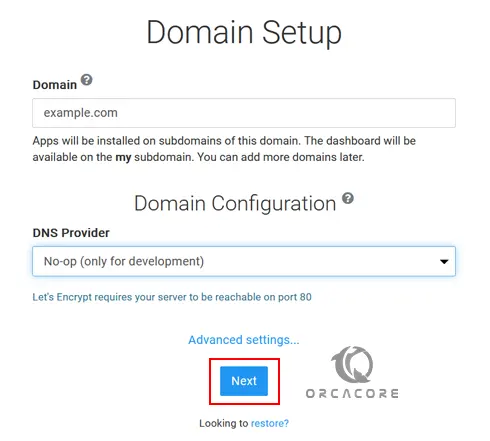
http://your-server-ipYou should see the Cloudron domain setup dashboard.
Enter your domain name (non-subdomain). Under DNS Provider, you can select one that you want. Or you can choose No-op (only for development).
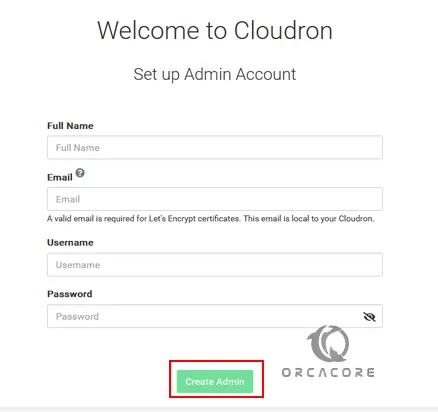
Next, set up an Administrator account by entering the Full Name, Email, Username, and Password for the Cloudron account on Ubuntu 20.04. Then, click Create Admin to proceed.
Cloudron will create my.yourdomain subdomain, and automatically redirect you to the main web dashboard. This means the platform is ready to use. You can deploy Apps, set up DNS, create databases, add users, and automate backups, among other features.
For more information, you can visit the Cloudron Docs page.
Conclusion
In short, Cloudron is a tool to make self-hosting apps on your server simple, secure, and hassle-free. At this point, you have learned to Install Cloudron on Ubuntu 20.04.
Hope you enjoy it. You may also like these articles: