Share your love
Install and Configure Apache Tomcat on Rocky Linux 8
In this tutorial, we want to teach you to Install and Configure Apache Tomcat on Rocky Linux 8.
Apache Tomcat is a web server environment for running applications built on the Java programming language. This guide will give a compelete installation and configuration of Apache Tomcat on Rocky Linux 8. The installation steps include:
- Install Java
- Create Tomcat Group and nologin User
- Install and Configure Tomcat
- Access Tomcat Dashboard
Steps To Install and Configure Apache Tomcat on Rocky Linux 8
To complete this guide, you must log in to your server as a non-root user with sudo privileges and set up a basic firewall. To do this, you can follow our guide the Initial Server Setup with Rocky Linux 8.
Step 1 – Java Installation on Rocky Linux 8
First, update your local package index with the following command:
sudo dnf update -y Then, install OpenJDK on your server with the following command:
sudo dnf install java-11-openjdk.x86_64You can verify your Java installation by checking its version:
java --versionIn your output you will see:
Output
openjdk 11.0.13 2021-10-19 LTS
OpenJDK Runtime Environment 18.9 (build 11.0.13+8-LTS)
OpenJDK 64-Bit Server VM 18.9 (build 11.0.13+8-LTS, mixed mode, sharing)
When your Java installation is finished, you must create a Tomcat group and user that will have access to Tomcat only.
Step 2 – Create a Tomcat Group and nologin User
To create a Tomcat group, run the following command:
sudo groupadd tomcatNow create a directory to save the Tomcat files with the following command:
sudo mkdir /opt/tomcatAdd the user in the above directory and disable its login rights with the following command:
sudo useradd -s /bin/nologin -g tomcat -d /opt/tomcat tomcatwhen you are done, follow the steps below to install Tomcat on your server.
Step 3 – Tomcat Installation on Rocky Linux 8
At this point, you must visit the Apache Tomcat Downloads page and copy the tar.gz binary package.
Then, use the wget command to download the Tomcat 10, paste your copied link in the below command:
wget https://dlcdn.apache.org/tomcat/tomcat-10/v10.0.13/bin/apache-tomcat-10.0.13.tar.gzWhen your download is completed, extract your file and copy it into the /opt/tomcat directory with the following command:
sudo tar -zxvf apache-tomcat-*.tar.gz -C /opt/tomcat --strip-components=1Now you need to set the correct permissions for the Tomcat user with the following command:
sudo chown -R tomcat:tomcat /opt/tomcatAlso, you need to allow the script available inside the folder to execute with the command below:
sudo sh -c 'chmod +x /opt/tomcat/bin/*.sh'Step 4 – Create a Systemd Unit File for Apache Tomcat
Here you should create a systemd unit file for Tomcat. Create the file with your favorite text editor, here we use vi:
sudo vi /etc/systemd/system/tomcat.serviceThen, paste the following content to the file:
[Unit]
Description=Tomcat webs servlet container
After=network.target

[Service]
Type=forking

User=tomcat
Group=tomcat

Environment="JAVA_HOME=/usr/lib/jvm/jre"
Environment="JAVA_OPTS=-Djava.awt.headless=true -Djava.security.egd=file:/dev/./urandom"

Environment="CATALINA_BASE=/opt/tomcat"
Environment="CATALINA_HOME=/opt/tomcat"
Environment="CATALINA_PID=/opt/tomcat/temp/tomcat.pid"
Environment="CATALINA_OPTS=-Xms512M -Xmx1024M -server -XX:+UseParallelGC"

ExecStart=/opt/tomcat/bin/startup.sh
ExecStop=/opt/tomcat/bin/shutdown.sh

[Install]
WantedBy=multi-user.target
When you are done, save and close the file.
At this point, you can start and enable your Tomcat service on Rocky Linux 8 with the following commands:
$ sudo systemctl start tomcat
$ sudo systemctl enable tomcat
Verify that your Tomcat service is active and running on your server with the command below:
sudo systemctl status tomcatIn your output you should see:
Output
tomcat.service - Tomcat webs servlet container
   Loaded: loaded (/etc/systemd/system/tomcat.service; enabled; vendor preset: >
   Active: active (running) since Tue 2021-12-07 07:36:33 EST; 13s ago
 Main PID: 89736 (java)
    Tasks: 19 (limit: 11409)
   Memory: 126.5M
   CGroup: /system.slice/tomcat.service
           └─89736 /usr/lib/jvm/jre/bin/java -Djava.util.logging.config.file=/o>
Step 5 – Configure Firewall for Apache Tomcat
To access the Apache Tomcat web interface, you need to open port 8080 through the Rocky Linux firewall.
We assumed that you have enabled firewalld from the requirements. To allow traffic on port 8080 you can use the following command:
sudo firewall-cmd --zone=public --permanent --add-port=8080/tcpReload the firewall to apply the new rules:
sudo firewall-cmd --reloadNow you can access the Apache Tomcat web interface on Rocky Linux 8.
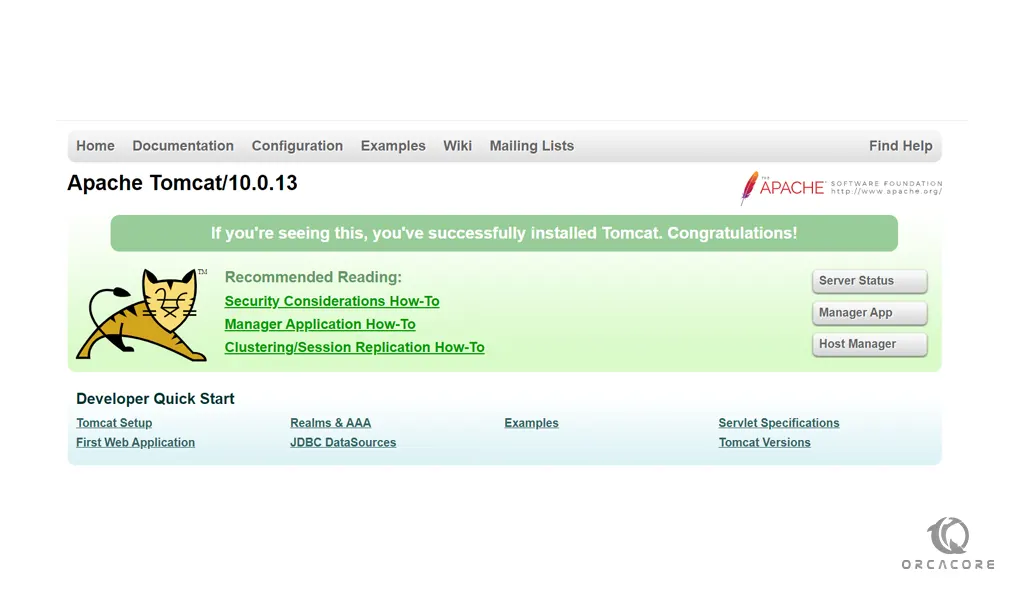
Step 6 – Access Apache Tomcat web Interface on Rocky Linux 8
In your web browser type your server’s IP address followed by 8080:
http://server-IP-adress:8080You will see:
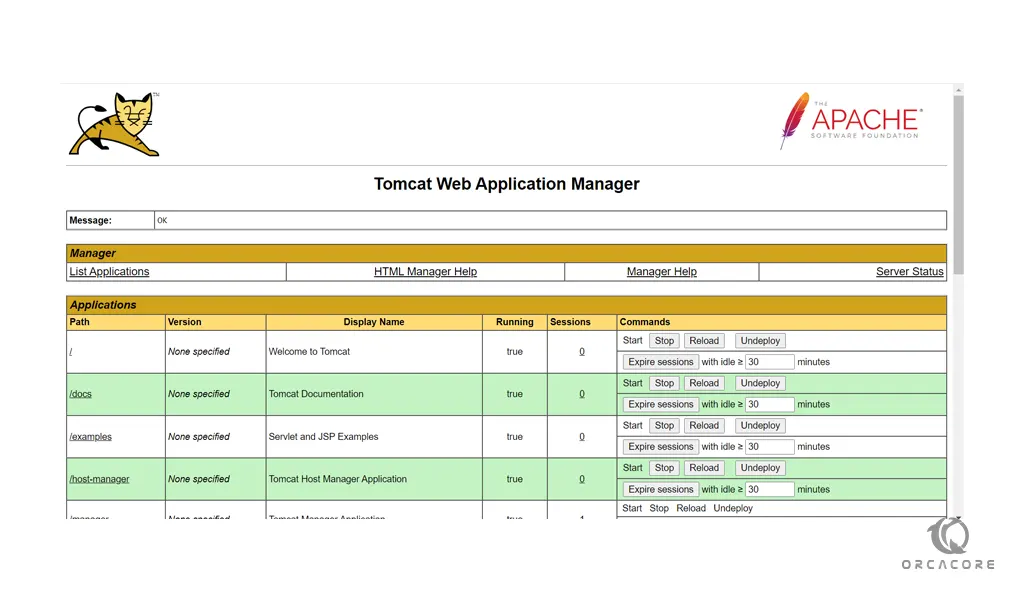
Access Server Status / Manager App / Host Manager on Tomcat
If you want to access the “Server Status“, “Manager App” and “Host Manager”, you should follow the steps below:
First, you need to add a username and password to the Tomcat User XML file on Rocky Linux 8. Open the file with your favorite text editor, here we use the vi editor:
sudo vi /opt/tomcat/conf/tomcat-users.xmlAt the end of the file before </tomcat-users> paste the following contents:
<role rolename="admin"/>
<role rolename="admin-gui"/>
<role rolename="manager"/>
<role rolename="manager-gui"/>

<user username="user" password="pwd" roles="admin,admin-gui,manager,manager-gui"/>
Remember to replace the username and password with your own.
When you are done, save and close the file.
Second, edit the manager context file:
sudo vi /opt/tomcat/webapps/manager/META-INF/context.xmlComment the following line as shown below:
<!-- <Valve className="org.apache.catalina.valves.RemoteAddrValve"
allow="127\.\d+\.\d+\.\d+|::1|0:0:0:0:0:0:0:1" /> -->
When you are finished, save and close the file.
Next, you need to edit the host manager context file:
sudo vi /opt/tomcat/webapps/host-manager/META-INF/context.xmlAgain, comment on the following line as above:
<!-- <Valve className="org.apache.catalina.valves.RemoteAddrValve"
allow="127\.\d+\.\d+\.\d+|::1|0:0:0:0:0:0:0:1" /> -->
Save and close the file, when you are done.
To apply the changes, restart Tomcat on Rocky Linux 8:
sudo systemctl restart tomcatNow you can refresh your Tomcat web interface and click on the Manager app. You need to enter the username and password that you have defined in the XML file.
Conclusion
At this point, you have learned to Install and Configure Apache Tomcat on Rocky Linux 8 Step by Step. As you can see you can easily follow the installation steps and access your Apache tomcat on Rocky Linux 8.
Hope you enjoy it. You may be interested in these articles: