Share your love
Install and Configure Apache on Windows Server 2019
In this article, we want to teach you How To Install and Configure Apache on Windows Server 2019.
Apache is the most widely used web server software. It is open-source software available for free. It is fast, reliable, and secure.
Also, it can be highly customized to meet the needs of many different environments by using extensions and modules.
Most WordPress hosting providers use Apache as their web server software. However, WordPress can run on other web server software as well.
How To Install and Configure Apache on Windows Server 2019
To set up Apache on your Windows Server 2019, you can follow the steps below.
First, you need to download Apache from the ApacheLounge.
Depending on your Windows Server, choose the 32 or 64-bit version of windows.
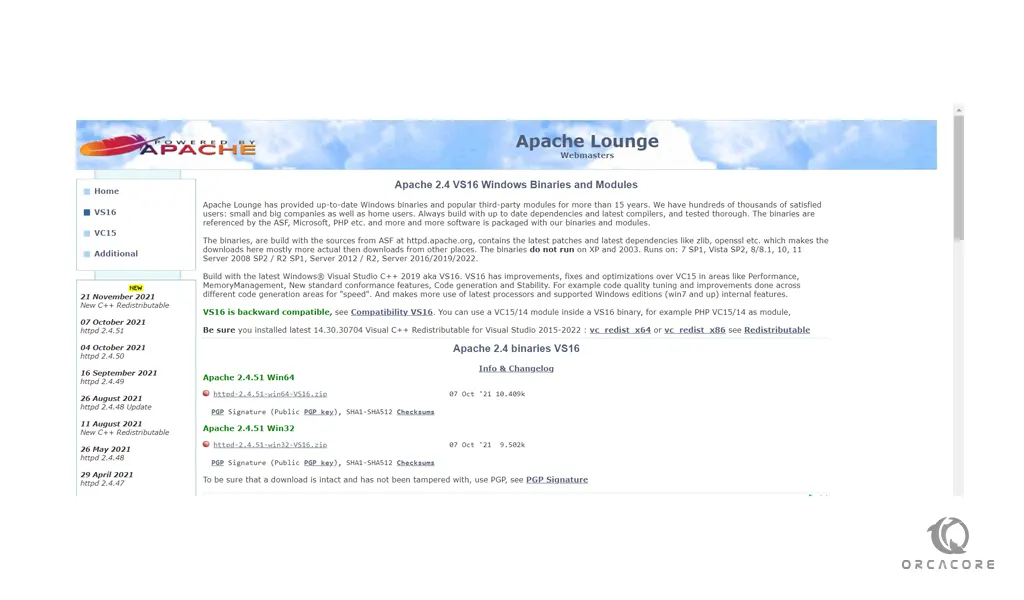
Note: Be sure you installed the latest 14.30.30704 Visual C++ Redistributable for Visual Studio 2015-2022.
When your download is completed, open your downloaded file and extract it to a suitable location like c:/Apache24 or etc.
Now you need to make some configuration changes.
Configure Apache
Now that you have extracted Apache on your Windows server, you need to configure it.
Open the conf subdirectory and open the httpd.conf file with a text editor like notepad.
We assume that you have extracted the file in the c:/Apache24.
You need to update the ${SRVROOT} variable point to the new location like this:
Define SRVROOT "C:/Apache24"
Also, you need to locate the following lines and change them to the new location that you have extracted Apache:
ServerRoot "C:/Apache24"
DocumentRoot "C:/Apache24/htdocs"
<Directory "C:/Apache24/htdocs">
ScriptAlias /cgi-bin/ "C:/Apache24/cgi-bin/"
After that you need to uncomment and set the server name point to your server name or its IP address:
ServerName www.example.com:80
Next, locate the following line and add the “ExecCGI” in front of it:
Options Indexes FollowSymLinks ExecCGI
After that, find the line below and uncomment it by removing the # from the beginning of the line:
AddHandler cgi-script .cgi
And also add the following line:
AddHandler cgi-script .pl
At the end of the file add the following line:
ScriptInterpreterSource Registry
When you are done, save and close the file.
Now you can start Apache on your Windows Server 2019.
Open a command/PowerShell prompt in the “bin” folder at the location where you extracted Apache.
In a command prompt you can start Apache with the following command:
httpd.exe
You can start Apache in a PowerShell prompt with the following command:
& "c:\Apache24\bin\httpd.exe"
Now you can verify that your Apache is running on your server by typing 127.0.0.1 in your web browser.
http://127.0.0.1
You will see:
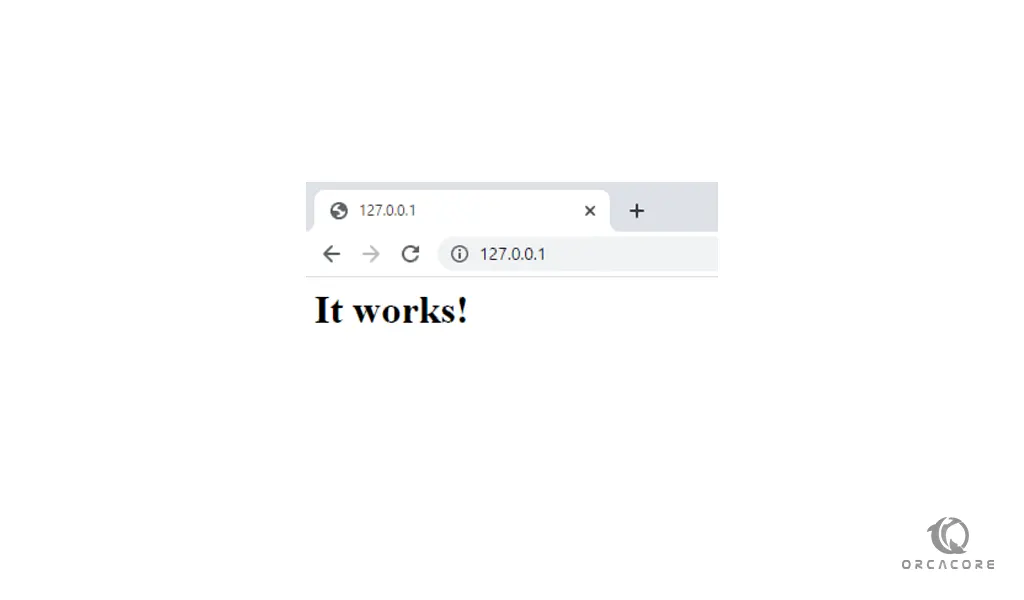
If you see this in your web browser means that your Apache is running on your Windows Server 2019.
Conclusion
At this point, you learn to set up and configure Apache on Windows Server 2019.
Hope you enjoy using it.