Share your love
Install and Configure GitLab on Rocky Linux 8: Easy Steps To Host Git Repos
In this guide on the Orcacore website, we want to teach you to Install and Configure GitLab on Rocky Linux 8. GitLab CE or Community Edition is an open-source application to host your Git repositories. It offers you the advantage of keeping the data on your server for your team and clients. It offers total control of your codebase while providing an easy-to-use interface for you and your team members.
Table of Contents
Steps To Install and Configure GitLab on Rocky Linux 8
To complete this guide, you must log in to your server as a non-root user with sudo privileges and set up a basic firewall. To do this, you can follow our guide on Initial Server Setup with Rocky Linux 8.
Also, you need a domain name that is pointed to your server’s IP address.
1. Required Packages For GitLab Setup
First, you need to update your local package index with the command below:
sudo dnf update -yThen, use the following command to install dependencies and required packages:
sudo dnf install curl vi policycoreutils python3-policycoreutils git -y2. Install GitLab on Rocky Linux 8
The GitLab repository isn’t available in the default Rocky Linux repository. So you need to add it manually to your server.
Add GitLab Repository
Create and open GitLab repo file by using your favorite text editor, here we use the vi editor:
sudo vi /etc/yum.repos.d/gitlab_gitlab-ce.repoAdd the following content to the file:
[gitlab_gitlab-ce]
name=gitlab_gitlab-ce
baseurl=https://packages.gitlab.com/gitlab/gitlab-ce/el/8/$basearch
repo_gpgcheck=1
gpgcheck=1
enabled=1
gpgkey=https://packages.gitlab.com/gitlab/gitlab-ce/gpgkey
       https://packages.gitlab.com/gitlab/gitlab-ce/gpgkey/gitlab-gitlab-ce-3D645A26AB9FBD22.pub.gpg
sslverify=1
sslcacert=/etc/pki/tls/certs/ca-bundle.crt
metadata_expire=300

[gitlab_gitlab-ce-source]
name=gitlab_gitlab-ce-source
baseurl=https://packages.gitlab.com/gitlab/gitlab-ce/el/8/SRPMS
repo_gpgcheck=1
gpgcheck=1
enabled=1
gpgkey=https://packages.gitlab.com/gitlab/gitlab-ce/gpgkey
       https://packages.gitlab.com/gitlab/gitlab-ce/gpgkey/gitlab-gitlab-ce-3D645A26AB9FBD22.pub.gpg
sslverify=1
sslcacert=/etc/pki/tls/certs/ca-bundle.crt
metadata_expire=300
When you are done, save and close the file.
Verify your GitLab repo has been added to your Rocky Linux server:
dnf repolist
GitLab CE Installation on Rocky Linux 8
At this point, you can use the following command to install GitLab CE (free edition) on your server:
sudo dnf install gitlab-ce -y3. Configure GitLab CE on Rocky Linux 8
At this point, you need to update the GitLab configuration file. To do this, open the file with your favorite text editor, here we use vi:
sudo vi /etc/gitlab/gitlab.rbFind the external_url configuration line and update it to your domain and make sure to change http to https to automatically redirect users to the site protected by the Let’s Encrypt certificate.
...
external_url 'https://your_domain'
...
Also, find the line below and uncomment it by removing the “#” and setting your email address:
...
letsencrypt['contact_emails'] = ['olivia@orcacore.com']
...
When you are done, save and close the file.
Reconfigure GitLab
Now use the command below to reconfigure GitLab on Rocky Linux 8:
sudo gitlab-ctl reconfigureThis will initialize GitLab using the information it can find about your server. The process will also configure a Let’s Encrypt certificate for your domain.
This will take some time to complete.
When you are done, you will get the following output:
Output
gitlab Reconfigured!
Configure Firewall for GitLab
At this point, you need to allow the HTTP/HTTPS and SSH services through the firewall:
sudo firewall-cmd --permanent --add-service={ssh,http,https} --permanentReload the firewall to apply the changes:
sudo firewall-cmd --reload4. Access GitLab Dashboard Web Interface
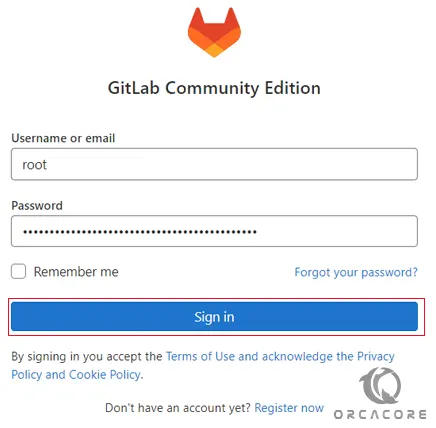
At this point, you can continue your GitLab configuration on Rocky Linux 8 from the Web interface. To do this, type your domain name in your web browser as shown below:
https://your_domainYou will see the GitLab Community Edition Login page.
GitLab Initial Password
Note: GitLab generates an initial secure password for you. It is stored in a folder that you can access as an administrative sudo user:
sudo cat /etc/gitlab/initial_root_passwordYou should see something similar to this:
Password: Kei6i+7QSMZP7mmIrYM+jCuWot0d3bV4FvsHISYQfk8=Now from your GitLab login page enter root as the username and your initial password as your password and click Sign in.
You will be signed in to the GitLab application and taken to a landing page that prompts you to begin adding projects.
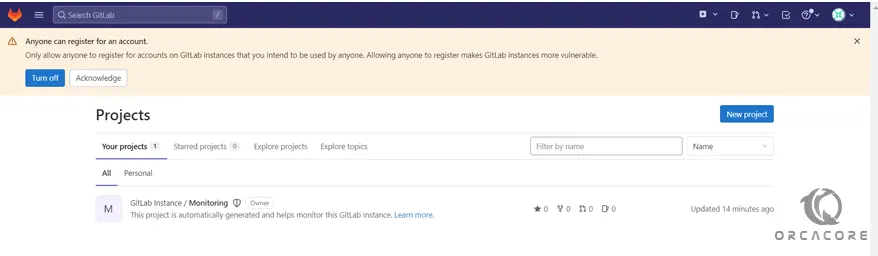
From here you can update your password, adjust your profile settings, change your account name, add an SSH key to your account, etc.
5. Renew Certificates for GitLab on Rocky Linux 8
By default, GitLab has a scheduled task set up to renew Let’s Encrypt certificates after midnight every fourth day, with the exact minute based on your external_url.
You can change these settings by modifying the GitLab configuration file:
sudo vi /etc/gitlab/gitlab.rbThen, find the following lines in the file and remove the # and update it with the following:
letsencrypt['auto_renew'] = true
letsencrypt['auto_renew_hour'] = "12"
letsencrypt['auto_renew_minute'] = "30"
letsencrypt['auto_renew_day_of_month'] = "*/7"
...
This will renew your certificates every 7th day at 12:30. You can change it to your desired date.
Disable auto-renewal Certificate
Also, you can disable auto-renewal by setting the letsencrypt[‘auto_renew’] to false:
...
letsencrypt['auto_renew'] = false
...
When you are done, save and close the file.
Conclusion
At this point, you have learned to Install and Configure GitLab on Rocky Linux 8. With GitLab, you can easily host your Git repositories.
Hope you enjoy using it. You may also like these articles:
Install Cinnamon Desktop Environment on Rocky Linux 8
How To Install PHP 7.4 on Rocky Linux 8
Anaconda Installation on Rocky Linux 8
GCC Compiler Setup Rocky Linux 8
Squid Proxy Server Rocky Linux 8