Share your love
Lighttpd Setup on Ubuntu 22.04: Best Web Server

This guide intends to teach you Lighttpd Setup on Ubuntu 22.04. Lighttpd (pronounced “Lighty”) is a high-performance web server software designed for speed, security, and flexibility. It can be an excellent option for environments with minimal resources, dynamic websites, or diverse applications.
It’s also suitable for both the Windows and Linux Operating Systems. Now proceed to the guide steps on the Orcacore website to complete Lighttpd Setup on Ubuntu 22.04.
Table of Contents
Steps To Install and Configure Lighttpd on Ubuntu 22.04
To install Lighttpd, you must log in to your server as a non-root user with sudo privileges and set up a basic firewall. To do this, follow our guide on Initial Server Setup with Ubuntu 22.04.
Now follow the steps below to complete this guide.
1. Lighttpd Setup on Ubuntu 22.04
Lighttpd packages are available in the default Ubuntu repository. First, update your local package index with the following command:
sudo apt update -yThen, use the following command to install Lighttpd:
sudo apt install lighttpd -yManage Lighttpd Web Server
Start and enable your Lighttpd service to start on boot:
# sudo systemctl start lighttpd
# sudo systemctl enable lighttpd
Verify that Lighttpd is active and running on Ubuntu 22.04:
sudo systemctl status lighttpdIn your output you will see:

To check which Lighttpd version is installed on your server, run the following command:
lighttpd -vOutput
lighttpd/1.4.63 (ssl) - a light and fast webserver2. Install MariaDB support for Lighttpd on Ubuntu 22.04
At this point, you need to install the dependencies and required packages with the following command:
sudo apt install curl software-properties-common dirmngr ca-certificates apt-transport-https -yYou can import MariaDB by using the MariaDB bash script designed for Linux distributions such as Ubuntu that are supported, given they are long-term releases. To do this, run the following command:
curl -LsS https://downloads.mariadb.com/MariaDB/mariadb_repo_setup | sudo bash -s -- --mariadb-server-version=10.11Now update your local package index again:
sudo apt updateAt this point, you can use the following command to install MariaDB on your server:
sudo apt install mariadb-server mariadb-client -yVerify your MariaDB installation by checking its version:
mariadb --versionOutput
mariadb Ver 15.1 Distrib 10.11.2-MariaDB, for debian-linux-gnu (x86_64) using EditLine wrapperManage MariaDB Service
Now you need to start and enable your MariaDB service to start on boot with the following commands:
# sudo systemctl start mariadb
# sudo systemctl enable mariadb
Confirm that your MariaDB is active and running on Ubuntu 22.04:
sudo systemctl status mariadb
MySQL Security Script
At this point that you have MariaDB installed on your server you need to secure your MariaDB by running a security script:
sudo mysql_secure_installation
Now you can use the command below to access your MariaDB shell on Ubuntu 22.04:
sudo mysql -u root -p
Once you have finished, you can proceed to the next step.
3. Install PHP and PHP-FPM with FastCGI
To enable PHP-FPM with FastCGI support, first, you need to install PHP along with the necessary extensions for Lighttpd on Ubuntu 22.04.
sudo apt install php php-cgi php-cli php-fpm php-curl php-gd php-mysql php-mbstring zip unzip -y
Confirm your PHP installation by checking its version:
php --version
Enable PHP-FPM Module
To enable the PHP-FPM module, edit the following file with your favorite text editor. Here we use vi editor.
sudo vi /etc/php/*/fpm/pool.d/www.confIn the file, Find the following line:
listen = /run/php/php*-fpm.sockAnd change it to the line below:
listen = 127.0.0.1:9000When you are done, save and close the file.
To list all loaded PHP Modules, run the following command :
php -mEnable FastCGI Module
To enable the FastCGI module, open the following file with your favorite text editor, here we use vi:
sudo vi /etc/lighttpd/conf-available/15-fastcgi-php.confFind the following lines under the FastCGI.server:
"bin-path" => "/usr/bin/php-cgi",
"socket" => "/run/lighttpd/php.socket",
Replace the lines with the following:
"host" => "127.0.0.1",
"port" => "9000",
When you are done, save and close the file.
4. Test Lighttpd Web Server
At this point, you can test your installation and configuration by creating a simple PHP info file to show the information about the PHP version installed, the web server running on our system, and the PHP extensions.
To do this, you can use the command below:
sudo vi /var/www/html/phpinfo.phpAdd the following content to the file:
<?php
 phpinfo();
 ?>
When you are done, save and close the file.
Next, you need to set the correct permission and ownership:
# sudo chown -R www-data:www-data /var/www/html/
# sudo chmod -R 755 /var/www/html/
Then, you need to edit the Lighttpd config file on Ubuntu 22.04 and add the module mod_fastcgi to your server configuration.
sudo vi /etc/lighttpd/lighttpd.confAdd mod_fastcgi to the server.modules section:
server.modules              = (
            "mod_indexfile",
            "mod_access",
            "mod_alias",
            "mod_redirect",

            "mod_fastcgi",
)
Next, add the following contents just below the file above to configure fastcgi.server.
fastcgi.server = ( ".php" => ((
                     "bin-path" => "/usr/bin/php-cgi",
                     "socket" => "/tmp/php.socket"
                 )))
Finally, restart Lighttpd to apply the changes:
sudo systemctl restart lighttpdNow you can access your PHP Info page by typing your server’s IP address in your web browser followed by /phpinfo.php:
http://your-server-ip/phpinfo.phpYou will see the following screen:
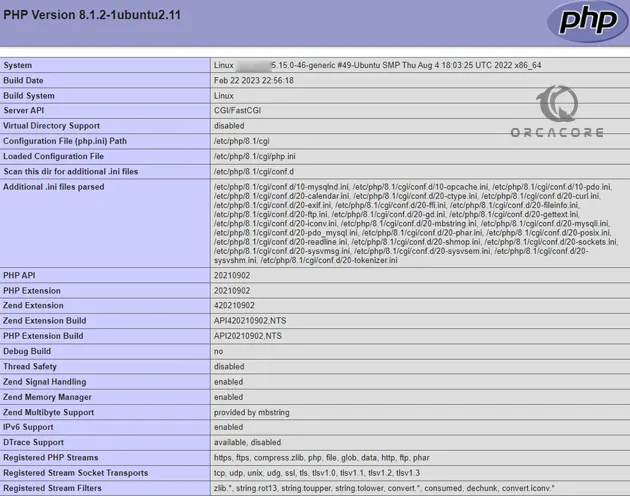
From there, you will see working information on PHP, PHP-FPM, and MySQL with lots of other modules that are already enabled.
For more information, you can visit the Lighttpd Documentation page.
Conclusion
At this point, you have learned to Install and Configure Lighttpd Web Server on Ubuntu 22.04.
Hope you enjoy it. You may also interested in these articles:
Install ProcessWire CMS on Ubuntu 22.04
Install OpenJDK 17 on Ubuntu 22.04
Apache Kafka Setup Ubuntu 22.04
Podman installation Ubuntu 22.04
Jekyll Site Generator Ubuntu 22.04