Share your love
Install Postfix Mail Server on Rocky Linux 8
This tutorial on the Orcacore website intends to teach you How To Install Postfix Mail Server on Rocky Linux 8. Postfix is a popular free and open-source software that acts as a mail transfer agent (MTA). The job of Postfix is to route and deliver emails. Besides the classic usage, Postfix can also be configured to send emails by local applications only.
This application of Postfix is a useful trick to deploy in various situations. For example, it can be used when sending email notifications regularly, working with a third-party email service provider with limited outbound traffic, etc. Compared to any full-fledged SMTP server, Postfix is a lighter alternative that at the same time retains the necessary functionalities.
Table of Contents
Full Steps To Install Postfix Mail Server on Rocky Linux 8
To install Postfix, you need to log in to your server as a non-root user with sudo privileges. To do this, you can follow our guide on the Initial Server Setup with Rocky Linux 8.
Now follow the steps below to complete the Posfix setup on Rocky Linux 8.
1. Install Postfix on Rocky Linux 8
First, you need to update your local package index with the following command:
sudo dnf update -yThen, run the command below to check whether Sendmail is installed or not:
rpm -qa | grep sendmailIf you didn’t get any output, that means you don’t have Sendmail installed, and you can keep going.
If you have Sendmail installed on your server, you need to remove it with the following command:
sudo dnf remove sendmail* -yAt this point, you can check whether you have Postfix installed on your server or not:
rpm -qa | grep postfixNext, if you don’t have it installed on your server, use the command below to install Postfix on Rocky Linux 8:
sudo dnf install postfix -y2. Configure Postfix on Rocky Linux 8
At this point, you need to make some configuration changes to the Postfix main configuration file on Rocky Linux 8.
First, open the file with your favorite text editor. Here we use the vi editor:
sudo vi /etc/postfix/main.cfAt the file, uncomment the myhostname line and set it to your hostname:
myhostname = your-hostnameUncomment and set the domain name on the line below:
mydomain = your-domain-nameAlso, uncomment the line below:
myorigin = $mydomainUncomment and set IPv4 at the following line:
inet_interfaces = allSet the line below to all:
inet_protocols = allComment on the following line:
#mydestination = $myhostname, localhost.$mydomain, localhost,Uncomment and add the IP range at the following line:
mynetworks = 192.168.1.0/24, 127.0.0.0/8Finally, uncomment the line below:
home_mailbox = Maildir/When you are done, save and close the file.
3. Start and Enable Postfix
At this point, you need to start and enable your Postfix Mail server with the following commands:
# sudo systemctl enable postfix
# sudo systemctl restart postfix
Verify that your Postfix service is active and running on Rocky Linux 8:
sudo systemctl status postfix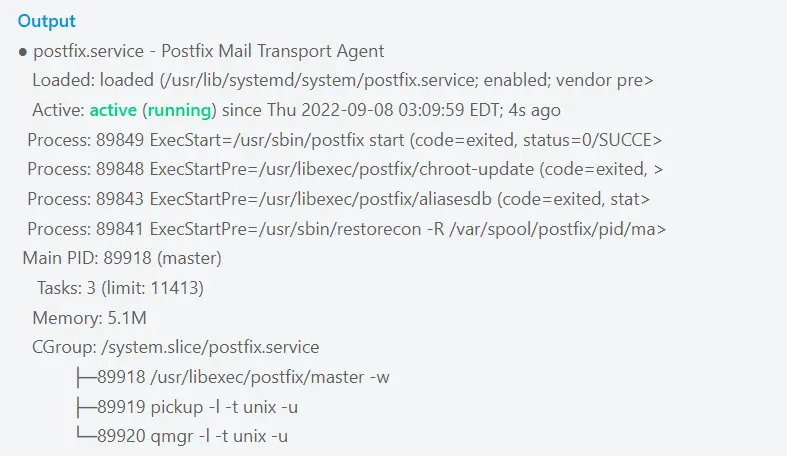
4. Testing Postfix on Rocky Linux
At this point, you need to create a new user for testing. To do this, run the command below:
sudo useradd postfixtesterAdd a password for your user:
sudo passwd postfixtesterWhen you are done, you will get the following output:

After adding the user, let’s check the server access using telnet. If you don’t have telnet installed on your server, use the command below to install telnet on Rocky Linux 8:
sudo dnf install telnet -yThen, run the following command:
telnet localhost smtpOnce you have successfully done the configuration, you will get the following output:
Output
Trying ::1…
Connected to localhost.
Escape character is '^]'.
220 your-hostname ESMTP Postfix
Start your transaction by writing the following command:
ehlo localhost250-hostname
250-PIPELINING
250-SIZE 10240000
250-VRFY
250-ETRN
250-ENHANCEDSTATUSCODES
250-8BITMIME
250 DSNOnce you get 250 DSN, you can send mail.
Finally! You have Postfix installed, and emails are getting sent! You are all set to use your server as your private SMTP server to send emails.
For more information, you can visit the Postfix Documentation page.
Conclusion
In conclusion, installing Postfix on Rocky Linux 8 is simple and easy. After installing the package and starting the service, your system is ready to send emails. Postfix is a reliable mail server that works well for sending messages from your server or applications.
Hope you enjoy it. You may also be interested in these articles: