Share your love
Comprehensive Guide To Install Seafile Server on Ubuntu 22.04
This article will give you a Complete Guide To Install Seafile Server on Ubuntu 22.04. Seafile is an open-source professional cloud storage platform. It is a reliable file storage that has advanced privacy protection features.
Seafile is a complete file sync and file share platform that is available for most OS such as Linux, Windows, Mac, etc. Also, you can consider Seafile as a great alternative to Dropbox and Nextcloud. Now follow the guide steps below on the Orcacore website to Install Seafile Server on Ubuntu 22.04.
Table of Contents
Complete Guide To Install Seafile Server with Apache and MariaDB on Ubuntu 22.04
Before you start to Install Seafile Server on Ubuntu 22.04, you must have access to your server as a non-root user with sudo privileges and set up a basic firewall. To do this, you can follow this guide on Initial Server Setup on Ubuntu 22.04.
Then, you need to install Apache and Create a virtual host file. For this purpose, you can visit this guide on Install Apache web server on Ubuntu 22.04.
Next, you need to have SSL configured with Let’s Encrypt. You can follow this guide on Secure Apache with Let’s Encrypt on Ubuntu 22.04.
When you are done with these requirements, follow the steps below to Install Seafile Server on Ubuntu 22.04.
Step 1 – MariaDB Configuration for Seafile Server on Ubuntu 22.04
At this point, you can use MySQL or MariaDB as your database server. In this guide, we use MariaDB. First, run the system update with the command below:
sudo apt updateThen, use the command below to install MariaDB on Ubuntu 22.04:
sudo apt install mariadb-server -yAlso, you must run the security script for MariaDB. To do this, run the following command set a password for your MariaDB and answer the other question by pressing Y.
sudo mysql_secure_installationCreate Seafile Server Databases
To Install Seafile Server on Ubuntu 22.04, you must create Seafile databases:
- ccnet server
- seafile server
- sea hub server
Login to your MariaDB shell with the command below:
sudo mysql -u root -pFrom your MariaDB shell, run the following commands to create the required Seafile databases:
MariaDB [(none)]> CREATE DATABASE seafiledb CHARACTER SET = 'utf8';
MariaDB [(none)]> CREATE DATABASE ccnetdb CHARACTER SET = 'utf8';
MariaDB [(none)]> CREATE DATABASE seahubdb CHARACTER SET = 'utf8';
Create Seafile Database User
To Install Seafile Server on Ubuntu 22.04, you must create a user database for Seafile and grant all the privileges for the created databases to it. To do this, you can use the following commands:
MariaDB [(none)]> CREATE USER 'orca'@'localhost' IDENTIFIED BY 'password';
MariaDB [(none)]> GRANT ALL PRIVILEGES ON seafiledb.* TO 'seafile'@'localhost';
MariaDB [(none)]> GRANT ALL PRIVILEGES ON ccnetdb.* TO 'seafile'@'localhost';
MariaDB [(none)]> GRANT ALL PRIVILEGES ON seahubdb.* TO 'seafile'@'localhost';
Then, exit from the MariaDB shell with the following commands:
MariaDB [(none)]> EXIT;Step 2 – Install Python Dependencies for Seafile Server
Seafile depends on Python and its modules. At this point, you must install Python and its required module to Install Seafile Server on Ubuntu 22.04. To do this, run the following commands:
# sudo apt install -y python3 python3-setuptools python3-pip libmysqlclient-dev memcached libmemcached-dev

# sudo pip3 install --upgrade pip

# sudo pip3 install --timeout=3600 django==3.2.* future==0.18.* mysqlclient==2.1.* \
    pymysql pillow==9.3.* pylibmc captcha==0.4 markupsafe==2.0.1 jinja2 sqlalchemy==1.4.3 \
    psd-tools django-pylibmc django_simple_captcha==0.5.* djangosaml2==1.5.* pysaml2==7.2.* pycryptodome==3.16.* cffi==1.15.1 lxml
Step 3 – Seafile Server Download on Ubuntu 22.04
To Install Seafile Server on Ubuntu 22.04, you must visit the Seafile download page and check for the latest release for the Seafile server. First, create a directory for your Seafile and switch to it. Then, use the following wget command to download the Seafile tar.gz package:
# mkdir seafile
# cd seafile
# wget https://download.seadrive.org/seafile-server_10.0.1_x86-64.tar.gz
When your download is completed, extract it:
tar -zxvf seafile-server_10.0.1_x86-64.tar.gzNow you just need to navigate to the Seafile server directory:
# cd seafile-server_10.0.1Step 4 – Install And Configure Seafile Server on Ubuntu 22.04
At this point, you can run the Seafile MySQL setup script to Install Seafile Server on Ubuntu 22.04:
bash setup-seafile-mysql.shYou will be asked to set a name for the Seafile server. Then, you should enter a valid domain name. For port usage, you can keep the default number by pressing enter.
Next, you need to choose a way to initialize seafile databases. Press 2 to use the existing database. For the MySQL server host and port number press enter to accept the default. Then, enter the Seafile user database name and password. Finally, enter the database name you have created.
When your configuration setup is completed, you will get the following output:
Output
-----------------------------------------------------------------
Your seafile server configuration has been finished successfully.
-----------------------------------------------------------------

run seafile server:     ./seafile.sh { start | stop | restart }
run seahub  server:     ./seahub.sh  { start <port> | stop | restart <port> }

-----------------------------------------------------------------
If you are behind a firewall, remember to allow input/output of these tcp ports:
-----------------------------------------------------------------

port of seafile fileserver:   8082
port of seahub: 8000Note: opening ports 8082 and 8000 in the firewall is not necessary, so you can ignore this part of the output.
Step 5 – Apache Configuration for Seafile on Ubuntu 22.04
In this part of the guide about Install Seafile Server on Ubuntu 22.04, you need to enable the proxy_http module in the Apache configuration. To do this, run the command below:
sudo a2enmod proxy_httpThen, open the Apache SSL virtual host file and update it:
sudo vi /etc/apache2/sites-enabled/your_domain-le-ssl.confAdd the highlighted content, beginning at Alias and ending with the ProxyPassReverse directive:
<IfModule mod_ssl.c>
<VirtualHost *:443>
    ServerAdmin admin@your_domain
    ServerName your_domain
    ServerAlias www.your_domain
    DocumentRoot /var/www/your_domain/html
    ErrorLog ${APACHE_LOG_DIR}/your_domain-error.log
    CustomLog ${APACHE_LOG_DIR}/your_domain-access.log combined

	SSLCertificateFile /etc/letsencrypt/live/your_domain/fullchain.pem
	SSLCertificateKeyFile /etc/letsencrypt/live/your_domain/privkey.pem
	Include /etc/letsencrypt/options-ssl-apache.conf

    Alias /media  /home/orca/seafile/seafile-server-latest/seahub/media
    <Location /media>
        Require all granted
    </Location>

    # seafile fileserver
    ProxyPass /seafhttp http://127.0.0.1:8082
    ProxyPassReverse /seafhttp http://127.0.0.1:8082
    RewriteEngine On
    RewriteRule ^/seafhttp - [QSA,L]

    # seahub web interface
    SetEnvIf Authorization "(.*)" HTTP_AUTHORIZATION=$1
    ProxyPass / http://127.0.0.1:8000/
    ProxyPassReverse / http://127.0.0.1:8000/
</VirtualHost>
</IfModule>
When you are done, save and close the file.
Check for Apache syntax error and restart the service to apply the changes:
# sudo apache2ctl configtest
# sudo systemctl restart apache2
Step 6 – Update Seafile Configuration files and Start the Services
In this part of the guide about Install Seafile Server on Ubuntu 22.04, you need to update the URLs in the Seafile configuration files in the conf directory. To do this, open the ccnet.conf directory:
sudo vi /home/orca/seafile/conf/ccnet.confAdd the service URL with your domain name in the file:
SERVICE_URL = https://your_domainSave and close the file.
Then, open the Seahub settings with the command below:
sudo vi /home/orca/seafile/conf/seahub_settings.pyAt the file specify the path where the file server is listening for file uploads and downloads.
SECRET_KEY = "..."
FILE_SERVER_ROOT = 'https://your_domain/seafhttp'
Save and close the file.
Now you can start the Seafile and Seahub services.
sudo ./seafile.sh start Output
Starting seafile server, please wait ...
** Message: 09:03:01.999: seafile-controller.c(621): No seafevents.
Seafile server started
Done.Then, you can start the Seahub (Django) web frontend service with the command below:
sudo ./seahub.sh start You need to set the Admin email and password for your Admin account.
Output
----------------------------------------
What is the email for the admin account?
[ admin email ] admin@orcacore.com

What is the password for the admin account?
[ admin password ]

Enter the password again:
[ admin password again ]


----------------------------------------
Successfully created seafile admin
----------------------------------------

Seahub is started

Done.
Step 7 – Access Seafile Server Admin Console via Web Interface
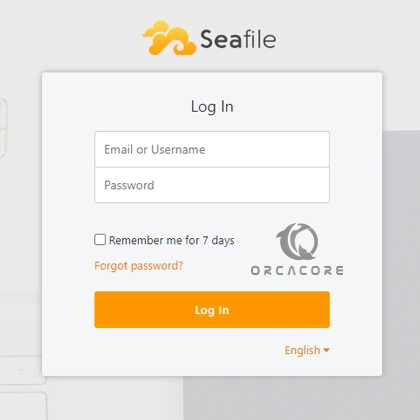
At this point, you have completed steps to Install Seafile Server on Ubuntu 22.04. Now you can access your Admin console by typing your domain name in your desired web browser:
https://your-domainYou will see the Seafile login screen on Ubuntu 22.04. Enter the email and password you provided for your Admin account and press login.
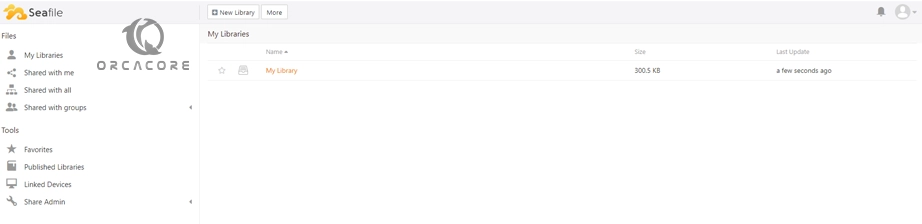
Then, you will see your private Seafile dashboard. From there there, you can easily share and store your data.
Conclusion
At this point, you have learned a Complete Guide To Install Seafile Server on Ubuntu 22.04 with Apache, MariaDB, and SSL configured with Let’s Encrypt. Access your Seafile Admin console and start using it.
Hope you enjoy using it. You may be interested in these articles:
Install Zenmap on Debian 12 Linux Terminal
Fail2ban Installation on Debian 12 Bookworm
FAQs
Is Seafile Free To Use?
You can use Seafile for free through its community edition. Also, you can choose the Professional Edition, which is free for 3 users and has a yearly subscription for more users.
What are the Seafile Features?
Seafile is a complete cloud storage software that has amazing features including:
File Sync
-Multi-Platform
-Isolated file libraries
-Team Collaboration
-Support for Amazon S3
-Virtual hard drive
-Install Syslinux
-Sync Network Drive
-Development API
-Encrypted sync