Share your love
Install and Use Zsh Autosuggestions Plugin: 3 Easy Steps

This guide intends to teach you to Install and Use Zsh Autosuggestions Plugin on Linux. Zsh or Z shell is a Linux and Unix-based shell environment. It has incredible plugging support, making it more customizable than other shell tools. And because of its improved features, it is a fast shell.
Also, using the Oh My Zsh framework you can install different plugins and themes. One of the most useful plugins is Zsh Autosuggestions. It will used for suggesting commands based on your history and the commands you run.
In this guide from the Orcacore website, we want to show you how you can easily install and use autosuggestions plugin.
Table of Contents
Steps To Install and Use Zsh Autosuggestions Plugin
Before you start your Zsh autosuggestions plugin, you need some requirements. You must have Zsh and Oh My Zsh framework installed on your Linux server. For this purpose, you can visit this guide on Install Zsh and Oh My Zsh on Linux from the Command Line.
When you are done, follow the steps below to Install and Use Zsh Autosuggestions Plugin.
Step 1 – Download the Autosuggestions Plugin via GitHub
To install the autosuggestions plugin, you can clone it via the Oh My Zsh Git repository.
Here we assumed that you have installed and started your Oh My Zsh framework. From there, run the following command to clone the zsh-autosuggestions plugin:
git clone https://github.com/zsh-users/zsh-autosuggestions ${ZSH_CUSTOM:-~/.oh-my-zsh/custom}/plugins/zsh-autosuggestions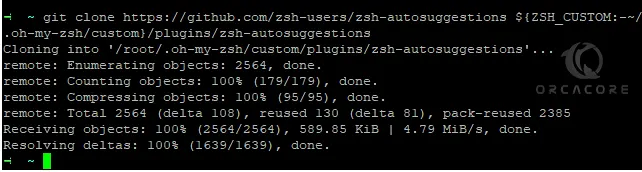
This command will add the autosuggestion repository to the plugin’s directory.
Step 2 – Enable the Zsh-Autosuggestions Plugin
At this point, you must enable your plugin by adding it to your ~/.zshrc file. Open the file with your favorite text editor, We use the Vi Editor:
vi ~/.zshrcAt the file, search for the Plugins section. It should look like this:
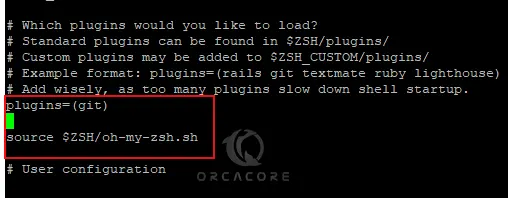
Then, add the following autosuggestions plugin under the section:
plugins=(git)
plugins=(
    zsh-autosuggestions
)
source $ZSH/oh-my-zsh.sh
Your file should look like this:
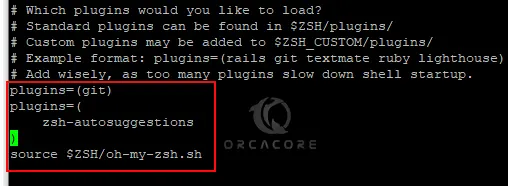
When you are done, save and close the file.
Now your autosuggestions plugin has been installed on your server.
Step 3 – Using the Zsh Autosuggestions Plugin
At this point, you must close the terminal and run it again. Your plugin now is enabled and you can start using it.
The usage of it is so simple and easy. Whenever you type a command in the terminal, the plugin will suggest a complete command. To accept the suggestion enter the right-arrow key. To ignore the suggestion press the down-arrow key.
That’s it, you are done.
Conclusion
At this point, you have learned to Install and Enable the Autosuggestions Plugin for Zsh and start using it in your terminal. It is easy to use and you can accept or ignore the suggestions by using the arrow keys.
Hope you enjoy it. You may be interested in these articles:
Install build-essential on Ubuntu 22.04