Share your love
Plex Media Server Setup on Debian 12 – Full and Easy Steps

This guide intends to teach you Plex Media Server Setup on Debian 12 Command Line. Plex Media Server is a multimedia streaming and management platform designed to organize, access, and stream different types of media content across different devices. It allows users to centralize their media collection, including movies, TV shows, music, photos, and videos, and then access them remotely from any compatible device with an internet connection.
In this guide from the Orcacore website, you will learn Plex Media Server Setup on Debian 12 From the Terminal Command Line.
Table of Contents
A Comprehensive Guide For Plex Media Server Setup on Debian 12 Command Line
Before you start the Plex setup on Debian 12, you must access your server as a non-root user with sudo privileges and set up a basic firewall. For this purpose, you can check the Debian 12 Initial Setup Guide.
Then, follow the steps below to start the Plex Media Server Setup on Debian 12.
Step 1 – Add Plex Repository To Debian 12
First, you must add the Plex Media server repository to your Debian 12. To do this, you need to run the system update and install some required packages:
# sudo apt update
# sudo apt install dirmngr ca-certificates software-properties-common apt-transport-https curl -y
Then, use the following commands to add the Plex GPG key and repository on Debian 12:
# curl https://downloads.plex.tv/plex-keys/PlexSign.key | sudo apt-key add -

# echo deb https://downloads.plex.tv/repo/deb public main | sudo tee /etc/apt/sources.list.d/plexmediaserver.list
Step 2 – Install Plex Server on Debian 12 From Terminal
At this point, run the system update and install the Plex media server:
# sudo apt update
# sudo apt install plexmediaserver
Step 3 – Start and Enable Plex Server on Debian 12
Once you have installed the Plex media server, it must be enabled and activated. To verify it, you can run the command below:
sudo systemctl status plexmediaserver
If your service is not activated, you can run the commands below:
# sudo systemctl start plexmediaserver
# sudo systemctl enable plexmediaserver
Step 4 – Configure Firewall Rules and SSH Access For Plex Media Server
By default, Plex listens on port 32400. So you must allow Plex port through your UFW firewall on Debian 12:
sudo ufw allow 32400Then, reload the firewall to apply the new rules:
sudo ufw reloadNote: To get more info about the UFW firewall, you can check the UFW configuration on Debian 12.
If you are using SSH instead of the Debian 12 desktop, you must set up an SSH tunnel to access your Plex media server. To do this, install and enable SSH with the commands below:
# sudo apt install openssh-server -y
# sudo systemctl enable ssh
Then, use the command below with your Server’s IP address to enable the SSH access:
sudo ssh {server-ip-address} -L 8888:localhost:32400
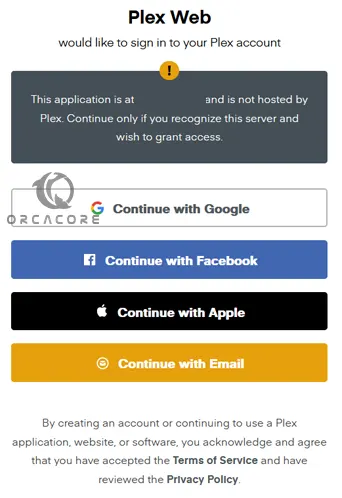
Step 5 – Access Plex Media Server Web UI
At this point, you can access your Plex media server app via the web interface by typing:
http://localhost:8888/web
Or
localhost:32400/web/index.html#!/setup
If you are using SSH, you can use the following URL address:
http://{server-ip-address}:32400At this point, you can log in to your Plex Media Server dashboard with an existing account or create a new one.
After you sign in to your account, you will see your dashboard and from there you can easily manage your digital media.
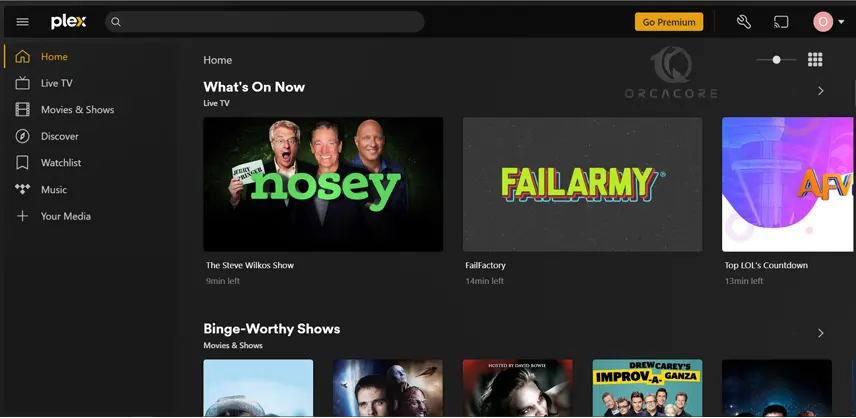
As you can see, you can install and use the Plex Media server for free. But it doesn’t have all the features. To access and use it completely, you can make it premium.
Conclusion
In conclusion, Plex Media Server provides a comprehensive solution for managing and enjoying multimedia content. At this point, you have learned Plex Media Server Setup on Debian 12 Command Line.
Hope you enjoy it. Also, you may like to read the following articles:
SVN Server (Apache Subversion) Setup on Debian 12