Share your love
Learn SFTP Server Setup on Debian 12

In this guide, you will learn SFTP Server Setup on Debian 12. SFTP is a secure file transfer protocol that enables users to transfer files securely over a network. It is an extension of the SSH protocol. It is suitable for secure data transmission over potentially untrusted networks such as the Internet. Now you can follow the rest of the article to start your SFTP installation and configuration on Debian 12. Also, you will learn to test it from your server to check if it is working correctly.
- Step-by-step Guide for SFTP Server Setup on Debian 12
- Step 1 - Verify SSH Installation on Debian 12
- Step 2 - Adding SFTP User and Group on Debian 12
- Step 3 - SFTP File Transfer Setup - Chroot Directory
- Step 4 - Access the SFTP Server on Debian 12
- Step 5 - Uninstall SFTP From Debian 12
- Final Words on SFTP Server Setup
Step-by-step Guide for SFTP Server Setup on Debian 12
First, you must log in to your server as a non-root user with sudo privileges. For this purpose, you can check the Debian 12 Initial Setup guide.
Then, follow the steps below to complete this guide.
Step 1 – Verify SSH Installation on Debian 12
As you know, SFTP is an extension of SSH. By default, SSH service must be installed and enabled on your Debian 12. To verify this, you can run the command below:
sudo systemctl status sshExample Output:

If you don’t have SSH installed on your server, you can use the following commands to install and enable it on Debian 12:
# sudo apt install ssh -y
# sudo systemctl start ssh
# sudo systemctl enable ssh
Step 2 – Adding SFTP User and Group on Debian 12
At this step, you must create an SFTP group on your server. To do this, you can run the command below:
sudo addgroup sftpOutput
Adding group `sftp' (GID 1000) ...
Done.Then, you must create an SFTP user and set a password for it. To do this, run the following commands:
# sudo useradd orca
# sudo passwd orca
Output
New password:
Retype new password:
passwd: password updated successfullyNext, you need to add your user to the SFTP group on Debian 12 with the following command:
sudo usermod -a -G sftp orcaVerify your SFTP group details by using the following command:
grep sftp /etc/groupOutput
sftp:x:1000:orcaAs you can see, your SFTP user and group have been successfully configured. Now follow the steps below to configure your SFTP Chroot directory on Debian 12.
Step 3 – SFTP File Transfer Setup – Chroot Directory
At this point, you need to have a directory that the users can access instead of accessing the entire machine. To create the directory under /var/sftp/, run the command below:
sudo mkdir -p /var/sftp/DocumentHere we created the Document directory.
Then, you need to set the correct permission and ownership with the root user for the /var/sftp directory:
# sudo chown root:root /var/sftp
# sudo chmod 755 /var/sftp
Next, you need to allow access to the SFTP directory to the SFTP user. In this case, our directory is Document and the user is Orca:
sudo chown orca:orca /var/sftp/DocumentFinally, you need to edit your SSH config file and make some configuration changes for the SFTP server. To do this, you can use your desired text editor like Vi editor or Nano editor:
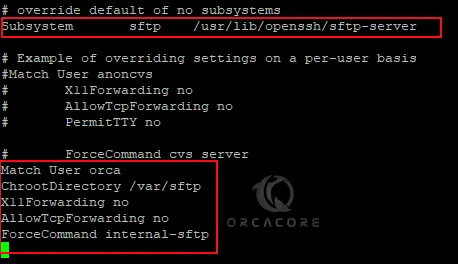
sudo vi /etc/ssh/sshd_configAt the end of the file, find the line starting with Subsystem SFTP and add the following content under it:
Match User orca
ChrootDirectory /var/sftp
X11Forwarding no
AllowTcpForwarding no
ForceCommand internal-sftp
The file should look like this:

When you are done, save and close the file.
To apply the changes, restart the SSH service:
sudo systemctl restart sshStep 4 – Access the SFTP Server on Debian 12
At this point, you can use SSH to connect to the user you have created by using the command below:
ssh orca@localhostIt is just for testing. So you should see the message: This service allows sftp connections only.

Also, you can connect to your SFTP server by using the loopback address to check if it is working correctly. To do this, run the command below:
sftp orca@127.0.0.1Press yes to continue the connection. Enter your SFTP user’s password. Then, you will see your SFTP shell. You can verify the directories you have access to:

As you can see your SFTP server is working correctly. Now you can start to transfer and manage your file securely.
Step 5 – Uninstall SFTP From Debian 12
As you know, SFTP is an extension of SSH service. To uninstall SFTP, you must remove SSH from your server. To do this, you can run the following command:
sudo apt purge ssh -yThis will remove your SFTP package and its data.
Final Words on SFTP Server Setup
Setting up an SFTP server provides a powerful solution for secure file transfer needs within your organization or personal environment. With an SFTP server, you will be sure that sensitive data is transmitted securely over networks, protecting it from unauthorized access and interception.
At this point, you have learned the SFTP Server Setup on Debian 12 and tested it from your server to check if it is working correctly. Hope you enjoy it.
Also, you may like to read the following articles:
Set up SFTP Server on AlmaLinux 9
3 Ways to Transfer Files from Linux Server to Local Machine
Efficiently backup and restore data on Linux with restic


