Share your love
Set up SFTP Server on AlmaLinux 9 with Easy Steps
This guide intends to show you how to Set up SFTP Server on AlmaLinux 9. Businesses that use SFTP can securely transfer information like billing data, funds, and data recovery files. It builds on File Transfer Protocol (FTP) software uses the secure shell (SSH) protocol to transfer files and requires the client to be authenticated by the server for enhanced security elements.
No matter what kind of file sharing is taking place, to ensure that all passwords and sensitive information are kept secure, SFTP commands and data are encrypted so that nothing is exposed to the network in plain text. You can now follow the guide steps on the Orcacore website to Set up SFTP Server on AlmaLinux 9.
Table of Contents
Steps To Set up SFTP Server on AlmaLinux 9
To Set up SFTP Server on AlmaLinux 9, you must log in to your server as a non-root user with sudo privileges. To do this, you can follow our guide on Initial Server Setup with AlmaLinux 9.
1. Install SSH For SFTP Setup on AlmaLinux 9
You should have SSH installed on your server to set up the SFTP server. First, update your local package index with the command below:
sudo dnf update -yThen, use the following command to install SSH:
sudo dnf install openssh-server -yStart and Enable SSH Service
When your installation is completed, use the commands below to start and enable the SSH service to start on boot:
# sudo systemctl start sshd
# sudo systemctl enable sshd
Verify your SSH service is active and running on AlmaLinux 9:
sudo systemctl status sshd
2. Configure SFTP User Account on AlmaLinux 9
At this point, you need to create a group for the SFTP to grant some mutual permissions to a group of users.
First, create a group named “sftp” by using the command below: You can choose your desired name.
sudo groupadd sftpThen, create a user who will have the same privileges as the group. To do this, run the command below: You can choose your desired name.
sudo useradd orcaVerify that your user has been created by using the command below:
less /etc/passwd | grep orcaOutput
orca:x:1000:1001::/home/orca:/bin/bashThen, create a password for your user by using the following command:
sudo passwd orcaOutput
Changing password for user orca.
New password:
Retype new password:
passwd: all authentication tokens updated successfully.Now you need to add your user to the SFTP group on AlmaLinux 9:
sudo usermod -a -G sftp orcaAt this point, verify the SFTP’s group details by using the command below:
grep sftp /etc/groupOutput
sftp:x:1000:orcaAs you can see from the output, user orca is added successfully to the SFTP group.
3. Configure a Transfer File for SFTP on AlmaLinux 9
At this point, you need to have a directory that the users can access instead of accessing the entire machine.
To create the directory under /var/sftp/ run the command below:
sudo mkdir -p /var/sftp/DocumentSet the ownership of the above directory to the root user by using the following command:
sudo chown root:root /var/sftpAlso, set the correct permissions for it:
sudo chmod 755 /var/sftpAt this point, you need to allow access to the “Documents” directory to the SFTP user (orca):
sudo chown orca:orca /var/sftp/DocumentNow you need to edit the SSH configuration file. Open the file with your favorite text editor, here we use the vi editor:
sudo vi /etc/ssh/sshd_configFind the Subsystem sftp /usr/lib/openssh/sftp-server line and the following content under it:
Subsystem sftp  /usr/libexec/openssh/sftp-server

# Example of overriding settings on a per-user basis
#Match User anoncvs
#       X11Forwarding no
#       AllowTcpForwarding no
#       PermitTTY no
#       ForceCommand cvs server
Match User orca
ChrootDirectory /var/sftp
X11Forwarding no
AllowTcpForwarding no
ForceCommand internal-sftp
When you are done, save and close the file.
Restart SSH, to apply the changes:
sudo systemctl restart sshd4. Login to SFTP Server on AlmaLinux 9
First, connect to the user orca using the SSH service only for testing purposes:
ssh orca@localhost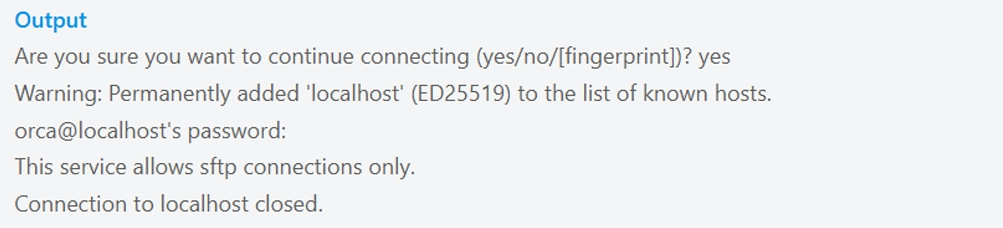
To test from the same system as the one you just configured SFTP on, connecting to the loopback address 127.0.0.1 will work just fine.
sftp orca@127.0.0.1
At this point, list down the directories of SFTP by using the command below:
sftp> ls
Document
To exit from the SFTP Server, just run the exit command.
sftp> exit5. Uninstall SFTP From AlmaLinux 9
At this point, if you want to remove the SFTP from your server, you can easily delete the SSH with all its associated files:
sudo dnf remove openssh-server -yThis command will remove SFTP and all of its data.
Conclusion
At this point, you have learned to Set up SFTP Server on AlmaLinux 9. SFTP Setup on AlmaLinux 9 is an essential tool for securely managing files on remote servers, especially when handling sensitive data or performing administrative tasks.
Hope you enjoy SFTP setup on AlmaLinux 9. Please subscribe to us on Facebook, Twitter, and YouTube.
Also, you may interested in these articles:
Install and Configure Laravel on AlmaLinux 9
Install and Configure Fail2ban on AlmaLinux 9