Share your love
Install and Configure Laravel on AlmaLinux 9 with Best Steps
In this guide, we want to show you how to install and Configure Laravel on AlmaLinux 9 with LEMP Stack. Also, you will learn to Secure the Laravel application on your AlmaLinux 9. Laravel is a free, open-source PHP web framework used for web application development. Follow the guide steps below on the Orcacore website to get familiar with Laravel and start the installation steps on AlmaLinux 9.
Table of Contents
Laravel PHP Web Framework Introduction
It is based on the MVC (Model-View-Controller) architectural pattern and aims to make the development process faster and more efficient by providing a set of tools and resources for building web applications.
Laravel is known for its elegant syntax and comprehensive toolkit, which includes tools for routing, authentication, caching, and more.
Many developers use Laravel for its ability to help them quickly develop robust and scalable web applications. Laravel is a backend web framework, meaning it is used for developing the back-end or server-side of web applications.
Laravel is written in PHP and is used to build web applications that run on a web server. It is not used for developing the front-end or client-side of web applications, which is typically handled by JavaScript frameworks like Vue.js or React.
Steps To Install and Configure Laravel on AlmaLinux 9
To Install and Configure Laravel on AlmaLinux 9, you need some requirements. Let’s see what we need.
1. Requirements For Laravel Setup
First, you need to log in to your server as a root or non-root user with sudo privileges and set up a basic firewall. To do this, you can follow our article the Initial Server Setup with AlmaLinux 9.
Then, you need to have the LEMP installed on your server. For this, you can follow the article How To Install LEMP Stack on AlmaLinux 9.
Also, you need a domain name that is pointed to your server’s IP address.
When you are done with these requirements, you can follow the steps below to complete this guide.
2. Configure PHP For Laravel Framework
First, you need to install some PHP extensions and required packages on your server with the command below:
dnf install php-common php-xml php-mbstring php-json php-zip curl unzip -yThen, you need to edit the PHP-FPM configuration file and open the file with your favorite text editor, here we use the vi editor:
vi /etc/php-fpm.d/www.confFind the lines below and uncomment them by removing the “;” from the beginning of the line and changing them to the Nginx:
listen.owner = nginx
listen.group = nginx
When you are done, save and close the file.
Next, you need to edit the php.ini configuration file:
vi /etc/php.iniAnd change the following lines. Set your own time zone, and uncomment them by removing the “;” from the beginning of the line:
date.timezone = America/New_York
cgi.fix_pathinfo=1
When you are done, save and close the file.
3. Install Composer For Laravel
In this guide, you will install Laravel by using the composer. So you need to install Composer on AlmaLinux 9 with the command below:
curl -sS https://getcomposer.org/installer | phpWhen your installation is completed, you will get the following output:
Output
All settings correct for using Composer
Downloading...

Composer (version 2.5.4) successfully installed to: /root/composer.phar
Use it: php composer.phar
Now you need to move the Composer binary to the system path:
mv composer.phar /usr/local/bin/composerThen, set the correct permissions for it:
chmod +x /usr/local/bin/composerVerify your Composer installation by checking its version:
composer --versionOutput
Composer version 2.5.4 2023-02-15 13:10:064. Install Laravel on AlmaLinux 9
At this point, you can start to install Laravel on your server.
First, switch to the Nginx web root directory:
cd /var/www/html/Then, install Laravel by using the Composer:
composer create-project --prefer-dist laravel/laravel laravelWhen your installation is completed, you will get the following output:
Output
   INFO  Application key set successfully.
Then, use the following commands to set the correct permissions and ownership to Laravel:
# chown -R nginx:nginx /var/www/html/laravel/
# chown -R nginx:nginx /var/www/html/laravel/storage/
# chown -R nginx:nginx /var/www/html/laravel/bootstrap/cache/
# chmod -R 0777 /var/www/html/laravel/storage/
# chmod -R 0775 /var/www/html/laravel/bootstrap/cache/
5. Create an Nginx VirtualHost for Laravel
At this point, you need to create an Nginx configuration file for Laravel, here we use vi:
vi /etc/nginx/conf.d/laravel.confAdd the following content to the file, remember to replace the domain name with your own:
server {
       listen 80;
       server_name domain-name;
       root        /var/www/html/laravel/public;
       index       index.php;
       charset utf-8;
       gzip on;
	gzip_types text/css application/javascript text/javascript application/x-javascript  image/svg+xml text/plain text/xsd text/xsl text/xml image/x-icon;
        location / {
        	try_files $uri $uri/ /index.php?$query_string;
        }

        location ~ \.php {
                include fastcgi.conf;
                fastcgi_split_path_info ^(.+\.php)(/.+)$;
                fastcgi_pass unix:/run/php-fpm/www.sock;
        }
        location ~ /\.ht {
                deny all;
        }
}
When you are done, save and close the file.
Then, verify Laravel for any configuration error on AlmaLinux 9:
nginx -tOutput
nginx: the configuration file /etc/nginx/nginx.conf syntax is ok
nginx: configuration file /etc/nginx/nginx.conf test is successfulTo apply the changes, restart Nginx and PHP-FPM:
# systemctl restart php-fpm
# systemctl restart nginx
6. Configure Firewall For Laravel Framework
Next, you need to allow ports 80 and 443 through the firewall. To do this, run the commands below:
# firewall-cmd --zone=public --permanent --add-service=http
# firewall-cmd --zone=public --permanent --add-service=https
Reload the firewall, to apply the new rules:
firewall-cmd --reload7. Access Laravel Framework Web Interface
At this point, you can access your Laravel through the web interface by typing your domain name or server’s IP address:
http://domain-nameYou will see the following screen:
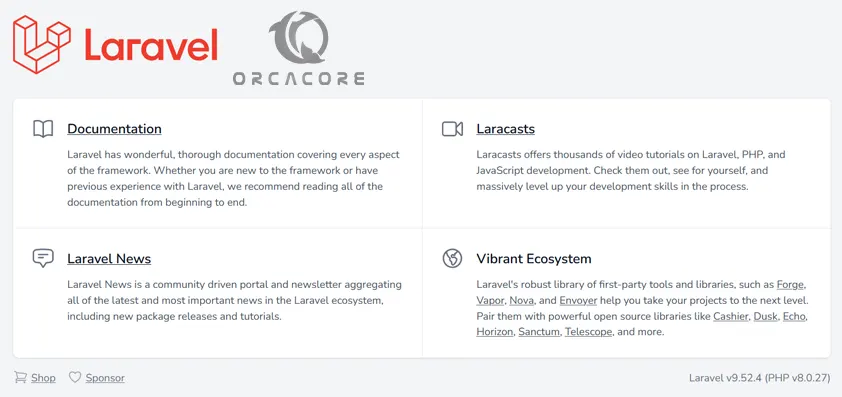
8. Secure Laravel Application with Let’s Encrypt
It is recommended to enable SSL on the Laravel website to secure the connection. Let’s Encrypt provides a free SSL to obtain, renew, and manage SSL/TLS certificates for your domain.
First, install the Certbot client on AlmaLinux 9 with the following commands:
# dnf install epel-release -y
# dnf install certbot python3-certbot-nginx -y
Then, run the following command to download Let’s Encrypt SSL for your Laravel domain:
certbot --nginx -d domain-nameYou will be asked to provide your valid email and accept the terms of service.
When the certificate has been installed, you should see the following output:

At this point, your Laravel website is secured with Let’s Encrypt SSL on AlmaLinux 9.
You can now access it securely using the URL below:
https://domain-nameSet up Auto-renewal for Laravel SSL certificates
Let’s Encrypt certificates are valid for 90 days, but it’s recommended that you renew the certificates every 60 days.
You can test automatic renewal for your certificates with the following command:
sudo certbot renew --dry-runYour output should be similar to this:

Also, it is safe to create a cron job that runs every week or even every day.
To edit the crontab for the root user run the following command:
sudo crontab -eThen, add the following line to the empty file:
0 0,12 * * * python -c 'import random; import time; time.sleep(random.random() * 3600)' && certbot renew --quietWhen you are done, save and close the file with the “:wq”.
Conclusion
At this point, you have learned to Install and Configure Laravel on AlmaLinux 9. Also, you have learned to Secure Laravel by using Let’s Encrypt on AlmaLinux 9.
Hope you enjoy it. You may also like the following articles:
OpenCV Installation on AlmaLinux 9
Arpwatch command on AlmaLinux 9
Lighttpd Web Server AlmaLinux 9