Share your love
Best Steps To Set up Anaconda on Rocky Linux 8

In this tutorial, we want to show you how to Set up Anaconda on Rocky Linux 8. Anaconda is an open-source distribution of the Python and R programming languages for data science that aims to simplify package management and deployment. Package versions in Anaconda are managed by the package management system, conda, which analyzes the current environment before executing an installation to avoid disrupting other frameworks and packages.
Now follow the guide steps below on the Orcacore website to set up Anaconda Python on Rocky Linux 8.
Table of Contents
Steps To Set up Anaconda on Rocky Linux 8
To set up Anaconda Python, you must log in to your server as a non-root user with sudo privileges. To do this, you can follow our guide on Initial Server Setup with Rocky Linux 8.
1. Install Python 3 on Rocky Linux 8
To Set up Anaconda on Rocky Linux 8, you need to install Python 3 on your server.
First, update your local package index with the command below:
sudo dnf update -yThen, use the command below to install Python 3:
sudo dnf install python3 -yVerify your Python installation by checking its version:
python3 --versionOutput
Python 3.6.82. Install Anaconda on Rocky Linux 8
First, you need to visit the Anaconda Downloads Page, and from the Linux section, copy the link address of the Anaconda installer.
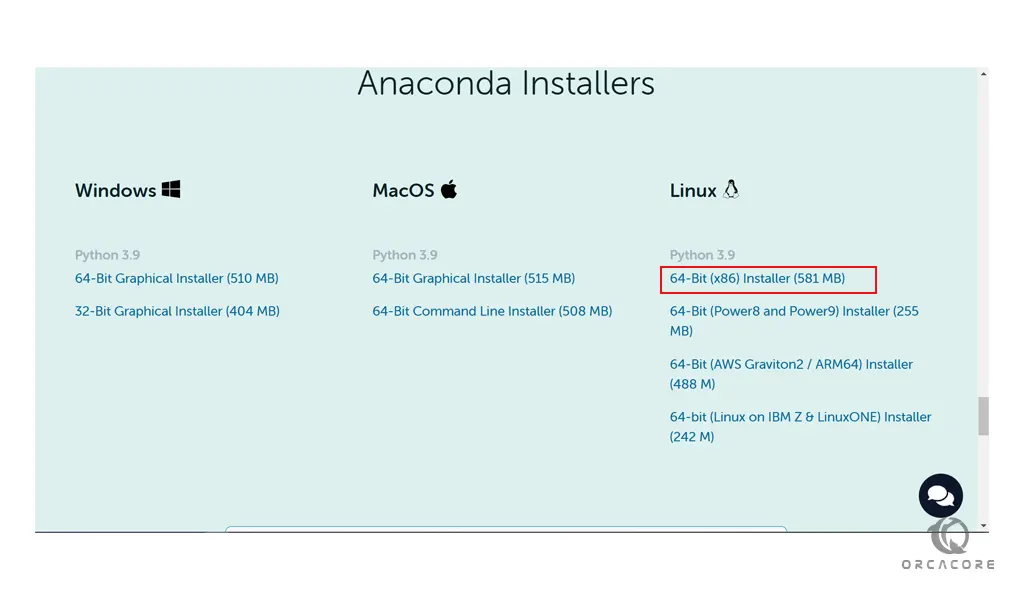
Download Anaconda Installer
Then, use the wget command to download the Anaconda installer on Rocky Linux 8.
The file should be saved to the Downloads directory. Or you can choose the other locations.
sudo wget -P ~/Downloads https://repo.anaconda.com/archive/Anaconda3-2022.10-Linux-x86_64.shAt this point, switch to your Downloads directory:
cd ~/DownloadsHere you can verify Anaconda download integrity on Rocky Linux 8 with the command below:
sha256sum Anaconda3-2022.10-Linux-x86_64.shIn your output, you will see something similar to this:

You can compare this with the hashes on the Anaconda hashes web page. If the codes match, that means the software is authentic and ready to be used.
Install Anaconda
From your Downloads directory, run the command below to Set up Anaconda on Rocky Linux 8:
sudo bash Anaconda3-2022.10-Linux-x86_64.shYou will be asked to review the license agreement. Press Enter, then use Enter or the Spacebar to scroll through the agreement. In the end, type yes to agree to the license.
Also, you’ll be asked to confirm Anaconda’s installation directory. Use the default directory by pressing Enter.
Then, you will be asked to initialize Anaconda with conda init. Press yes and Enter.
When your installation is completed you will get the following output:

Note: Do not install in the /usr directory. When the installation finishes, this time, you won’t be prompted to initialize Anaconda. Instead, enter the following commands:
source <anaconda_installation_location>/bin/activateconda initAt this point, you need to reboot your server. After that, you can verify your Anaconda installation on Rocky Linux 8 with the following command:
conda info
Load Anaconda Python Shell
At this point, you can load the Python programming shell by using the command below:
pythonYour command prompt will change to this:
Python 3.9.13 (main, Aug 25 2022, 23:26:10)
[GCC 11.2.0] :: Anaconda, Inc. on linux
Type "help", "copyright", "credits" or "license" for more information.
>>>
To exit from the Python shell, run the command below:
quit()3. Update Anaconda on Rocky Linux 8
To update your Anaconda service, you need to first update the conda with the command below:
conda update condaConda is a package manager for the Anaconda Python environment. It’s always best to update your package manager before installing updates.
Then, use the following command to update Anaconda on Rocky Linux:
conda update anaconda4. Uninstall Anaconda
If you want to remove Anaconda from your Rocky Linux 8, you need to install the removal software with the command below:
conda install anaconda-cleanWhen your installation is completed, you can uninstall Anaconda from your server with the command below:
anaconda-clean ––yesConclusion
At this point, you have learned to Set up Anaconda Python on Rocky Linux 8. You need to be sure that you have Python installed on your server, then, download the official installer and install your Anaconda.
Hope you enjoy it. Also, you may interested in these articles: