Share your love
How To Set up Netdata on Centos 7

In this article, we want to teach you How To Set up Netdata on Centos 7.
Netdata is an open-source tool designed to collect real-time metrics, such as CPU usage, disk activity, bandwidth usage, website visits, etc., and then display them in live, easy-to-interpret charts.
The tool is designed to visualize activity in the greatest possible detail, allowing the user to obtain an overview of what is happening and what has just happened in their system or application.
Set up Netdata on Centos 7
Before you start to install Netdata on Centos 7, you need some requirements first.
Requirements
You need to log in to your server as a non-root user with sudo privileges. To do this, you can follow our article the Initial Server Setup with Centos 7.
Also, you need to set up a basic firewall with firewalld. For this, you can check our article Set up a Firewall with firewalld on Centos 7.
Now you can follow the steps below to install Netdata on Centos 7.
Installing Netdata on Centos 7
At this point, we install Netdata from Github. First, update your local package index with the command below:
sudo yum update -y
Next, install the Epel release repo with the command below:
sudo yum install epel-release
Then, you need to install some required packages on Centos 7 with the following command:
sudo yum install autoconf automake curl gcc git libmnl-devel libuuid-devel openssl-devel libuv-devel lz4-devel Judy-devel elfutils-libelf-devel make nc pkgconfig python zlib-devel cmake
Now clone the Netdata from Git on Centos 7 with the following command:
sudo git clone https://github.com/netdata/netdata.git --depth=100
Here you need to switch to the Netdata directory with the command below:
cd netdata/
May you need these requirements for the Netdata installation:
sudo yum install autoconf-archive autogen libuv-devel
sudo ./packaging/installer/install-required-packages.sh --non-interactive --dont-wait netdataNow Run the script on Centos 7 to build and install Netdata with the following command:
sudo ./netdata-installer.sh
When your installation is completed, in your output you will see:
Output
 --- We are done! ---
  ^
  |.-.   .-.   .-.   .-.   .-.   .  netdata                          .-.   .-
  |   '-'   '-'   '-'   '-'   '-'   is installed and running now!  -'   '-'
  +----+-----+-----+-----+-----+-----+-----+-----+-----+-----+-----+-----+--->

  enjoy real-time performance and health monitoring...
Here you need to start your Netdata on Centos 7 with the command below:
sudo systemctl start netdataIf you want to start your service at boot, run the following command:
sudo systemctl enable netdataCheck that your Netdata is active and running on Centos 7 with the command below:
sudo systemctl status netdataIn your output you will see:
Output
netdata.service - Real time performance monitoring
Loaded: loaded (/usr/lib/systemd/system/netdata.service; enabled; vendor preset: disabled)
Active: active (running) since Thu 2021-12-30 02:17:59 EST; 2min 58s ago
Main PID: 2627 (netdata)
CGroup: /system.slice/netdata.service
├─2627 /usr/sbin/netdata -P /var/run/netdata/netdata.pid -D
├─2642 /usr/sbin/netdata --special-spawn-server
├─2781 /usr/bin/python /usr/libexec/netdata/plugins.d/python.d.plu...
├─2783 bash /usr/libexec/netdata/plugins.d/tc-qos-helper.sh 1
├─2790 /usr/libexec/netdata/plugins.d/apps.plugin 1
├─2793 /usr/libexec/netdata/plugins.d/ebpf.plugin 1
└─2796 /usr/libexec/netdata/plugins.d/go.d.plugin 1
Configure Firewall
By default, Netdata listens on port 19999. We assumed that you have enabled firewalld from the requirements.
Now you need to open the Netdata port through the Centos 7 firewall with the following command:
sudo firewall-cmd --permanent --add-port=19999/tcp
Then, reload the firewall to apply the new rules:
sudo firewall-cmd --reloadAccess Netdata Web Interface
At this point, you can access the Nedata web interface on Centos 7 by typing your Server’s IP address in your web browser followed by 19999:
http://server-ip-address:19999/
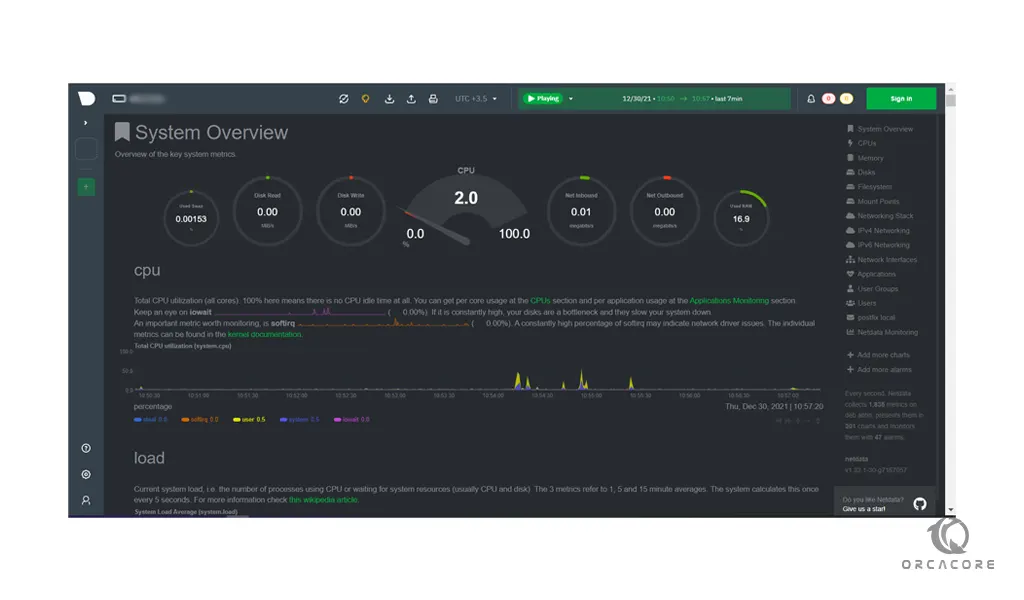
You will see your Netdata dashboard:
Conclusion
At this point, you learn to install Netdata on Centos 7.
Hope you enjoy using it.
May you will be interested in these articles: