Share your love
How To Set up VNC on Ubuntu 20.04

In this article, we want to teach you How To Set up or Install VNC Server on Ubuntu 20.04.
VNC stands for Virtual Network Computing. It is a cross-platform screen-sharing system that was created to remotely control another computer. This means that a computer’s screen, keyboard, and mouse can be used from a distance by a remote user from a secondary device as though they were sitting right in front of it.
VNC works on a client/server model. A server component is installed on the remote computer (the one you want to control), and a VNC viewer, or client, is installed on the device you want to control. This can include another computer, a tablet, or a mobile phone. When the server and viewer are connected, the server transmits a copy of the remote computer’s screen to the viewer.
Steps To Set up VNC on Ubuntu 20.04
Before you start to set up VNC, you need to log in to your server as a non-root user with sudo privileges and set up a basic firewall. To do this, you can follow our article the Initial Server Setup with Ubuntu 20.04.
Now follow the steps below to complete this guide.
Install Xfce Desktop Environment on Ubuntu 20.04
First, you need to update your local package index with the command below:
sudo apt update
Then, you need to install the latest Xfce and xfce4-goodies packages on your server with the command below:
sudo apt install xfce4 xfce4-goodies
During your installation, you will be asked to choose a default display manager for Xfce.
You can select either one and press enter.
Install VNC Server on Ubuntu 20.04
Next, install the TightVNC server with the command below:
sudo apt install tightvncserver
At this point, you need to set a VNC access password and create the configuration files on Ubuntu 20.04.
To do this, run the following command:
vncserver
You will be asked to enter and verify a password.
Then, you’ll have the option to create a view-only password. Press n to continue.
Output
Would you like to enter a view-only password (y/n)? n
xauth:  file /home/olivia/.Xauthority does not exist

New 'X' desktop is your_hostname:1

Creating default startup script /home/olivia/.vnc/xstartup
Starting applications specified in /home/olivia/.vnc/xstartup
Log file is /home/olivia/.vnc/your_hostname:1.log
Here your VNC server is installed on your Ubuntu 20.04. Let’s see how to configure it.
Configure VNC Server on Ubuntu 20.04
The VNC server needs to know which commands to run when it starts up. Specifically, VNC needs to know which graphical desktop environment it should connect to.
First, you need to stop the VNC server that is running on port 5901 with the command below:
vncserver -kill :1
You will get the following output with a different ID:
Output
Killing Xtightvnc process ID 27235
The commands that the VNC server runs at startup are located in a configuration file called xstartup in the .vnc folder under your home directory. The startup script was created when you ran the vncserver command in the previous step, but you’ll create your own to launch the Xfce desktop.
At this point, you need to back up the original file with the command below:
mv ~/.vnc/xstartup ~/.vnc/xstartup.bak
Then, create a new xstartup file with your favorite text editor, here we use vi:
vi ~/.vnc/xstartup
Add the following line to the file:
#!/bin/bash
xrdb $HOME/.Xresources
startxfce4 &
When you are done, save and close the file.
Set the correct permissions to the file:
chmod +x ~/.vnc/xstartup
Next, restart the VNC server on Ubuntu 20.04:
vncserver -localhost
You will get the following output:
Output
New 'X' desktop is your_hostname:1

Starting applications specified in /home/olivia/.vnc/xstartup
Log file is /home/olivia/.vnc/your_hostname:1.log
At this point, you are ready to connect to the VNC server from your local machine.
Secure Connection To the VNC Desktop
VNC itself doesn’t use secure protocols when connecting. To securely connect to your VNC server on Ubuntu 20.04, you’ll establish an SSH tunnel and then tell your VNC client to connect using that tunnel rather than making a direct connection.
To do this, run the command below via the terminal on Linux or macOS:
ssh -L 59000:localhost:5901 -C -N -l olivia your_server_ip
Make sure to replace olivia and your_server_ip with the name of your non-root user and your server’s IP address.
Note: If you are using PuTTY to connect to your server, you can create an SSH tunnel by right-clicking on the top bar of the terminal window, and then clicking the Change Settings… option.
Find the Connection branch in the tree menu on the left-hand side of the PuTTY Reconfiguration window. Expand the SSH branch and click on Tunnels. On the Options controlling SSH port forwarding screen, enter 59000 as the Source Port and localhost:5901 as the Destination is shown below:
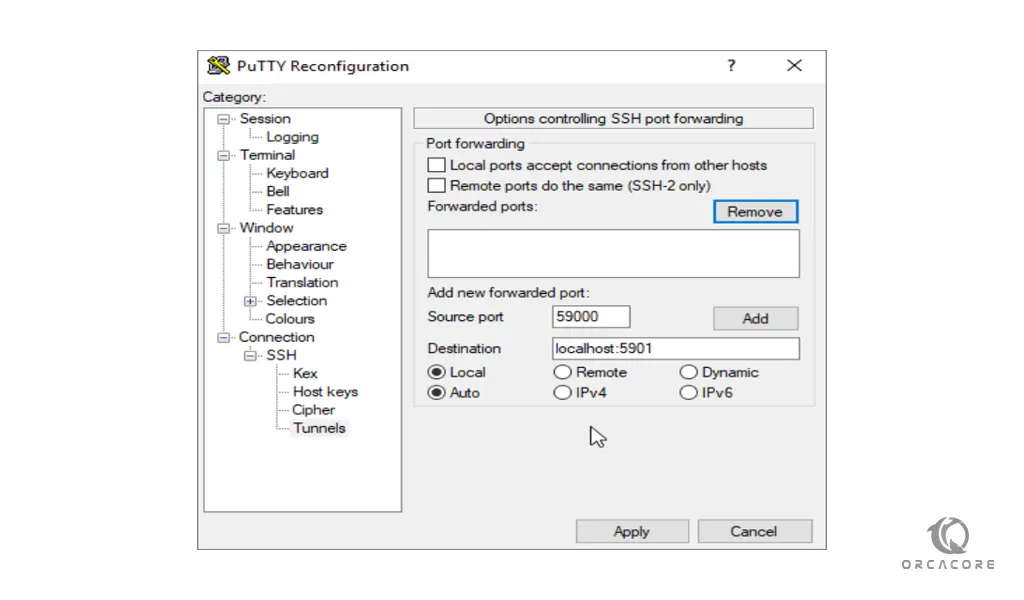
Then click the Add button, and then the Apply button to implement the tunnel.
Once the tunnel is running, use a VNC client to connect to localhost:59000. You’ll be prompted to authenticate using the password you set in Step 1.
Once you are connected, you’ll see the default Xfce desktop.

Press CTRL+C in your local terminal to stop the SSH tunnel and return to your prompt. This will disconnect your VNC session as well.
Also, you can configure your VNC server to run as a systemd service.
Run the VNC server as a systemd service
First, you need to create a unit file with your favorite text editor, here we use vi:
sudo vi /etc/systemd/system/vncserver@.service
Add the following line to the file:
[Unit]
Description=Start TightVNC server at startup
After=syslog.target network.target

[Service]
Type=forking
User=olivia
Group=olivia
WorkingDirectory=/home/olivia

PIDFile=/home/olivia/.vnc/%H:%i.pid
ExecStartPre=-/usr/bin/vncserver -kill :%i > /dev/null 2>&1
ExecStart=/usr/bin/vncserver -depth 24 -geometry 1280x800 -localhost :%i
ExecStop=/usr/bin/vncserver -kill :%i

[Install]
WantedBy=multi-user.target
When you are done save and close the file.
Note: Change the value of User, Group, WorkingDirectory, and the username in the value of PIDFILE to match your username.
Reload the system services to apply the changes:
sudo systemctl daemon-reload
Start and Enable VNC on Ubuntu 20.04
Enable the VNC unit file on Ubuntu 20.04:
sudo systemctl enable vncserver@1.service
Stop the current instance of the VNC server if it’s still running on Ubuntu 20.04:
vncserver -kill :1
Start the service:
sudo systemctl start vncserver@1
Verify that your VNC service is active and running on your server:
sudo systemctl status vncserver@1
Output
● vncserver@1.service - Start TightVNC server at startup
     Loaded: loaded (/etc/systemd/system/vncserver@.service; enabled; vendor preset: enabled)
     Active: active (running) since Tue 2022-04-26 16:57:26 UTC; 20s ago
    Process: 97088 ExecStartPre=/usr/bin/vncserver -kill :1 > /dev/null 2>&1 (code=exited, status=2)
    Process: 97092 ExecStart=/usr/bin/vncserver -depth 24 -geometry 1280x800 -localhost :1 (code=exited, status=0/SUCCESS)
   Main PID: 97103 (Xtightvnc)
      Tasks: 77 (limit: 4665)
     Memory: 146.7M
        CPU: 4.459s
     CGroup: /system.slice/system-vncserver.slice/vncserver@1.service
. . .
However, there won’t be any difference on the client side. To reconnect, start your SSH tunnel again:
ssh -L 59000:localhost:5901 -C -N -l olivia your_server_ip
Then make a new connection using your VNC client software to localhost:59000 connect to your server.
Conclusion
At this point, you learn to Set up VNC on Ubuntu 20.04 and connect to it securely.
Hope you enjoy it.
May this article about How To Install and Configure VNC on CentOS 7 be useful for you.