Share your love
Best Setup of Termux Desktop GUI on Android
This tutorial intends to teach you to Install Termux Desktop GUI and Access it through the VNC on Android Devices. If you are interested in a graphical interface rather than a command line interface, Termux Desktop is the best solution for you. You use this tool to run your Termux app in a graphical mode.
Follow the rest of the article on the Orcacore website to get your Termux Desktop GUI on Android.
Table of Contents
Termux Desktop GUI on Android – Step-by-Step Installation
Before you start your Termux Desktop installation, you need to install it on your Android device. For this purpose, we provide you with an article to Set up Termux on an Android Device.
Note: It is recommended to set up Termux Desktop in a fresh Termux app.
When you are done, follow the steps below to set up Termux Desktop GUI on Android.
Step 1 – Update Termux on Android
The first step is to run the system update in Termux with the following commands:
# pkg update
# pkg upgrade -yNote: To get more information about Termux commands and how you can use them, you can visit this guide on Termux Commands For Android Devices.
Step 2 – Install Termux-API and Git in Termux
Because we want to clone the Termux Desktop from GitHub, you must have Git installed on your device. To do this, you can run the following command:
pkg install gitAlso, you must install Termux-API on your device. This will expose device functionality as API to command line programs in Termux. To do this, run the command below:
pkg install termux-apiWhen you are done, proceed to the next step.
Step 3 – Download the Termux Desktop app on Android
At this point, we clone the Termux Desktop app from GitHub. To do this, you can run the following command:
git clone --depth=1 https://github.com/adi1090x/termux-desktop.gitWhen your download is completed, switch to your Termux Desktop directory with the command below:
cd termux-desktopThen, make your file executable with the following command:
chmod +x setup.shStep 4 – Install Termux Desktop
At this point, you can use the following command to install the Termux Desktop on your device:
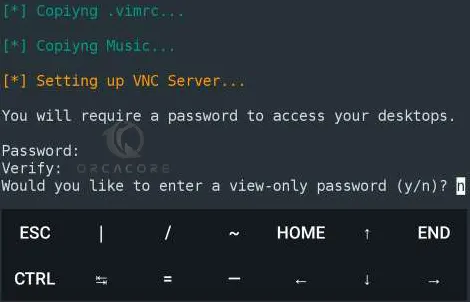
./setup.sh --installDuring the installation, you will be asked to set a password for the VNC server. Enter your desired password and verify it. Then, you will be asked to enter a view-only password, simply enter N and continue.
This command will also install all the dependencies.
It will take some time to complete.
When it is completed, you will get something similar to the following output.
Output
[*] Server Is Running...

TigerVNC server sessions:

X DISPLAY #     PROCESS ID
:1              12590

[*] Creating Launcher Script...

[*] Script /data/data/com.termux/files/home/.local/bin/startdesktop created successfully.
[*] $PATH reference ~/.local/bin added to /etc/profile successfully.

[*] Termux Desktop Installed Successfully.

[-] Restart termux and enter startdesktop command to start the VNC server.
[-] In VNC client, enter 127.0.0.1:5901 as Address and Password you created to connect.                   [-] To connect via PC over Wifi or Hotspot, use it's IP, ie: ...:5901 to connect. Also, use TigerVNC client.                                          [-] Make sure you enter the correct port. ie: If server is running on Display :2 then port is 5902 and so on.

~/termux-desktop $
Step 5 – Start Termux Desktop VNC Server
When your installation is completed, you must restart your Termux in Android. Then, enter the following command to start your VNC server:
startdesktopStep 6 – Install VNC Viewer on Android
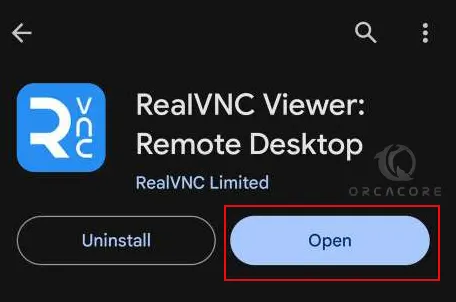
At this point, you must install a VNC viewer on your device. To do this, you can open your Play Store and search for VNC viewer. Download and install the app. When your download is completed, open the VNC viewer.
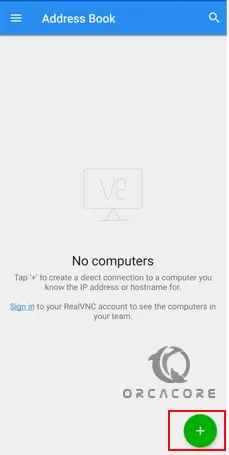
Step 7 – Access Termux Desktop via VNC Viewer on Android
From your VNC viewer, click on the Plus sign given in the main menu.
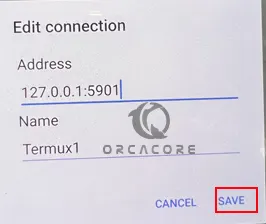
Now from your New Connection window, enter 127.0.0.1:5901 in the address field. And in the Name field give a name to your connection. Here we use Termux1. Click Save.
Note: Remember that if you are running the server next time you need to change the IP address port to 2 or 3.
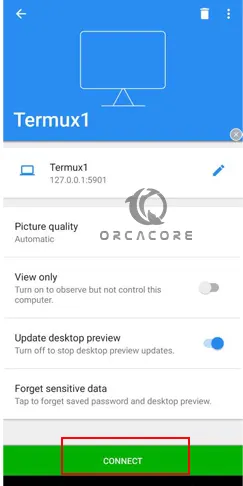
Your VNC will connect to your Termux app. From there, you can click on Connect.
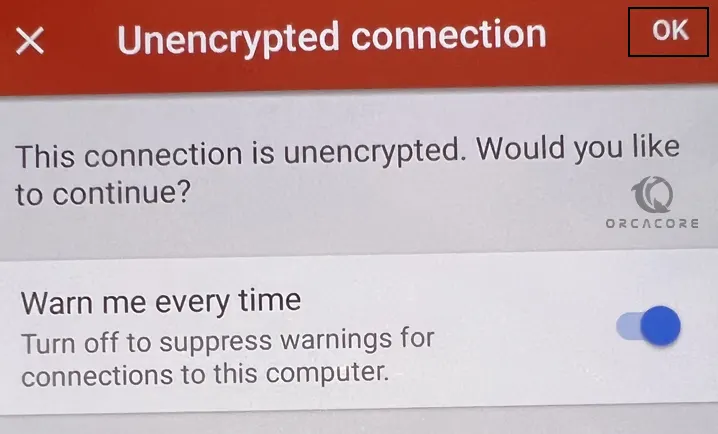
Next, you will see the Unencrypted connection window, simply click OK.
At this point, you must enter the password that you have set up for the VNC server in Step 4 and click continue.

Finally, you must see your Temrux Desktop GUI on your Android device.
From there, you can easily do your tasks from a graphical user interface.
Conclusion
At this point, you have learned to Install Termux Desktop GUI on Android Devices Step by Step and Access it through the VNC client. It is so simple and easy to use. For those who are interested in a graphical interface, Termux Desktop is the best choice for them.
Hope you enjoy it. Also, you may like to read the following articles:
Remote Windows via Android Device