Share your love
Create Nginx Password Authentication on Ubuntu 22.04 – Best Setup

This tutorial intends to Create Nginx Password Authentication on Ubuntu 22.04. If you want to protect your website or app information online, it is recommended to use password authentication. With this option, users have a unique username and password and only they can be able to access the account.
In this guide from the Orcacore website, we want to show you how to Create Nginx Password Authentication on Ubuntu 22.04.
Table of Contents
Steps To Create Nginx Password Authentication on Ubuntu 22.04
First, you must log in to your server as a non-root user with sudo privileges. To do this, you can follow Initial Server Setup with Ubuntu 22.04.
Because you want to set up Nginx password authentication, you must have Nginx installed on your server. For this purpose, you can follow this guide on How To Install Nginx Web Server on Ubuntu 22.04.
Now follow the steps below to Create Nginx Password Authentication on Ubuntu 22.04.
Step 1 – Create a Password File on Ubuntu 22.04
At this point, you must have a file that stores your username and password combinations. To do this, you can use one of the following methods:
- OpenSSL utility
- htpasswd: It is included in the apache2-utils package (Nginx password files use the same format as Apache).
Use OpenSSL Utility To Create a Password File
If you choose to Create Nginx Password Authentication on Ubuntu 22.04 with OpenSSL, you don’t need the additional packages. You just have to OpenSSL package installed on your server. To install it, you can use the following command:
sudo apt install openssl -yThen, you need to add your desired user at the /etc/nginx/.htpasswd directory. To do this, you can run the following command:
sudo sh -c "echo -n 'olivia:' >> /etc/nginx/.htpasswd"Next, run the following command to create an encrypted password for your user on Ubuntu 22.04:
sudo sh -c "openssl passwd -apr1 >> /etc/nginx/.htpasswd"Note: You can repeat these commands for additional users.
Finally, you can list your usernames and password by using the following command:
cat /etc/nginx/.htpasswdUse Apache Utilities To Create a Password File
If you are interested in using the Apache utilities instead of OpenSSL, follow the steps below Create Nginx Password Authentication on Ubuntu 22.04:
First, you need to install the apache2-utils package on Ubuntu 22.04. To do this, run the command below:
sudo apt install apache2-utils -yWith the apache2-utils package, you have access to the htpasswd command.
Then, use the following command to add your user to the/etc/nginx/.htpasswd directory:
sudo htpasswd -c /etc/nginx/.htpasswd oliviaYou should enter a password for your user:
Output
New password:
Re-type new password:
Adding password for user oliviaNote: To add more users, you should use the above command without the “-c” option:
sudo htpasswd /etc/nginx/.htpasswd another_userTo list your usernames and passwords, use the following command:
cat /etc/nginx/.htpasswdOutput
olivia:$apr1$uobvwe7l$Mssq0hgy3VRwsItN21Aqj.Step 2 – Configure Nginx for Password Authentication
At this point, you have created a file for your users and passwords in a format that Nginx can read on Ubuntu 22.04.
The next step is to configure your Nginx to check your password file. To do this, you need to open a server block configuration file. Here we use the default Nginx server block, open the file with your favorite text editor, here we use the vi editor:
sudo vi /etc/nginx/sites-enabled/defaultNow you need to use the auth_basic_user_file directive to point Nginx to the password file you have created. This is a server-level restriction. Add the following directives under the default server configuration:
server {
    listen 80 default_server;

     . . .

    auth_basic "Restricted Content";
    auth_basic_user_file /etc/nginx/.htpasswd;
}Note: You can only restrict the document root with a location block, and you can even modify this listing to only target a specific directory within the web space:
server {
    listen 80 default_server;

     . . .

    location / {
    try_files $uri $uri/ =404;
    auth_basic "Restricted Content";
    auth_basic_user_file /etc/nginx/.htpasswd;
    }
}
When you are done, save and close the file.
Restart Nginx to apply the changes on Ubuntu 22.04:
sudo systemctl restart nginxStep 3 – Verify Password Authentication with Nginx
To confirm that your content is protected, try to access your restricted content by typing your server’s IP address in your web browser:
http://your-server-ipYou should be presented with a username and password prompt:
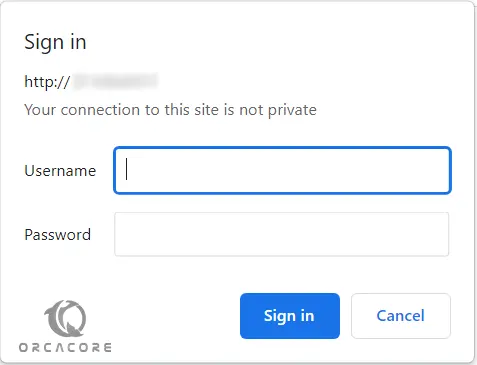
If you enter the correct credentials, you will be allowed to access the content.
For more information, you can visit the Nginx Docs.
Conclusion
At this point, you have learned to Create Nginx Password Authentication on Ubuntu 22.04. Most of the time, password authentication is not recommended. For more security, it is better to use the TLS encryption. To get more information, you can visit this guide on Secure Nginx with Let’s Encrypt on Ubuntu 22.04.