Share your love
Easy Steps for Elasticsearch Installation on AlmaLinux 9

In this guide, you will learn the Elasticsearch Installation on AlmaLinux 9. Elasticsearch is an open-source analytics engine. Also, it is a highly scalable and full-text search engine. With Elasticsearch, you can store, search, and analyze big data in real-time. This tutorial will show you how to install Elasticsearch on AlmaLinux 9 step by step by using the official RPM packages. To do this, proceed to the following steps provided by the Orcacore team.
Table of Contents
Steps To Elasticsearch Installation on AlmaLinux 9
Before you start your Elasticsearch installation, you must log in to your server as a non-root user with sudo privileges. For this purpose, you can check the AlmaLinux 9 Initial Setup Guide.
Now follow the steps below to complete Elasticsearch Installation on AlmaLinux 9.
Step 1 – Install Java For Elasticsearch Setup
Elasticsearch needs Java to run on your AlmaLinux 9. So you must install Java. First, run the system update with the following command:
sudo dnf update -yThen, use the following command to install OpenJDK on AlmaLinux 9:
sudo dnf install java-17-openjdk-devel -yVerify your Java installation by checking its version:
java --versionExample Output:

Step 2 – Download and Install Latest Elasticsearch RPM Package on AlmaLinux 9
At this point, you must visit the official website and get the latest RPM package on AlmaLinux 9. First, import the GPG key by using the following command:
sudo rpm --import https://artifacts.elastic.co/GPG-KEY-elasticsearchThen, use your favorite text editor like Vi editor or Nano editor to create a repository file for Elasticsearch:
sudo vi /etc/yum.repos.d/elasticsearch.repoAdd the following latest RPM repo to the file:
[elasticsearch]
name=Elasticsearch repository for 8.x packages
baseurl=https://artifacts.elastic.co/packages/8.x/yum
gpgcheck=1
gpgkey=https://artifacts.elastic.co/GPG-KEY-elasticsearch
enabled=0
autorefresh=1
type=rpm-md
When you are done, save and close the file.
At this point, you can use the following command to start your Elasticsearch Installation on AlmaLinux 9:
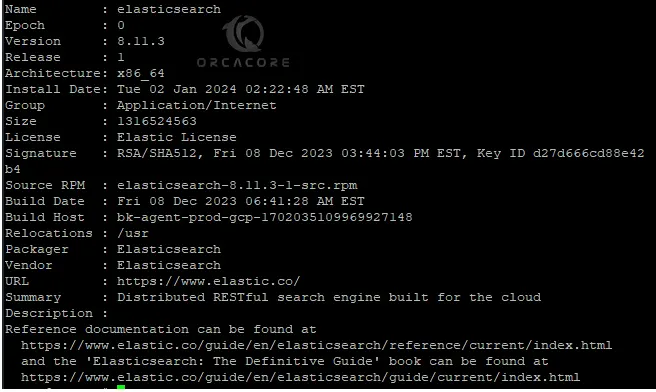
sudo dnf install --enablerepo=elasticsearch elasticsearch -yOnce your installation is completed, you can verify it by using the following command:
sudo rpm -qi elasticsearchExample Output:
Step 3 – Start and Enable Elasticsearch Service on AlmaLinux 9
At this point, you need to reload the system daemon and start and enable your Elasticsearch service. To do this, you can use the following commands:
# sudo systemctl daemon-reload
# sudo systemctl enable elasticsearch.service
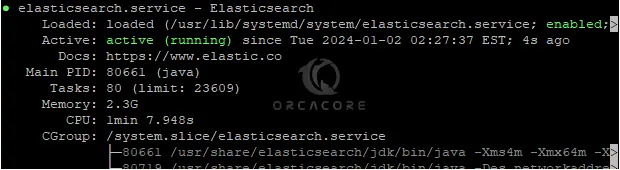
# sudo systemctl start elasticsearch.serviceThen, verify your ELasticsearch service is active and running on your server:
sudo systemctl status elasticsearch.serviceExample Output:
Step 4 – Check Elasticsearch Listening Port
By default, the Elasticsearch service listens to port 9200. You can confirm this using the command below:
ss -pnltu | grep 9200Example Output:

Step 5 – Modify Elasticsearch to Allow Remote Connections
By default, Elasticsearch data is sotred in the /var/lib/elasticsearch directory. The Elasticsearch configuration file can be found under the /etc/elasticsearch directory. Also, the Java start-up options are available in the /etc/default/elasticsearch directory.
If you want to set up a cluster, you must make some changes to the Elasticsearch configuration file and allow the remote connections on AlmaLinux 9. Open the file with your desired text editor:
sudo vi /etc/elasticsearch/elasticsearch.ymlIn the file, find the network.host directive and uncomment it. By default, Elasticsearch listens on localhost. You can replace it with your private IP address. Or you can change it to listen to all by entering 0.0.0.0:
network.host: 0.0.0.0 or Server's IP AddressThen, find the cluster.name directive and uncomment it. Set a name for your cluster:
cluster.name: my-clusterNext, uncomment the node.name directive and specify the name of your node:
node.name: my-nodeFinally, set the xpack.security.enabled security setting to false:
xpack.security.enabled: falseWhen you are done, save and close the file.
Restart the Elasticserach service to apply the changes on AlmaLinux 9:
sudo systemctl restart elasticsearchStep 6 – Test Elasticsearch with HTTP Request on AlmaLinux 9
At this point, you can verify your successful installation by using the curl command to send an HTTP request to port 9200 on localhost or your server’s IP:
sudo curl -X GET "localhost:9200/"Or from your web browser, you can follow:
http://localhost:9200You should see:
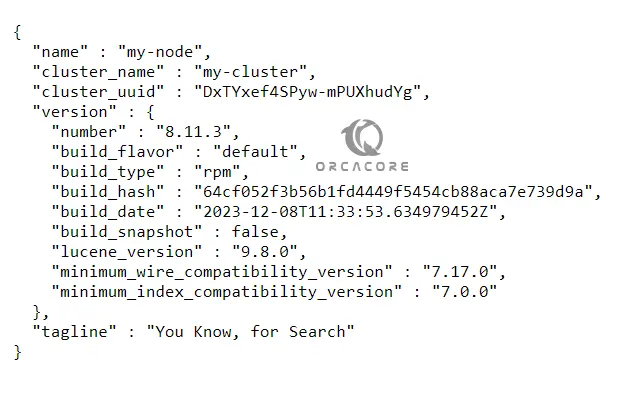
Here are some other examples of using Elasticsearch with curl command:
To delete an index like samples, you can run:
sudo curl -X DELETE 'http://localhost:9200/samples'You can list all indexes with:
sudo curl -X GET 'http://localhost:9200/_cat/indices?v'Also, you can list all docs in the index with:
sudo curl -X GET 'http://localhost:9200/sample/_search'Conclusion
Elasticsearch is a powerful tool for managing and analyzing large volumes of data, especially when search and real-time analysis are critical components of your application. At this point, you have learned Elasticsearch Installation on AlmaLinux 9. Hope you enjoy it.
Also, you may like to read the following articles:
Install Syncthing on Ubuntu 22.04