Share your love
Comprehensive Steps For GlassFish Server Setup on Debian 12

This guide will teach you a comprehensive GlassFish Server Setup on Debian 12 Bookworm. GlassFish is an open-source application server designed to support the development and deployment of Java Platform, Enterprise Edition (Java EE) applications. Also, it provides a powerful, scalable, and high-performance runtime environment for Java EE applications. It enables developers to build and deploy enterprise-grade applications with ease.
Here on the Orcacore website, we will show you how to complete the GlassFish Server Setup on Debian 12 and Access the dashboard through the Web interface.
Table of Contents
A Comprehensive Guide For GlassFish Server Setup on Debian 12 Bookworm
Before you start your GlassFish Server Setup on Debian 12, you must access your server as a non-root user with sudo privileges and set up a basic firewall. For this purpose, you can check the following articles:
Initial Server Setup with Debian 12
UFW Configuration on Debian 12
Because GlassFish is designed to support the Java platform, you must install Java. To do this, you can visit the following guide and install the default JDK:
Install Java with Apt on Debian 12
Now follow the steps below to complete the GlassFish Server Setup on Debian 12.
Step 1 – Verify Java Installation For GlassFish Server Setup
In this guide, we will install Eclipse GlassFish. Eclipse GlassFish is a complete application server that implements the Jakarta EE specification. Currently, the latest version of the GlassFish server is 7.0.12. It is compatible with JDK 11 and JDK 17. Also, it runs from JDK 18 to JDK 21 as well.
The default Java on Debian 12 is JDK 17. To verify it, you can run the command below:
java --version
Step 2 – Download Latest Eclipse GlassFish on Debian 12
You must visit the official downloads page and use the following wget command to download the latest Zip package. To do this, you can navigate to your /opt directory and run the command below:
# cd /opt
# sudo wget https://download.eclipse.org/ee4j/glassfish/glassfish-7.0.12.zip
Once your download is completed, extract it with the command below:
sudo unzip glassfish-7.0.12.zipStep 3 – Start and Enable GlassFish Server on Debian 12
To manage your GlassFish server as a service, you need to create a systemd unit file for it. To do this, you can use your desired text editor like Vi Editor or Nano Editor:
sudo vi /etc/systemd/system/glassfish.serviceAdd the following content to the file:
[Unit]
Description = GlassFish Server v7.0
After = syslog.target network.target

[Service]
ExecStart=/opt/glassfish7/bin/asadmin start-domain
ExecReload=/opt/glassfish7/bin/asadmin restart-domain
ExecStop=/opt/glassfish7/bin/asadmin stop-domain
Type = forking

[Install]
WantedBy = multi-user.target
Remember to replace the correct path of your GlassFish server installation.
Once you are done, save and close the file.
Then, reload the system service, start and enable your GlassFish service on Debian 12:
# sudo systemctl daemon-reload
# sudo systemctl start glassfish
# sudo systemctl enable glassfish
Now you can verify your GlassFish Service is active and running on your server:
sudo systemctl status glassfish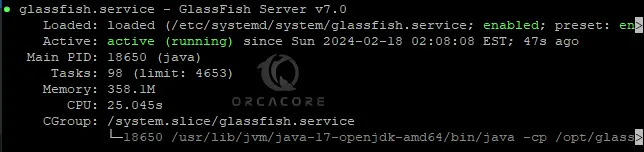
Step 4 – Set an Admin Password For GlassFish Server
The default GlassFish admin password is blank. For more security, you must set a password for your GlassFish admin user on Debian 12. GlassFish has a tool called asadmin that accepts commands for setting up GlassFish via a command line.
To use this command line utility, you must make it executable with the command below:
sudo export PATH=/opt/glassfish7/bin:$PATH
Then, run the following command to set an admin password for GlassFish:
sudo asadmin --port 4848 change-admin-passwordYou will be asked to enter the admin password, press enter to set a new password:

Now you can enable the secure admin feature for GlassFish. Run the command below:
sudo asadmin --port 4848 enable-secure-admin
Enter the admin user and password to complete it:

To apply the changes, restart the GlassFish server on Debian 12:
sudo systemctl restart glassfishStep 5 – Set Firewall Rules For GlassFish Server
At this point, we assumed that you have a running FW firewall. Now you must allow the following ports through your firewall so that you can access your GlassFish dashboard via the web interface:
# sudo ufw allow 4848/tcp
# Sudo ufw allow 8080/tcp
Apply the new rules by reloading the firewall:
sudo ufw reloadStep 6 – Access GlassFish Server Administration Console
At this point, you can access the default GlassFish page by typing your server’s IP address in your web browser followed by 8080:
http://your-server-IP:8080You will see:

Also, you can access the web administrator console by typing your Server’s IP address in your web browser followed by 4848:
https://your-server-IP:4848You will see the GlassFish Administration console login screen. Enter your Admin user and password you have configured and press Login:

Then, you will see your GlassFish server admin console on Debian 12:

GlassFish Server Administration Console is a web-based tool used to manage and monitor GlassFish Server instances. From there, you can do many tasks including:
- Managing Applications
- Configuring Server
- Monitoring
- Managing Resources
- Security
- Logs
- Documentation
Final Words on GlassFish Server Setup
By using the features of the GlassFish Server Administration Console, you can effectively manage and monitor your GlassFish Server instance to ensure optimal performance and reliability. Hope you enjoy this guide on GlassFish Server Setup on Debian12. If you need any help, please comment for us.
Also, you may like to read the following articles:
Install Tesseract OCR on Debian 12 via Terminal