Share your love
Easy Setup for HAproxy Load Balancing on AlmaLinux 9

In this guide, you will learn HAproxy Load Balancing on AlmaLinux 9. HAproxy stands for High Availability Proxy. It is an open-source software used for load balancing and proxying TCP and HTTP-based applications. Also, it helps to improve the performance and reliability of server environments. HAProxy can perform health checks on backend servers to ensure traffic is only sent to operational servers.
The most common uses of HAproxy include:
- Web Application Load Balancing
- Database Load Balancing
- SSL Termination
- Reverse Proxying
- Microservices and Container Environments
Now follow the steps below from the Orcacore website to start your HAproxy installation and configuration on AlmaLinux 9.
Table of Contents
Step-by-Step Guide for HAproxy Load Balancing on AlmaLinux 9
Before you start your HAproxy Load Balancing on AlmaLinux 9, you must log in to your server as a root or non-root user with sudo privileges and set up a basic firewall. For this purpose, you can check the Initial Server Setup on AlmaLinux 9.
Step 1 – Install HAproxy on AlmaLinux 9
The HAproxy packages are available in the default AlmaLinux 9 repository. First, you need to update your local packages and use the command below to install HAproxy:
# sudo dnf update -y
# sudo dnf install haproxy -y
Step 2 – Start and Enable HAproxy Load Balancing Service
Once your installation is completed, you must start and enable your HAproxy service by using the following commands:
# sudo systemctl start haproxy
# sudo systemctl enable haproxy
Verify your HAproxy service is active and running on AlmaLinux 9:
sudo systemctl status haproxy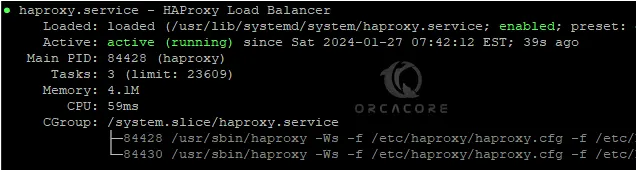
Step 3 – HAproxy Load Balancing Configuration on AlmaLinux 9
The default configuration file of HAproxy is located under the /etc/haproxy/haproxy.cfg directory. At this point, you need to make some configuration changes to the file. To do this, open the file with your desired text editor like Vi editor or Nano editor:
sudo vi /etc/haproxy/haproxy.cfgAt the file, you must change the frontend and backend sections.
In the Frontend section, you should specify the following lines:
- The IP address of the HAProxy load balancer and the port it will listen to.
- The Stats URI
For the Backend section, you should specify:
- The load-balancing algorithm.
- The username and password for accessing the load balancer statistics on the browser.
- The webservers’ hostnames and IP addresses.
frontend load_balancer
    bind haproxy-server-ip:80
    option http-server-close
    option forwardfor
    stats uri /haproxy?stats

default_backend   webservers

backend webservers
    mode        http
    balance     roundrobin
    stats       enable
    stats auth  user:strongpass
    option httpchk HEAD / HTTP/1.1\r\nHost:\ localhost
    server  Apache_Web_Server_1  first-server-ip-address:80
    server  Apache_Web_Server_2  second-server-ip-address:80
When you are done, save and close the file.
Then, check the configuration file for syntax issues before restarting HAProxy:
sudo haproxy -c -f /etc/haproxy/haproxy.cfgIn your output, you should see:
Output
Configuration file is valid
Now restart the HAproxy service to apply the changes:
sudo systemctl restart haproxyNow you must allow port 80 through your AlmaLinux firewall:
# sudo firewall-cmd --add-port=80/tcp --permanent
# sudo firewall-cmd --reload
Step 4 – Configure Backend Servers For HAproxy
At this point, you must install Apache on both backend servers. To do this, run the command below:
sudo dnf install httpd -y
Then, start and enable the httpd service with the following commands:
# sudo systemctl start httpd
# sudo systemctl enable httpd
Next, you can edit the default index.html file on the first backend server (Apache_Web_Server_1). Open the file with your desired text editor:
sudo vi /usr/share/httpd/noindex/index.htmlIn the file, delete all lines and add the line below:
Welcome Apache Web Server 1When you are done, save and close the file.
After that, make changes in the index.html file on the second backend server (Apache_Web_Server_2):
sudo vi /usr/share/httpd/noindex/index.htmlDelete all lines and insert the following line:
Welcome Apache Web Server 2When you are done, save and close the file.
Then, restart Apache to apply the changes:
sudo systemctl restart httpdNote: If you have a firewall running on your servers, open port 80:
# sudo firewall-cmd --add-port=80/tcp --permanent
# sudo firewall-cmd --reload
Step 5 – Verify Backend Servers with HAproxy Load Balancing
At this point, from your web browser enter the HAProxy server IP address. You should see the first backend server.

Then, reload the browser to see your second backend server.

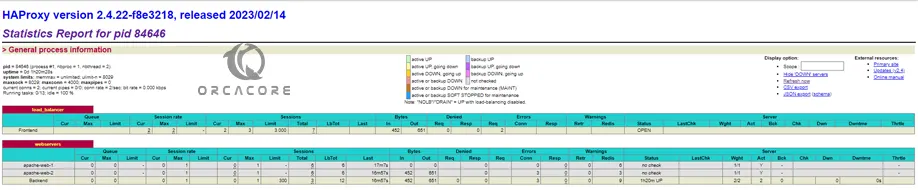
Step 6 – Access the HAproxy Stats
Also, you can access your HAproxy stats to check your general process information. To do this, you can follow the URL below:
http://your_server_ip/haproxy?statsIt will prompt you for the username and password you have defined in the HAproxy config file.
Conclusion
HAProxy is a powerful tool for improving the scalability, reliability, and performance of server environments. At this point, you have learned to set up HAproxy Load Balancing on AlmaLinux 9 and Configure Backend servers. Hope you enjoy it.
Also, you may like to read the following articles:
Install and Configure Squid Proxy on AlmaLinux 9
10 Useful ncat Commands on AlmaLinux