Share your love
Install Adminer on AlmaLinux 9: Best GUI DB Manager

In this guide, you will learn to Install Adminer on AlmaLinux 9 with LAMP Stack (Apache, MariaDB, PHP). Adminer is a GUI database management tool. The amazing feature of this tool is that supports all the databases such as PostgreSQL, SQLite, MySQL, MariaDB, Oracle, etc. Now you can follow the steps below on the Orcacore website to start your Adminer installation on Almalinux.
Table of Contents
Steps To Install Adminer on AlmaLinux 9
To complete this guide, you must have access to your server as a non-root user with sudo privileges. To do this, you can follow this guide on Initial Server Setup with AlmaLinux 9.
Because we want to install Adminer with LAMP Stack, you need to have it on your server. For this purpose, you can follow this guide on Install LAMP Stack on AlmaLinux 9.
Also, you need a domain name that is pointed to your server’s IP address.
When you are done, follow the steps below to complete your Adminer installation on AlmaLinux 9 and access the Adminer default login screen.
Step 1 – Set Adminer Root Database Password
At this point, you need to log in to your MariaDB shell and set a root database password for your Adminer. Log in to your MariaDB shell with the command below:
sudo mysql -u root -pThen, set the password for the root user with the command below:
MariaDB [(none)]> SET PASSWORD FOR 'root'@'localhost' = PASSWORD("password");Next, flush the privileges and exit from the MariaDB shell by using the following commands:
MariaDB [(none)]> FLUSH PRIVILEGES;
MariaDB [(none)]> exit;
Step 2 – Install Adminer on AlmaLinux 9
At this point, you need to visit the GitHub release page for Adminer and get the latest package.
First, create a directory for Adminer under the /var/www/html directory with the command below:
mkdir /var/www/html/adminerThen, switch to your Adminer directory and use the following command to download the latest Adminer package on AlmaLinux 9, we downloaded the file as index.php:
# cd /var/www/html/adminer
# sudo wget -O index.php https://github.com/vrana/adminer/releases/download/v4.8.1/adminer-4.8.1.php
When your download is completed, set the correct permission and ownership for the file with the commands below:
# sudo chown -R apache:apache /var/www/html/adminer/
# sudo chmod -R 775 /var/www/html/adminer/
Step 3 – Configure Apache for Adminer
At this point, you need to create an Apache virtual host file for Adminer on AlmaLinux 9. To do this, you can use the following command:
sudo vi /etc/httpd/conf.d/adminer.confAdd the following content to the file:
<VirtualHost *:80>
     ServerAdmin admin@example.com
     DocumentRoot /var/www/html/adminer/
     ServerName example.com
     DirectoryIndex index.php
     ErrorLog /var/log/httpd/adminer-error.log
     CustomLog /var/log/httpd/adminer-access.log combined

</VirtualHost>
When you are done, save and close the file.
Finally, restart Apache to apply the changes:
sudo systemctl restart httpdStep 4 – How To Access Adminer Dashboard?
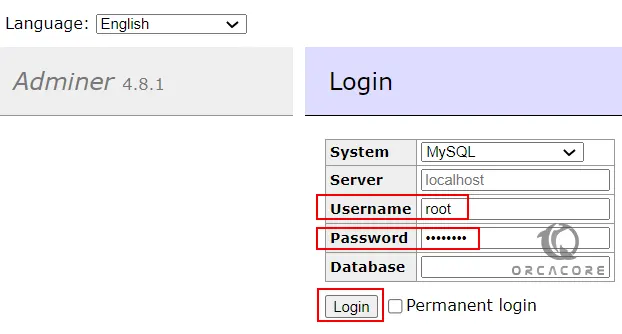
At this point, you can access your Adminer web interface by typing your domain name or IP address in your web browser followed by index.php:
http://domain-name/index.phpYou will see the Adminer default login screen. You should enter the root as the username and the password that you have configured for the Adminer on AlmaLinux 9.
After login, you will have the Dashboard to access all the available databases.
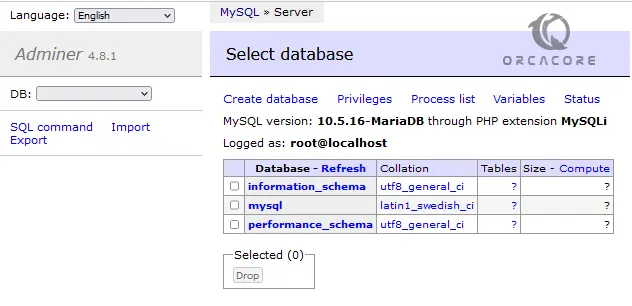
From there, you can delete or create a database, etc.
Conclusion
Adminer is a GUI database management tool that is simple, easy to navigate, understandable, and not confusing. You have learned to Install the Latest Adminer on AlmaLinux 9 and access your Adminer Web GUI.
Hope you enjoy it. You may like these articles too:
Install GitHub Desktop on AlmaLinux 9