Share your love
Using SCP to Transfer Files with SSH keys Ubuntu: 3 Easy Steps
This tutorial intends to teach you Using SCP to Transfer Files with SSH keys Ubuntu. As you must know, every Linux Administrator uses a different utility to access and manage the remote server. The most popular utilities are SCP and SSH. Let’s get familiar with these utilities and scp with ssh key to Transfer Files Ubuntu.
Table of Contents
What is SCP and SSH?
SCP which stands for secure copy protocol is a command line utility used for transferring files between servers in a secure mode. It is based on the SSH protocol. And SSH which stands for the secure shell is a network protocol that you can use to transfer data between SSH client and SSH server in a secure channel.
Is SCP the same as SSH?
At this point, you may face the question of whether the SCP and SSH are the same or not. The main difference between them is that SSH is used for logging into remote systems and controlling those systems while SCP is used for transferring files among remote computers in a network.
How to Use SCP with SSH key?
You can use the SCP command to transfer files from a remote server with an encrypted SSH tunnel. Also, you can use SSH keys to make your transfer action more secure. To do this, you can follow the steps below to learn Using SCP to Transfer Files with SSH keys Ubuntu.
Steps To Using SCP to Transfer Files with SSH keys Ubuntu
At this point, we want to use SCP to transfer files with SSH keys (PEM file). PEM file format is mostly used to store the cryptographic keys. Now you must have access to your Ubuntu server as a root user, and generate a Pem file, and follow the steps below for Using SCP to Transfer Files with SSH keys Ubuntu.
In this guide, we use Ubuntu 22.04 server to show the guide steps for Using SCP to Transfer Files with SSH keys Ubuntu.
Step 1 – Generate SSH Keys and a PEM File on Ubuntu
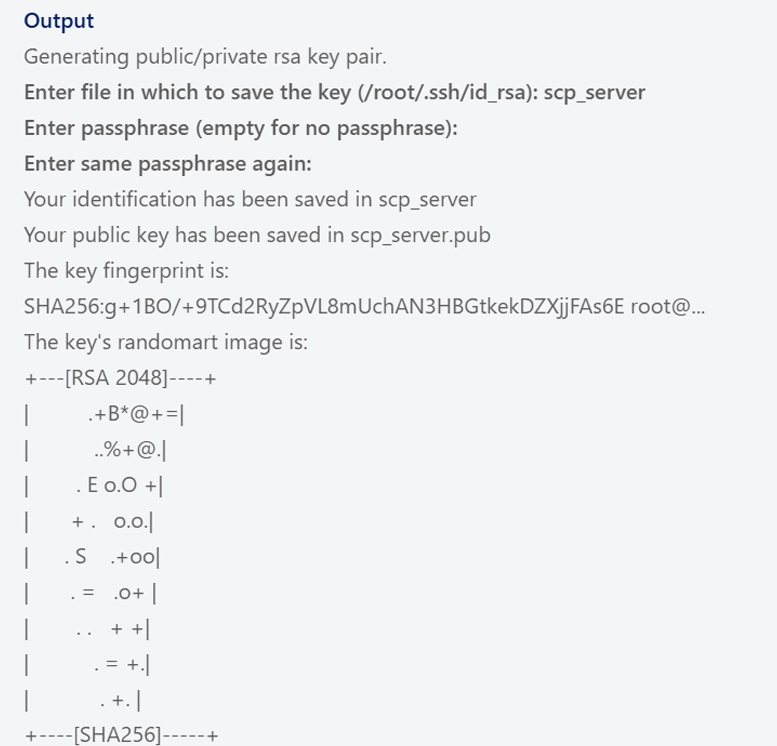
The first step is to generate the SSH keys on Ubuntu. To do this, you can run the command below:
ssh-keygen -t rsa -b 2048When you run the above command, you will be asked to enter a file name for your key and set a passphrase for your file. Here we named our file scp_server, you can choose your desired name. When you are done, you will get the following output:
At this point, you can list your SSH key files with the following command:
lsThen, you should see that you can two SSH key files (public and private):
Output
scp_server  scp_server.pub
Next, you must generate a Pem file with your Private SSH key by using the following command:
cp -p scp_server scp_server.pemNow when you list the files, you must see the pem file is generated too.
lsOutput
scp_server scp_server.pem scp_server.pubStep 2 – Copy the Ubuntu SSH Public Key to the Remote Server
At this point of Using SCP to Transfer Files with SSH keys Ubuntu, you must copy the public key to the server you want to access. To do this, you can use the following command:
ssh-copy-id -i public-key username@remote-server-ipFor example, our public key is scp_server.pub, and remember to replace the username and IP with the remote server you want to access.
You will be asked to enter the remote server’s password. You should get the following output:
Output
Number of key(s) added: 1

Now try logging into the machine, with:   "ssh 'root@...'"
and check to make sure that only the key(s) you wanted were added.
Then, in the Ubuntu local machine, set the correct permissions for the Pem file with the following command:
chmod 400 scp_server.pemYou can verify everything is working fine by using the command below:
ssh -i scp_server.pem username@remote-server-ipEnter the passphrase of the SSH key file you have generated, then, you should see:

Now that you have logged in successfully with the Pem file, you can start Using SCP to Transfer Files with SSH keys Ubuntu.
Step 3 – Use the SCP command with SSH keys (Pem File) To Transfer Files
At this point, you can easily use the SCP command to transfer files with SSH keys on Ubuntu. You just want to specify the path to the Pem file:
scp -i /path/to/file.pem /path/to/local/file username@remote.server.com:/path/to/remote/destinationFor example, to copy a single file with a Pem file to a remote server, you can run the command below:
scp -i scp_server.pem test-file username@remote-server-ip:/home/username/Also, you can copy an entire directory by using the -r option. For example:
scp -i scp_server.pem -r Test-Directory username@remote-server-ip:/home/username/Next, if you want to transfer a file from the remote server to the local machine, you can use the following syntax:
scp <options> remote-server@ip-addres:/path-to-file <folder_local_system>That’s it, you are done. With this option, you can easily transfer files securely.
Conclusion
At this point, you have learned a secure way to transfer files between a local and remote machine. You can easily generate a Pem file and use SCP with this file to transfer the data between servers. Hope you enjoy this guide on Using SCP to Transfer Files with SSH keys Ubuntu.
You may be interested in these articles: