Share your love
Steps To Install CyberPanel on AlmaLinux 8

In this guide, you will learn to Install and Configure CyberPanel on AlmaLinux 8. As you may know, CyberPanel is a popular, free, open-source, and easy-to-use Admin web control panel. It comes with a LiteSpeed web server that you can use both free and enterprise versions. The installation and configuration of it is straightforward. To complete this guide, proceed to the following steps.
Steps To Install CyberPanel on AlmaLinux 8
Before you start your CyberPanel installation on AlmaLinux, you need to check the following system requirements for CyberPanel.
What are the system requirements for CyberPanel?
First, you need a fresh AlmaLinux 8 server. Then, you must have access to your server as a root user.
Be sure to have 1G RAM and higher. 10G Disk space.
Also, you need to set up a basic firewall. To do this, you can check FirewallD Configuration on AlmaLinux.
Now follow the steps below to complete this guide.
Step 1 – Get CyberPanel Installer Script on AlmaLinux 8
First, you must run the system update and upgrade by using the commands below:
# dnf update -y
# dnf upgrade -y
CyberPanel provides an installer script that you can easily use to install and configure your CyberPanel. To download the installer, run the following wget command:
wget -O installer.sh https://cyberpanel.net/install.sh
When your download is completed, set the correct permissions to your file:
chmod +x installer.shThen, follow the steps below to start your CyberPanel installation and configuration.
Step 2 – Run CyberPanel Installer on AlmaLinux 8
To install and configure CyberPanel, you can easily run your installer script by using the command below on your AlmaLinux server:
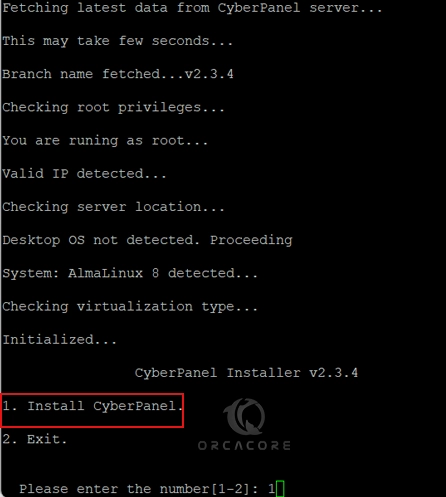
sh installer.shAfter the system check, start to install CyberPanel by pressing 1.
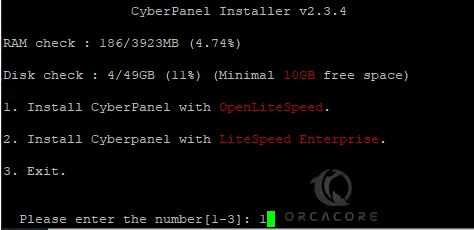
Then, you must choose which LiteSpeed version you want to use. Here we proceed with the free version of OpenLiteSpeed.
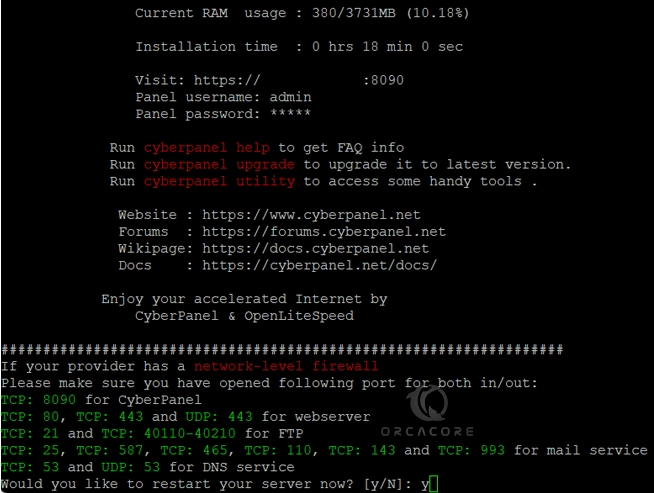
If you want a full-service installation, press Y to continue.

Next, you will be asked to set up Remote MySQL. Here we choose No by default.

Now press Enter to proceed with the installation with the latest version of CyberPanel.

At this point, you can set an admin password for your CyberPanel on AlmALinux 8. Enter s and set your password to continue.

Also, you can install Memcached, Redis, and PHP extensions. Simply press Y.

At this point, it is recommended to enable WatchDog service which helps to detect issues in tables and data. So press no to continue.

Now you must wait until your installation is completed, it will install all the required packages. When it is completed, you will get the following output, press Y to reboot your server.
Step 3 – Allow Required Ports through AlmaLinux 8 Firewall For CyberPanel
At this point, you must open the required ports through your firewalld rules. To do this, you can run the following commands:
# firewall-cmd --permanent --add-port={8090,80,443,21,25,587,465,110,143,993,53}/tcp

# firewall-cmd --permanent --add-port=40110-40210/tcp

# firewall-cmd --permanent --add-port={443,53}/udp
Then, reload the firewall to apply the new rules:
firewall-cmd --reloadStep 4 – Access Admin CyberPanel via Web Interface
At this point, you can easily access your CyberPanel dashboard by visiting the URL you have got from the installation. From your web browser, you can follow the URL below:
https://your-server-ip:8090You will see your CyberPanel Login screen. Enter admin as the username, and enter the password you have set for it. Click Sign in.
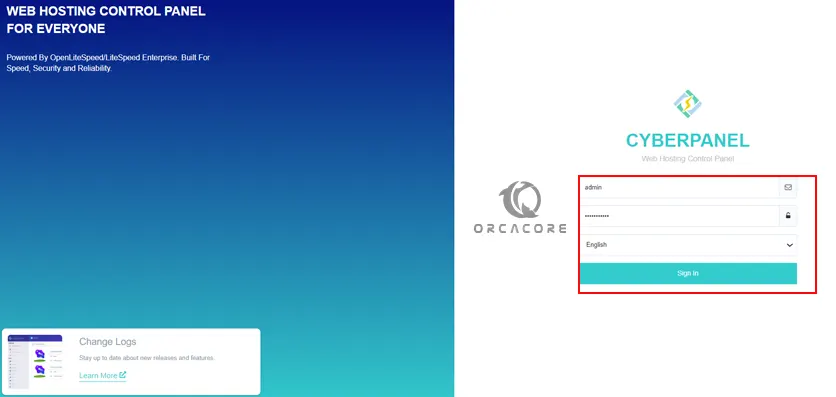
Once you log in, you will see your CyberPanel dashboard and its options on AlmaLinux 8.
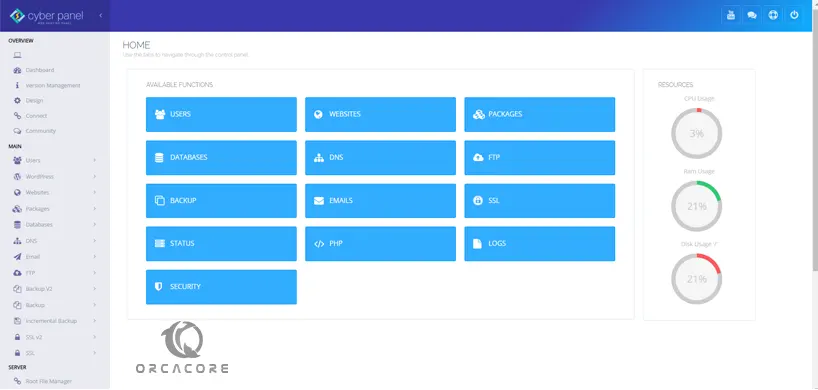
At this point, you can easily manage your web server and website by using OpenLiteSpeed and CyberPanel Web hosting control panel running on AlmaLinux 8.
Conclusion
Now you have learned to use CyberPanel Installer script to install and configure it on ALmaLinux 8, access your Admin panel via the Web interface, and manage your website and other tasks with it. Hope you enjoy using it.
Also, you may interested in these articles:
Install CyberPanel on Ubuntu 22.04


