Share your love
How To Install Monitorix on AlmaLinux 8: Free Monitoring Tool

This guide intends to teach you to Install Monitorix on AlmaLinux 8. Monitorix is a free, open-source system monitoring tool that keeps track of several Linux services and system resources. This Linux system monitoring tool is composed of two programs. The first, Monitorix, is a system data logging daemon written in Perl. The second, its web interface uses the CGI script, monitorix.cgi.
Besides tracking Linux server elements such as overall system load, file system activity, and global kernel usage, Monitorix also tracks hardware data such as sub-system temperatures, battery status, and UPS statistics. It also monitors popular third-party Linux programs such as mail servers; libvirt-based virtual machines; and MySQL, Nginx, and MongoDB databases.
Now follow the guide steps below on the Orcacore website to complete the Monitorix config on AlmaLinux 8.
Table of Contents
Steps To Install Monitorix on AlmaLinux 8
To complete this guide, you must log in to your server as a non-root user with sudo privileges and set up a basic firewall. For this purpose, you can visit our guide on Initial Server Setup with AlmaLinux 8.
Installation Steps of Monitorix on AlmaLinux 8
The installation of Monitorix is so easy. First, update your local package index with the command below:
sudo dnf updateInstall the Epel repo on your server by using the command below:
sudo dnf install epel-release -yThen, use the following command to install Monitorix:
sudo dnf install monitorix perl-CGI perl-HTTP-Server-Simple perl-rrdtool perl-Config-General perl-LWP-Protocol-https perl-LWP-Protocol-http10 -yWhen your installation is completed, verify it by checking its version:
monitorix -vOutput
Monitorix version 3.15.0 (07-Dec-2022)Manage Monitorix Service
At this point, you can use the following command to start and enable your Monitorix service:
sudo systemctl enable --now monitorixVerify your Monitorix service is active and running on AlmaLinux 8:
sudo systemctl status monitorixOutput
● monitorix.service - Monitorix
Loaded: loaded (/usr/lib/systemd/system/monitorix.service; enabled; vendor p>
Active: active (running) since Sat 2023-05-06 04:06:35 EDT; 14s ago
Docs: man:monitorix(8)
Process: 50968 ExecStart=/usr/bin/monitorix -c /etc/monitorix/monitorix.conf >
Main PID: 50969 (/usr/bin/monito)
Tasks: 2 (limit: 23668)
Memory: 74.7M
CGroup: /system.slice/monitorix.service
├─50969 /usr/bin/monitorix -c /etc/monitorix/monitorix.conf -p /run/>
└─51032 monitorix-httpd listening on 8080Monitorix Config on AlmaLinux 8
Monitorix is configured with a single plain text configuration file /etc/monitorix/monitorix.conf. At this point, you need to make a few changes to the configuration file before using Monitorix.
Before you start, it is recommended to take a copy of the Monitorix config file:
sudo cp /etc/monitorix/monitorix.conf /etc/monitorix/monitorix.conf.backupNow open the Monitorix config file with your favorite text editor, here we use the vi editor:
sudo vi /etc/monitorix/monitorix.confIn the configuration file replace the settings according to your environment:
# line 6: change to any title you like
title = Monitorix

# line 7: change to your hostname
hostname = your-hostname

# line 8: background color of admin site
theme_color = black

# line 12: change network units to bps (default is Bytes per/sec)
netstats_in_bps = y

# 28-43: change if you need
<httpd_builtin>
        enabled = y
        host =
        port = 8080
        user = nobody
        group = nobody
        log_file = /var/log/monitorix-httpd
        # if enable permission for admin site, add settings
        hosts_deny = all
        hosts_allow = 10.0.0.0/24
        autocheck_responsiveness = y
        <auth>
                # if enable Basic auth, turn to [y]
                enabled = n
                msg = Monitorix: Restricted access
                htpasswd = /var/lib/monitorix/htpasswd
        </auth>
</httpd_builtin>

# line 76: set kind of graphs you'd like to monitor
# Graphs (de)activation
# -----------------------------------------------------------------------------
<graph_enable>
        system          = y
        kern            = y
        proc            = y
        hptemp          = n
        lmsens          = n
        gensens         = n
        ipmi            = n
        ambsens         = n
        nvidia          = n
        disk            = n
.....
.....
When you are done, save and close the file.
To apply the changes, restart the Monitorix service on AlmaLinux 8:
sudo systemctl restart monitorixConfigure Firewall for Monitorix
If you have a running firewall, you must open port 8080 to enable access using the command below:
sudo firewall-cmd --add-port=8080/tcp --permanentReload the firewall to apply the new rules:
sudo firewall-cmd --reloadAccess Monitorix Web Interface
To access your Monitorix through the web interface, you need to type your server’s IP address in your web browser followed by 8080/monitorix:
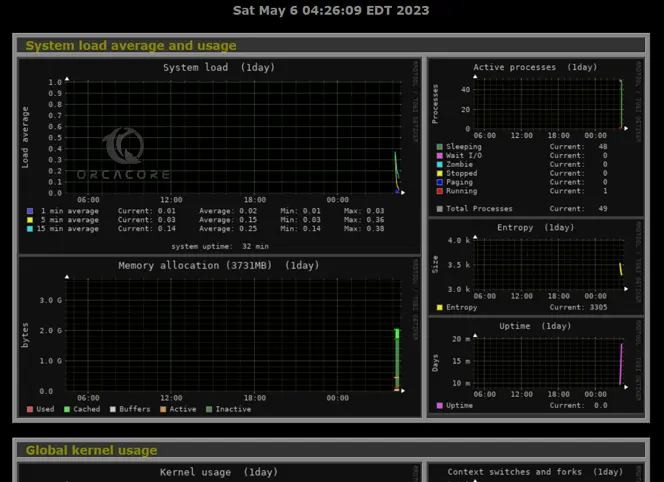
http://server-ip-address:8080/monitorixAt the first screen, choose the graph and the daily, weekly, monthly, or yearly options and click ok.

From there, you can see your graphs and monitor your server.
Conclusion
Monitorix is like a health monitor for your servers and networks, helping you spot and fix issues early. At this point, you have learned to Install land Configure Monitorix on AlmaLinux 8.
Hope you enjoy it. Also, you may interested in these articles:
Enable Brotli Compression in Nginx on AlmaLinux 9