Share your love
Easily Install Netdata on Rocky Linux 9

In this tutorial, we intend to teach you How To Install Netdata on Rocky Linux 9. Netdata is distributed, real-time, performance and health monitoring for systems and applications. It is a highly optimized monitoring agent you install on all your systems and containers.
Netdata provides unparalleled insights, in real-time, of everything happening on the systems it runs (including web servers, databases, and applications), using highly interactive web dashboards. It can run autonomously, without any third-party components, or it can be integrated into existing monitoring toolchains.
Netdata is fast and efficient, designed to permanently run on all systems (physical & virtual servers, containers, IoT devices), without disrupting their core function.
Netdata is free, open-source software and it currently runs on Linux, FreeBSD, and macOS.
Now follow the steps below provided by the Orcacore website to Install and Configure Netdata on Rocky Linux 9.
Table of Contents
Steps To Install and Configure Netdata on Rocky Linux 9
To complete this guide, you must log in to your server as a non-root user with sudo privileges and set up a basic firewall. To do this, you can follow our guide on Initial Server Setup with Rocky Linux 9.
Install Netdata on Rocky Linux 9
First, you need to update your local package index with the command below:
sudo dnf update -yInstall Epel Repository
Then, you need to install the Epel repo on Rocky Linux 9 by using the command below:
sudo dnf install epel-release -yInstall Required Packages and Dependencies
Netdata installation on Rocky Linux 9 needs some required packages, install them with the command below:
sudo dnf install git libuuid-devel autoconf automake pkgconfig zlib-devel curl findutils libmnl gcc make -yHere we install Netdata from Github.
Clone Netdata from GitHub
First, clone the Netdata on Rocky Linux with the following command:
sudo git clone https://github.com/netdata/netdata.git --depth=100Then, switch to the Netdata directory with the command below:
cd netdataEnable PowerTools (crb) on Rocky Linux 9
Here you need to enable the power tools with the following command:
sudo dnf config-manager --set-enabled crbThen, use the following commands to install the required packages:
# sudo dnf install autoconf-archive libuv-devel
# sudo ./packaging/installer/install-required-packages.sh --non-interactive --dont-wait netdata
Build and Install Netdata on Rocky Linux 9
Now run the script below to build and install Netdata on Rocky Linux:
sudo ./netdata-installer.shWhen your installation is completed, you will get the following output:

Start and Enable Netdata Service
At this point, you need to start and enable the Netdata service on Rocky Linux 9. To do this, run the commands below:
# sudo systemctl start netdata
# sudo systemctl enable netdata
Verify that Netdata is active and running on your server:
sudo systemctl status netdata
Configure Firewall For Netdata on Rocky Linux 9
By default, Netdata listens on port 19999. At this point, we assumed that you have enabled firewalld.
Now you need to allow Netdata port through the Rocky Linux 9 firewall with the command below:
sudo firewall-cmd --permanent --add-port=19999/tcpThen, reload the firewall to apply the new rules:
sudo firewall-cmd --reloadAccess Netdata Dashboard From Web Interface
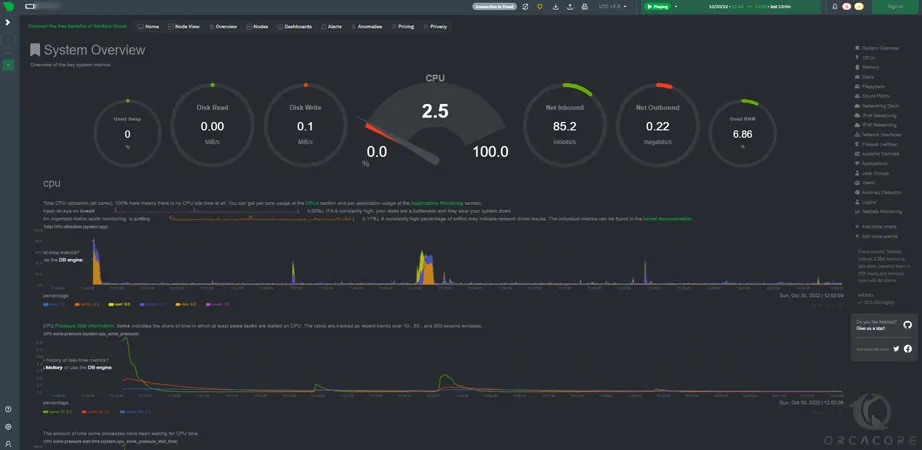
At this point, you have learned to Install Netdata on Rocky Linux 9. Here you can access the Netdata dashboard on Rocky Linux by typing your server’s IP address in your web browser followed by 19999:
http://server-ip-address:19999/You will your system overview on the Netdata dashboard:
For more information, you can visit the Netdata Documentation page.
Conclusion
At this point, you have learned to Install Netdata on Rocky Linux 9. You can use Netdata for performance and health monitoring for systems and applications. Hope you enjoy using it.
You may also like these articles:
Upgrade Rocky Linux 9 Kernel To The Latest Version
Install Bitwarden on AlmaLinux 9 / Rocky Linux 9
Install LEMP Stack on Rocky Linux 9
Install LAMP Stack on Rocky Linux 9
FAQs
How do I start and enable the Netdata service on Rocky Linux 9?
You can start and enable the Netdata service with the following commands:sudo systemctl start netdata
sudo systemctl enable netdata
How can I access the Netdata web interface after installation on Rocky Linux 9?
You can access the Netdata dashboard on Rocky Linux by typing your server’s IP address in your web browser followed by 19999.
What ports need to be opened for Netdata on Rocky Linux 9?
By default, Netdata listens on port 19999. You need to open port 19999 through your firewall settings as we said in the guide steps on Install Netdata on Rocky Linux 9.