Share your love
Install Nextcloud with LAMP stack on Debian 12 Bookworm – Easy Way
This tutorial intends to teach you to Install and Configure Nextcloud with LAMP Stack on Debian 12 Bookworm. Nextcloud is a great collaboration platform that allows teamwork to share documents, send or receive emails, manage calendars, and communicate via secure video chats. You can follow these instructions on the Orcacore website to set up Nextcloud from the source and access it from the web interface.
Table of Contents
Install Nextcloud with LAMP stack on Debian 12 Bookworm
To Install Nextcloud with LAMP stack on Debian 12, you must have access to your server as a non-root user with sudo privileges and set up a basic firewall. For this purpose, you can visit the Initial Server Setup with Debian 12 Bookworm.
We want to install Nextcloud with LAMP, so you must have it installed on your server. To do this, you can check this guide on How To Install LAMP Stack on Debian 12.
Also, you need a domain name that is pointed to your server’s IP address.
Now proceed to the following steps to Install Nextcloud with LAMP stack on Debian 12.
Step 1 – PHP Configuration for Nextcloud on Debian 12
At this point, you need to install some additional PHP extensions for Nextcloud on your server. To do this, run the command below:
sudo apt -y install php-{cli,xml,zip,curl,gd,cgi,mysql,mbstring,fpm}Then, you need to add the FPM support and restart your Apache service by using the following commands:
# sudo a2enmod proxy_fcgi setenvif
# sudo a2enconf php8.2-fpm
# sudo systemctl restart apache2
Step 2 – Set up Nextcloud Database and User on Debian 12
At this point, you need to create a user and database for Nextcloud. First, log in to your MariaDB shell with the following command:
sudo mysql -u root -pThen, from your MariaDB shell run the command below to create your user, here we named it nextcloud-user, remember to choose a strong password for it:
MariaDB [(none)]> CREATE USER 'nextcloud-user'@'localhost' IDENTIFIED BY "password";Next, use the command below to create your database, here we named it nextclouddb:
MariaDB [(none)]> CREATE DATABASE nextclouddb;Now you need to grant all the privileges to your Nextcloud DB with the command below:
MariaDB [(none)]> GRANT ALL PRIVILEGES ON nextclouddb.* TO 'nextcloud-user'@'localhost';Flush the privileges and exit from your MariaDB shell with the commands below:
MariaDB [(none)]> FLUSH PRIVILEGES;
MariaDB [(none)]> exit;
Step 3 – Download the Latest Nextclould from the Official Site on Debian 12
At this point, you need to visit the Nextcloud official page and download it. Right-click on the Download for server from the Archive file and copy the link address.
Then, use the wget command to download Nextcloud on Debian 12 Bookworm:
sudo wget https://download.nextcloud.com/server/releases/latest.zipUnzip your downloaded file with the command below:
sudo unzip latest.zipNext, move your extracted file to the /var/www/html/ directory:
sudo mv nextcloud/ /var/www/html/Now Set the correct ownership for your Nextcloud directory:
sudo chown -R www-data:www-data /var/www/html/nextcloudStep 4 – Configure Apache VirtualHost For Nextcloud on Debian 12
At this point, you need to create an Apache configuration file for Nextcloud, to serve the file in case you are using the domain name or multiple websites are running on the same server.
Create and open your file with your favorite text editor, here we use the vi editor:
sudo vi /etc/apache2/sites-available/nextcloud.confAdd the following content to your file:
Remember to change the domain name with yours.
<VirtualHost *:80>
     ServerAdmin admin@example.com
     DocumentRoot /var/www/html/nextcloud
     ServerName example.com
     ServerAlias www.example.com

     <Directory /var/www/html/nextcloud/>
          Options FollowSymlinks
          AllowOverride All
          Require all granted
     </Directory>

     ErrorLog ${APACHE_LOG_DIR}/error.log
     CustomLog ${APACHE_LOG_DIR}/access.log combined

     <Directory /var/www/html/nextcloud/>
            RewriteEngine on
            RewriteBase /
            RewriteCond %{REQUEST_FILENAME} !-f
            RewriteRule ^(.*) index.php [PT,L]
    </Directory>
</VirtualHost>
When you are done, save and close the file.
At this point, you need to disable the default Apache configuration and enable the new one you have created above:
# sudo a2dissite 000-default.conf
# sudo a2ensite nextcloud.conf
Also, enable a few modules with the command below:
sudo a2enmod headers rewrite env dir mimeFinally, restart Apache to apply the changes:
sudo systemctl restart apache2Step 5 – How To Access and Install Nextcloud from Web Interface?
At this step, you can easily access your Nextcloud dashboard from the web interface on Debian 12 Bookworm and Install Nextcloud with LAMP stack on Debian 12. Open your web browser and type your server’s IP address or domain name:
http://your-server-ip-address
or
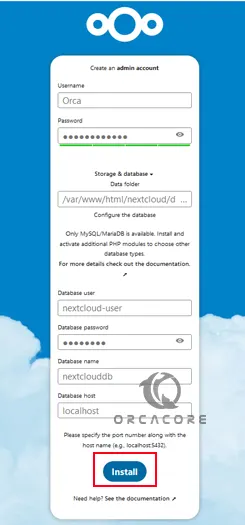
http://your-domain.comYou will see the following screen. You need to create an Admin user and password and Then enter the details of the Database you have created. In the end, click Install.
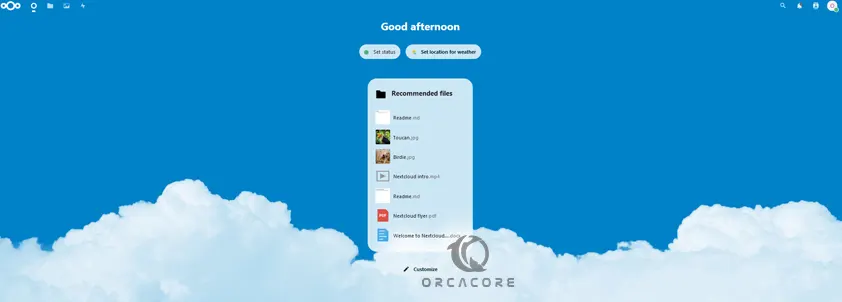
Now the NextCloud Dashboard will be there to access and store your data.
That’s it, you are done. You have learned to Install Nextcloud with LAMP stack on Debian 12.
Conclusion
At this point, you have learned to Install Nextcloud with LAMP stack on Debian 12 Bookworm. With Netcloud you can store your data and documents and share them with your teamwork. Hope you enjoy using it.
You may also interested in these articles:
Install the Latest Apache Solr on Debian 12 Bookworm
Install Rust on Debian 12 From Linux Terminal
FAQs
What is Nextcloud, and why use it with a LAMP stack?
Nextcloud is an open-source platform for hosting your cloud services like file storage, calendars, and contacts. Installing it with a LAMP stack ensures a stable and secure environment optimized for web applications. As you saw, you can easily Install Nextcloud with LAMP stack on Debian 12 Bookworm.
Can I use Let’s Encrypt SSL certificates for Nextcloud?
Yes, you can secure your Nextcloud installation with Let’s Encrypt SSL certificates.
How do I configure Nextcloud to use the LAMP stack?
After installing Apache, MariaDB, and PHP, you need to download Nextcloud, configure the database, and adjust permissions. Add Nextcloud files in the Apache web directory and complete the setup through the web installer. The guide steps above will show you how to Install Nextcloud with LAMP stack on Debian 12.
Can I integrate external storage with Nextcloud?
Yes, Nextcloud allows integration with external storage solutions like Google Drive, Dropbox, and AWS S3. You can configure this in the admin settings under “External Storage.” Also, you can read this guide on Add External Storage to Nextcloud with Amazon S3 Bucket.