Share your love
How To Install Nginx on Rocky Linux 9

This guide intends to teach you How To Install Nginx Web Server on Rocky Linux 9. Also, you will learn to Set up Nginx Server Blocks on Rocky Linux 9 (Blue Onyx).
NGINX is a web server commonly used as a reverse proxy. It can be scaled efficiently as a web server as well as a reverse proxy. It does not allow you to allocate a process to a particular connection, but it creates a process pool that can be easily shared among multiple connections within the network. Whenever a request is made, a resource will be allocated to the process resulting in better resource utilization that can easily handle extensive connections.
NGINX also helps in setting up a secure connection between your data centers and the outside network. It also works well as an HTTP load balancer that allows you to use multiple different load-sharing mechanisms.
Steps To Install Nginx Web Server on Rocky Linux 9 Blue Onyx
To complete this guide, you must log in to your server as a non-root user with sudo privileges and set up a basic firewall. To do this, you can follow our guide the Initial Server Setup with Rocky Linux 9.
Also, you need a domain name that is pointed to your server’s IP address.
Now follow the steps below to complete this tutorial.
Install Nginx on Rocky Linux 9
First, you need to update your local package index with the command below:
sudo dnf update -yThen, use the command below to install the Nginx web server:
sudo dnf install nginxStart and Enable Nginx on Rocky Linux 9
By default, Nginx is not enabled on Rocky Linux 9. So you need to start and enable Nginx manually by using the command below:
sudo systemctl enable nginx --nowNow you can check that your Nginx service is active and running on your server by running the command below:
sudo systemctl status nginxIn your output you will see:
Output
 nginx.service - The nginx HTTP and reverse proxy server
Loaded: loaded (/usr/lib/systemd/system/nginx.service; enabled; vendor prese>
Active: active (running) since Wed 2022-10-26 08:51:53 EDT; 6s ago
Process: 74025 ExecStart=/usr/sbin/nginx (code=exited, status=0/SUCCESS)
Process: 74023 ExecStartPre=/usr/sbin/nginx -t (code=exited, status=0/SUCCESS)
Process: 74021 ExecStartPre=/usr/bin/rm -f /run/nginx.pid (code=exited, statu>
...
Configure Firewall For Nginx Web Server
At this point, we assumed that you have enabled the firewalld in the requirements part.
Now you need to enable HTTP and HTTPs connections with the following command:
# sudo firewall-cmd --permanent --zone=public --add-service=http
# sudo firewall-cmd --permanent --zone=public --add-service=https
Reload the firewall to apply the new rules:
sudo firewall-cmd --reload
Now your Nginx web server is installed on Rocky Linux 9.
Access Default Nginx Landing Page
At this point, you can check that your Nginx server is up and running with your server’s public IP address.
If you don’t have your server’s public IP address you can get it with the following command:
hostname -I
Or you can use the curl tool to get your IP from icanhazip.com with the following command:
curl -4 icanhazip.com
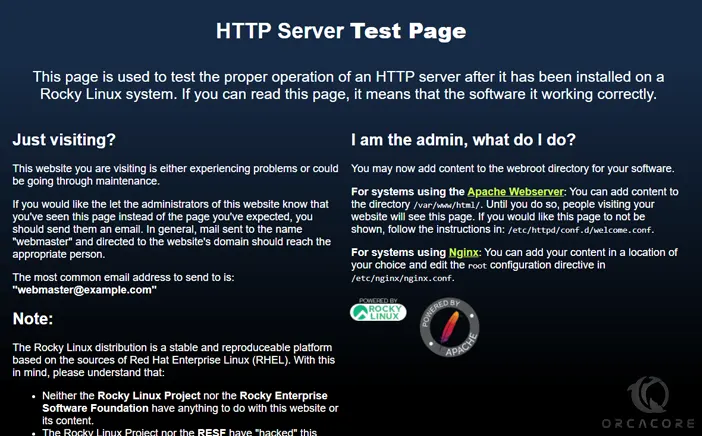
Then, type your IP address in your web browser to access the default Nginx page.
http://your_server_IP_address
If you see this page means that your Nginx web server is correctly installed and is up and running on Rocky Linux 9.
Manage Nginx Process on Rocky Linux 9
Now that you have your web server up and running you can manage the Nginx process on Rocky Linux 9.
To stop your web server you can use the following command:
sudo systemctl stop nginx
When your Nginx web server is stopped you can start it again with the following command:
sudo systemctl start nginx
To stop and start the service again you can use the command below:
sudo systemctl restart nginx
You need to reload the Nginx web server when you have made configuration changes on Rocky Linux 9. To do this, you can run the following command:
sudo systemctl reload nginx
Nginx is configured to start automatically when the server boots. If you don’t want to this happen run the following command:
sudo systemctl disable nginx
To make Nginx starts at boot again you can use the following command:
sudo systemctl enable nginx
Now you can set up server blocks to host multiple websites within the same Nginx web server on Rocky Linux 9.
Let’s see how it works.
Set up Nginx Server Blocks on Rocky Linux 9
Nginx server blocks are the same as the Apache virtual hosts, allowing a single server to respond to multiple domain names and serve different content for each of them.
To create Nginx Server blocks, follow the steps below.
First, you need to create a directory for your domain with the following command:
sudo mkdir -p /var/www/example.com/Then, you need to assign ownership of the directory:
sudo chown -R nginx:nginx /var/www/example.com/Create a sample index.html page on Rocky Linux 9
Here you need to create a sample index.html page to test the server block configuration. We use vi text editor to create it, you can use your favorite text editor:
sudo vi /var/www/example.com/index.htmlThen, add the following HTML code to the file:
<html>
<head>
<title>Welcome to example.com</title>
</head>
<body>
<h1>Success! Your Nginx server is successfully configured for <em>example.com</em>. </h1>
<p>This is a sample page.</p>
</body>
</html>
When you are done, save and close the file.
Create Nginx Server Block on Rocky Linux 9
Creating Nginx server blocks is the same as the Apache server blocks; first, create the directories. To do this, run the command below:
sudo mkdir /etc/nginx/sites-available/ /etc/nginx/sites-enabled/Now, you need to create the server block for your website on Rocky Linux 9 using any text editor, here we use vi:
sudo vi /etc/nginx/sites-available/example.com.confThen, paste the following configuration block to the file:
server {
 listen 80;
 listen [::]:80;

 root /var/www/example.com/;

  index index.html index.htm index.nginx-debian.html;
  server_name example.com www.example.com;

 location / {
  try_files $uri $uri/ =404;
 }
}
When you are done, save and close the file.
At this point, you need to enable the Nginx Server block on Rocky Linux 9 by running the command below:
sudo ln -s /etc/nginx/sites-available/example.com.conf /etc/nginx/sites-enabled/Edit Nginx Configuration File on Rocky Linux 9
At this point, you need to make configuration changes to the default Nginx config file. To do this, open the file with your favorite text editor, here we use vi:
sudo vi /etc/nginx/nginx.confThen uncomment the following in the HTTP{} section of the nginx.conf configuration file:
server_names_hash_bucket_size 64;Lastly, you need to add the sites-enabled path to your Nginx configuration file, locate the existing “include /etc/nginx/conf.d/*.conf;” and replace or add a line directly under it.
include /etc/nginx/sites-enabled/*.conf;When you are done, save and close the file.
Run the following command to make sure that there are no syntax errors in any of your Nginx files on Rocky Linux 9:
sudo nginx -t
In your output you should see:
Output
nginx: the configuration file /etc/nginx/nginx.conf syntax is ok
nginx: configuration file /etc/nginx/nginx.conf test is successful
If your server has failed, the most common occurrence in the symlink is missing or incorrect. Navigate to your /etc/nginx/sites-enabled/ directory.
cd /etc/nginx/sites-enabled/Now print the files using the ls command:
lsRemove any configuration files that will not be used, including the default file:
sudo rm default Re-run the test; if ok, then restart the Nginx web server on Rocky Linux 9:
sudo systemctl restart nginxTest Nginx Server Blocks
Now you can test your custom domain setup by typing your domain name in your web browser:
http://your_domain_nameIf you see the page below it means that your Nginx server is correctly configured to serve your domain.

For more information, you can visit the Nginx Documentation page.
Conclusion
At this point, you have learned to Install Nginx and Set up Nginx Server Blocks on Rocky Linux 9.
Hope you enjoy it.
You may be like these articles:


