Share your love
How To Install PHP 7.4 on Ubuntu 20.04
This guide intends to teach you How To Install PHP 7.4 on Ubuntu 20.04. The term PHP is an acronym for PHP: Hypertext Preprocessor. PHP is a server-side scripting language designed specifically for web development. It is open-source, which means it is free to download and use. It is straightforward to learn and use. The files have the extension “.php”.
You can now proceed to the guide steps below on the Orcacore website to set up PHP 7.4 on Ubuntu 20.04.
Note: PHP 7.4 is no longer supported, and Ubuntu 20.04 reaches end of standard support in April 2025. You can use more recent PHP versions and upgrade Ubuntu to 22.04 LTS or newer.
Table of Contents
Steps To Install PHP 7.4 on Ubuntu 20.04
To install PHP 7.4, you must log in to your server as a non-root user with sudo privileges. To do this, you can follow our guide on the Initial Server Setup with Ubuntu 20.04.
Now, follow the steps below to complete this guide.
1. Install Required Packages for PHP 7.4
First, you need to update and upgrade your local package index with the following command:
sudo apt update && sudo apt upgrade -yThen, you need to install the required packages on your server with the command below:
sudo apt install software-properties-common apt-transport-https -yAt this point, you need to add the Ondřej Surý PHP repository on Ubuntu 20.04. This is a home for packaging various software into Debian and Ubuntu.
To add the Sury PHP repo to your server, you can use the following command:
sudo add-apt-repository ppa:ondrej/php -yUpdate and upgrade your APT repository list again:
sudo apt update && sudo apt upgrade -yNow let’s see how to install PHP 7.4 with Apache and Nginx options.
2. Set up PHP 7.4 on Ubuntu 20.04
If you run an Apache HTTP server, you can run PHP as an Apache module or PHP-FPM. To do this, follow the steps below:
Installing PHP 7.4 with Apache module
To install PHP 7.4 as an Apache module, run the following command:
sudo apt install php7.4 libapache2-mod-php7.4 -yWhen your installation is completed, restart Apache to apply the changes:
sudo systemctl restart apache2To install PHP-FPM, you can use the following command:
sudo apt install php7.4-fpm libapache2-mod-fcgidNote: By default, PHP-FPM is not enabled for Apache. You must enable it by the following command:
sudo a2enmod proxy_fcgi setenvif && sudo a2enconf php7.4-fpmThen, restart Apache again:
sudo systemctl restart apache2Verify your PHP-FPM service is active and running on your server with the command below:
sudo systemctl status php7.4-fpm
Also, you can verify that PHP 7.4 is installed on your Ubuntu 20.04 by checking its version:
php --version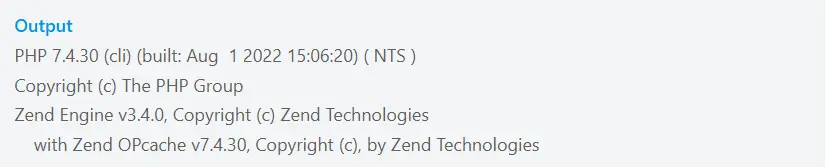
Installing PHP 7.4 with Nginx Module
As you know, Nginx does not contain native PHP processing like some other web servers, like Apache. You will need to install PHP-FPM to handle the PHP files.
To install PHP 7.4 and PHP 7.4-FPM, run the command below:
sudo apt install php7.4 php7.4-fpm php7.4-cli -yPHP-FPM will start automatically when your installation is completed. To verify that it is active and running on your server, run the command below:
sudo systemctl status php7.4-fpm
At this point, you need to edit your Nginx server block and add the example below for Nginx to process the PHP files on Ubuntu 20.04.
This is an example for all server blocks that process PHP files that need the location ~ .php$ added.
server {
 location ~ .php$ {
   include snippets/fastcgi-php.conf;
   fastcgi_pass unix:/run/php/php7.4-fpm.sock;
 }
Now you can check that you have no syntax errors for Nginx:
sudo nginx -tOutput
nginx: the configuration file /etc/nginx/nginx.conf syntax is ok
nginx: configuration file /etc/nginx/nginx.conf test is successfulRestart Nginx to apply the changes:
sudo systemctl restart nginxAlso, you can verify that PHP 7.4 is installed on your server by checking its version:
php --version
That’s it. You are done.
Conclusion
Installing PHP 7.4 on Ubuntu 20.04 with Apache or Nginx gives you the flexibility to run PHP-based applications in your preferred web server environment. While it’s a stable setup for legacy projects, consider upgrading PHP for improved security and performance. But it is recommended to upgrade Ubuntu and PHP to newer versions.
Hope you enjoy it. Please subscribe to us on Facebook, X, and YouTube.
You may be interested in these articles:
How To Install PHP 7.3 on Ubuntu 20.04
How To Install SmartGit on Ubuntu 20.04