Share your love
Run Docker Containers with Portainer

In this guide, we want to teach you to Run Docker Containers with Portainer. Portainer is an amazing tool that you can use to manage your container from the graphical user interface. It will help you to add, stop, delete, etc., your containers from the Web GUI without running Docker commands.
This guide will show you how to select your environment and start to run your containers in Portainer.
Steps To Run Docker Containers with Portainer
At this point, we assumed that you had set up Portainer and accessed your dashboard. But if you are looking for Portainer installation guides, you can check the following guides in different Linux platforms:
Install Portainer Docker GUI on Debian 12
Install Portainer on AlmaLinux 9
Set up Portainer on Ubuntu 22.04
Manage Docker Containers with Portainer on Umbrel OS
Now follow the steps below to complete this guide.
Step 1 – Environment Setup in Portainer
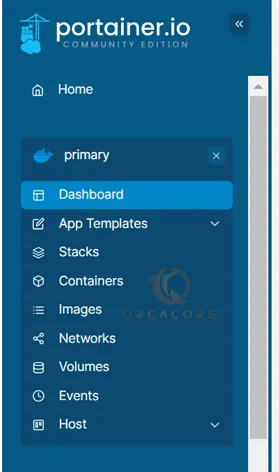
To start your Docker container management with Portainer, you must set up an environment that loads the containerization system from your local Docker environment in which Portainer is running. So we select the primary environment that is running.

Once you select your environment, you will see the dashboard menu which includes Add templates, Stacks, Containers, Images, etc.

Now you can start using your Portainer to manage Docker containers. Because we want to show you how to run a Docker container, we go forward with an example to add a container in Portainer.
Step 2 – Deploy a Container in the Docker Portainer
From the left-side menu, click on Containers and click on Add Container.

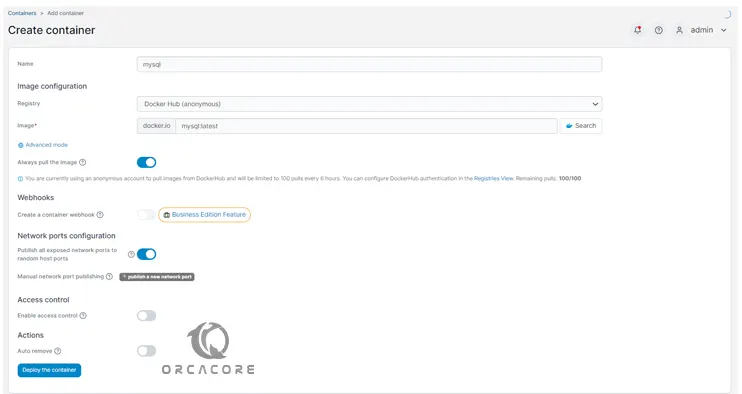
Then, you will see the Create Container settings. Give a name for your container in the name field. Here because we want to deploy the MySQL container, we named it mysql.
Then, select Docker Hub registry and add your image name, here we add mysql:latest.
Enable the pull image. In the Network Ports configuration, you can enable random host ports which is to select a random port, or, you can manually publish a network port. Here we enable the random mode.
Also, you can restrict your access control to who can access your Docker container and manage it with Portainer.
From the action mode, you can enable it to remove the container when it exists.
Finally, click on Deploy the container.

This will create and add your container. From there, you can stop, start, and delete your container.

Also, you can use Stacks to create and add your desired Docker compose to your stack file and deeply the Stack and start using and accessing it.
For more information, you can visit the Official Docs page.
Conclusion
Portainer allows you to manage all your Docker resources (containers, images, volumes, networks, and more). It is compatible with the standalone Docker engine and with Docker Swarm mode. At this point, you have learned to Run Docker Containers with Portainer.
Hope you enjoy using it. If you need any help, please comment for us.


