Share your love
Install Portainer on AlmaLinux 9

This tutorial intends to teach you to Install the Portainer Docker GUI Tool on AlmaLinux 9. If you are looking for a Web interface tool to manage your Docker containers, Portainer is the best solution for you. In this guide, you will learn to install Docker and Docker Compose as the requirements and the installation steps of Portainer on your server and access it from the web interface.
Portainer has many features, including:
- Managing the creation and deletion of Swarm services
- User authentication
- Authorizations
- Executing commands in the console of running containers
- Viewing containers’ logs
Steps To Install Portainer on AlmaLinux 9
First, log in to your server as a root or non-root user with sudo privileges. For this purpose, you can follow this guide on Initial Server Setup with AlmaLinux 9.
To install Portainer, you must have Docker and Docker Compose installed on your server. To do these, you can check our Docker Tutorials to set it up:
Install and Use Docker on AlmaLinux 9
Set up Docker Compose on AlmaLinux 9
When you are done with these requirements, follow the steps below to complete your Portainer installation.
Installation Steps of Portainer on AlmaLinux 9
At this point, you can start to install Portainer container management on your server.
Step 1 – Create Docker Volume For Portainer
Here you need to create a Docker volume to store your Portainer data. To create the Docker volume on AlmaLinux 9, you can run the following command:
docker volume create dataHere we named it data, you can choose your desired name.
Then, use the following command to verify your Docker volume:
docker volume lsOutput
DRIVER VOLUME NAME
local dataStep 2 – Download and Run Portainer Docker Image
At this point, you can easily use the following single command to download and run the Portainer Docker image on AlmaLinux 9:
docker run -d -p 8000:8000 -p 9000:9000 --name=portainer --restart=always -v /var/run/docker.sock:/var/run/docker.sock -v data:/data portainer/portainerWhen it is completed, you will get the following output:
Output
latest: Pulling from portainer/portainer
772227786281: Pull complete
96fd13befc87: Pull complete
0bad1d247b5b: Pull complete
b5d1b01b1d39: Pull complete
Digest: sha256:47b064434edf437badf7337e516e07f64477485c8ecc663ddabbe824b20c672d
Status: Downloaded newer image for portainer/portainer:latest
e4152517e2ec3527ceeecaf496f9018dea208ec737a67831f9113c2d6d555a94
Step 3 – Check Portainer Status on AlmaLinux 9
To verify your Portainer installation, use the following command to check your Portainer status:
docker psOutput
CONTAINER ID IMAGE COMMAND CREATED STATUS PORTS NAMES
e4152517e2ec portainer/portainer "/portainer" 17 seconds ago Up 16 seconds 0.0.0.0:8000->8000/tcp, :::8000->8000/tcp, 0.0.0.0:9000->9000/tcp, :::9000->9000/tcp, 9443/tcp portainerStep 4 – Access Portainer Dashboard
At this point, you can access your Portainer through the Web interface by typing your server’s IP address in your web browser followed by 9000:
http://your-server-ip:9000Note: If you have a running firewall, you must open port 9000 through your firewalld. To do this, you can use the following command:
# sudo firewall-cmd --permanent --add-port=9000/tcp
# sudo firewall-cmd --reload
To learn more about FirewallD, you can visit this guide on FirewallD Configuration on AlmaLinux 9.
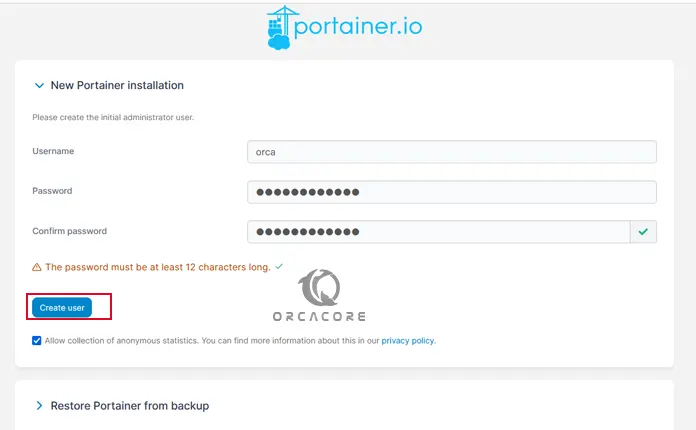
In the first screen of Portainer GUI, you should create the initial administrator user as shown below in the image:

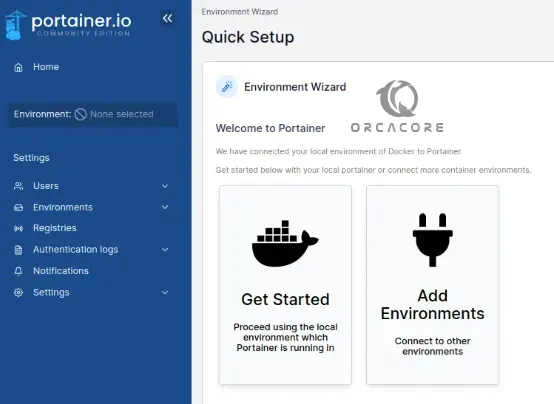
Then, you will see your Portainer dashboard on AlmaLinux 9:

From your Portainer dashboard, you can click on each of the components to get more information regarding a specific component.
Conclusion
As you saw, the installation of Portainer is straightforward. You have learned to install Docker and Docker Compose, create a docker volume to store your Portainer data, download and run the Portainer docker image, and finally access your Portainer dashboard.
Hope you enjoy this guide on How To Install the Portainer Docker GUI Tool on AlmaLinux 9.
Also, if you are looking for Portainer installation on AlmaLinux 8, you can check this guide on Portainer Setup Guide on AlmaLinux 8.


