Share your love
Secure Nginx with Let’s Encrypt on AlmaLinux 9
In this guide from the Orcacore website, we want to teach you How To Secure Nginx with Let’s Encrypt on AlmaLinux 9. Let’s Encrypt is a so-called open certificate authority, which provides free and automated SSL certificates. They do this because they strive for a safer and more privacy-respecting internet.
In short, an SSL certificate provides two parts: encryption and validation. Encryption ensures that traffic to and from your website goes over a secure, encrypted connection so that malicious parties can no longer intercept data, for example.
Validation means that an independent Certificate Authority checks whether a domain name belongs to the person or organization that claims to be the owner of it. The more validation, the more guarantee that you are dealing with who they say they are.
Let’s Encrypt, as the name suggests, has encryption as its primary purpose. They only provide SSL certificates, which include Domain Validation. With the SSL certificates that they issue, no organization data of the applicant is checked, as is done with Organization SSL and Extended SSL.
Table of Contents
Steps To Secure Nginx with Let’s Encrypt on AlmaLinux 9
To complete this guide, you need some requirements first. Let’s see what we need.
1. Requirements for Let’s Encrypt Setup with Nginx
Log in as a non-root user with sudo privileges and set up a basic firewall. You can check the Initial server setup article for AlmaLinux 9.
You need to install Nginx on AlmaLinux 9 and set up Nginx server blocks. To do this, you can visit our article about How To Install Nginx on AlmaLinux 9.
Also, you need a fully registered domain name.
When you are completely done with these requirements, you can start to secure your Nginx with Let’s Encrypt on AlmaLinux 9.
2. Install Certbot Let’s Encrypt Client on ALmaLinux 9
By default, the certbot package is not available in the DNF package manager. You need to enable the EPEL repository. Run the following command to add the EPEL repository on AlmaLinux 9:
sudo dnf install epel-release -yNow you can install Certbot Let’s Encrypt Client with the following command:
sudo dnf install certbot python3-certbot-nginx -yAt this point, you have installed the Let’s Encrypt client. To get the certificates, you need to update your firewall settings first.
To check which services are already enabled, run the following command:
sudo firewall-cmd --permanent --list-allIn your output, you will see:

Note: If you don’t see HTTP and HTTPS in your services list, run the following commands to enable them:
sudo firewall-cmd --permanent --add-service=http

sudo firewall-cmd --permanent --add-service=https
To apply these changes, reload the firewall with the following command:
sudo firewall-cmd --reloadNow you are ready to get your SSL certificate from Let’s Encrypt on AlmaLinux 9.
3. How to Get an SSL Certificate on AlmaLinux 9?
Here you can request an SSL certificate for your domain.
Note: If you want to install a single certificate that is valid for multiple domains or subdomains, you can pass them as additional parameters to the command.
Here, our domain name is nginx.orcacore.net; you should replace it with your domain in the commands.
sudo certbot --nginx -d nginx.orcacore.net -d www.nginx.orcacore.netFor the single domain, you can use:
sudo certbot --nginx -d nginx.orcacore.netYou will be asked to enter your email address and then agree to the terms of service.
In your output, you will see:

At this point, when you are finished securing Nginx with Let’s Encrypt on AlmaLinux 9, you can check your SSL certificate status from Let’s Encrypt on AlmaLinux 9. Type the following link into your web browser:
Remember to replace the domain name.
https://www.ssllabs.com/ssltest/analyze.html?d=nginx.orcacore.net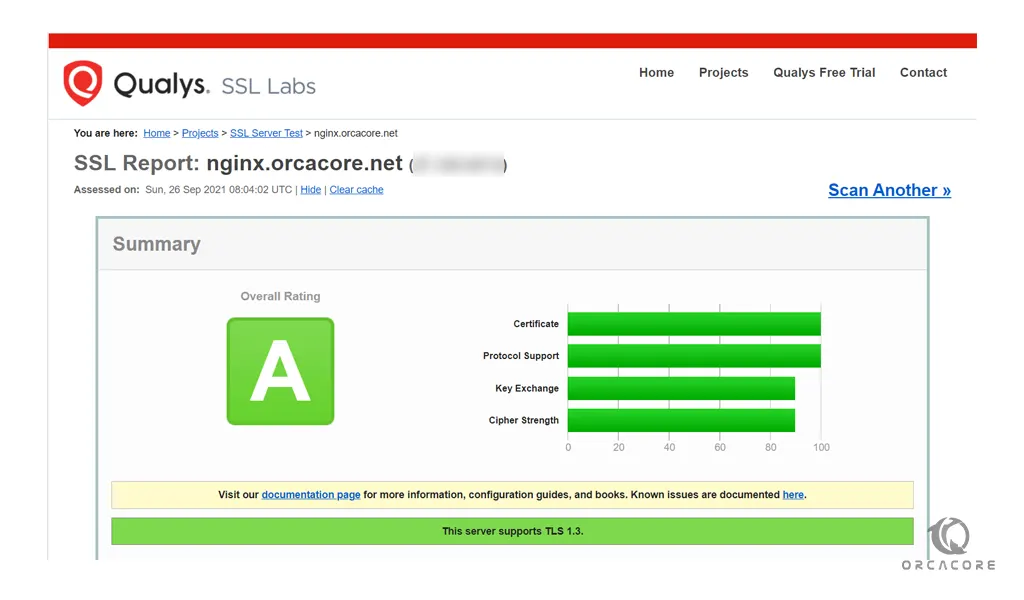
Here you will get an A grade from your SSL certificate. Also, you can access your website using the HTTPs prefix. Now you should renew certificates periodically to keep this setup working. Let’s see how to do that.
4. How to set up Auto-renewal for SSL certificates?
At this point, you have learned Secure Nginx with Let’s Encrypt on AlmaLinux 9. Let’s Encrypt certificates are valid for 90 days, but it’s recommended that you renew the certificates every 60 days.
You can test automatic renewal for your certificates with the following command:
sudo certbot renew --dry-runYour output should be similar to this:

Also, it is safe to create a cron job that runs every week or even every day. To edit the crontab for the root user, run the following command:
sudo crontab -eThen, add the following line to the empty file:
0 0,12 * * * python -c 'import random; import time; time.sleep(random.random() * 3600)' && certbot renew --quietWhen you are done, save and close the file with the “:wq”.
Conclusion
At this point, you learn to install the Let’s Encrypt client Certbot, download SSL certificates for your domain, and set up automatic certificate renewal. Hope you enjoy this article about how to secure Nginx with Let’s Encrypt on AlmaLinux 9. Please subscribe to us on Facebook, Instagram, and YouTube.
You may also like these articles:
Install LEMP Stack on AlmaLinux 9
Install LAMP Stack on AlmaLinux 9